
Begin extractners Sourdough bread recipe: High starter method. Have you ever dreamed of pulling a perfectly bronzed, crusty loaf of sourdough from your own oven, the kind with that irresistible tangy aroma and chewy interior? Perhaps the thought of “sourdough” feels intimidating, conjuring images of fussy feeding schedules and unpredictable results. Well, banish those doubts!gin extractis beginner-friendly sourdough bread recipe, utilizing a high starter method, is your golden ticket to sourdough success. What makes this approach so beloved? It’s the way the generous amount of active starter kickstarts the fermentation process, leading to a beautifully open crum extractb and a deeply satisfying flavor, all while being surprisingly forgiving for those new to the sourdough journey. This isn’t just baking; it’s alchemy, and we’re about to guide you through every magical step to creating your own delicious, homemade sourdough.

Ingredients:
- 2 cups Active Sourdough Starter (400 grams) – This should be active and bubbly, having been fed equal parts flour and water a few hours prior to mixing.
- 3 cups Sifted All-Purpose Flour (360 grams) – Sifting the flour ensures no lumps and helps it incorporate smoothly.
- 1 cup Warm Water (240 grams) – Warm water (around 90-100°F or 32-38°C) is ideal for activating the yeast in the sourdough starter.
- 1.5 teaspoons Salt (≈9 grams) – Salt not only enhances the flavor but also controls the fermentation rate and strengthens the gluten structure.
Mixing the Dough
Initial Incorporation
Begin extract by gently mixing your active sourdough starter, warm water, and salt in a large mixing bowl. You want to ensure the salt is dissolved in the water and dispersed throughout the starter mixture. This step is crucial for even distribution of these essential components. Once combined, gradually add the sifted all-purpose flour. Use your hands or a sturdy spatula to mix everything together until a shaggy, cohesive dough forms. Don’t worry about it being perfectly smooth at this stage; the gluten will develop further. It should look a bit messy and sticky, which is exactly what we’re aiming for. Ensure all the dry flour is incorporated.
Developing the Dough
Bulk Fermentation – First Fold
Once you have your shaggy dough, cover the bowl with a damp kitchen towel or plastic wrap and let it rest for about 30 minutes. This initial resting period allows the flour to fully hydrate, making the dough more pliable and easier to work with. After this rest, it’s time for your first set of folds. Wet your hands slightly to prevent sticking. Reach under one side of the dough, stretch it up gently, and fold it over onto itself. Rotate the bowl a quarter turn and repeat this stretching and folding motion three more times, completing a full set of folds. This process helps build gluten strength without intense kneading. The dough will start to feel a bit more elastic with each set of folds.
Bulk Fermentation – Subsequent Folds
Continue to perform sets of folds every 30 to 45 minutes for the next 2 to 3 hours. The goal is to build strength and structure in the dough. With each subsequent fold, you’ll notice the dough becoming smoother, more elastic, and less sticky. It should start to hold its shape better. You’re looking for the dough to become taut and show some resistance when you stretch it. As you get closer to the end of the bulk fermentation period, the dough will start to look bubbly and increase in volume, roughly by 30-50%. It’s important to observe the dough’s behavior rather than strictly adhering to time, as temperature and starter activity can influence fermentation speed.
Shaping the Loaf
Pre-Shaping
After the bulk fermentation is complete and the dough has achieved the desired volume and elasticity, it’s time to shape your loaf. Gently turn the dough out onto a lightly floured surface. Be careful not to deflate it too much, as you want to preserve those lovely air bubbles. For a round loaf (boule), gently gather the edges of the dough towards the center, creating a rough ball. Then, flip it over so the seam side is down. Lightly cup your hands around the dough and use a gentle, circular motion to create surface tension. This pre-shape allows the gluten to relax for about 20-30 minutes before the final shaping.
Final Shaping
After the dough has rested, it’s ready for its final shape. For a boule, gently flatten the dough slightly into a rough circle. Fold the top third down towards the center, then fold the bottom third up over the first fold, like folding a letter. Rotate the dough 90 degrees and repeat the letter fold. Now, bring the two edges together and pinch them to seal, creating a taut surface. You can also shape it into a batard (oval loaf) by folding the top edge down, then the bottom edge up, and then rolling it tightly from one end to the other, pinching the seam closed. Whichever shape you choose, ensure the seam is well-senon-alcoholic aled to prevent it from opening during baking. Place the shaped loaf seam-side up into a well-floured banneton or a bowl lined with a floured tea towel.
Proofing and Baking
Cold Retardation (Second Proof)**
Cover the banneton tightly with plastic wrap or place it inside a plastic bag. Refrigerate the dough for at least 12 hours, and up to 24 hours. This cold retardation period allows the flavors to develop beautifully and makes the dough much easier to score. The cold temperature slows down the yeast activity, allowing the wild yeast to work its magic on the flavor profile of the bread. It also firms up the dough, making it less sticky and more manageable for scoring, which is a critical step for achieving a good oven spring and a beautiful crust.
Baking the Bread
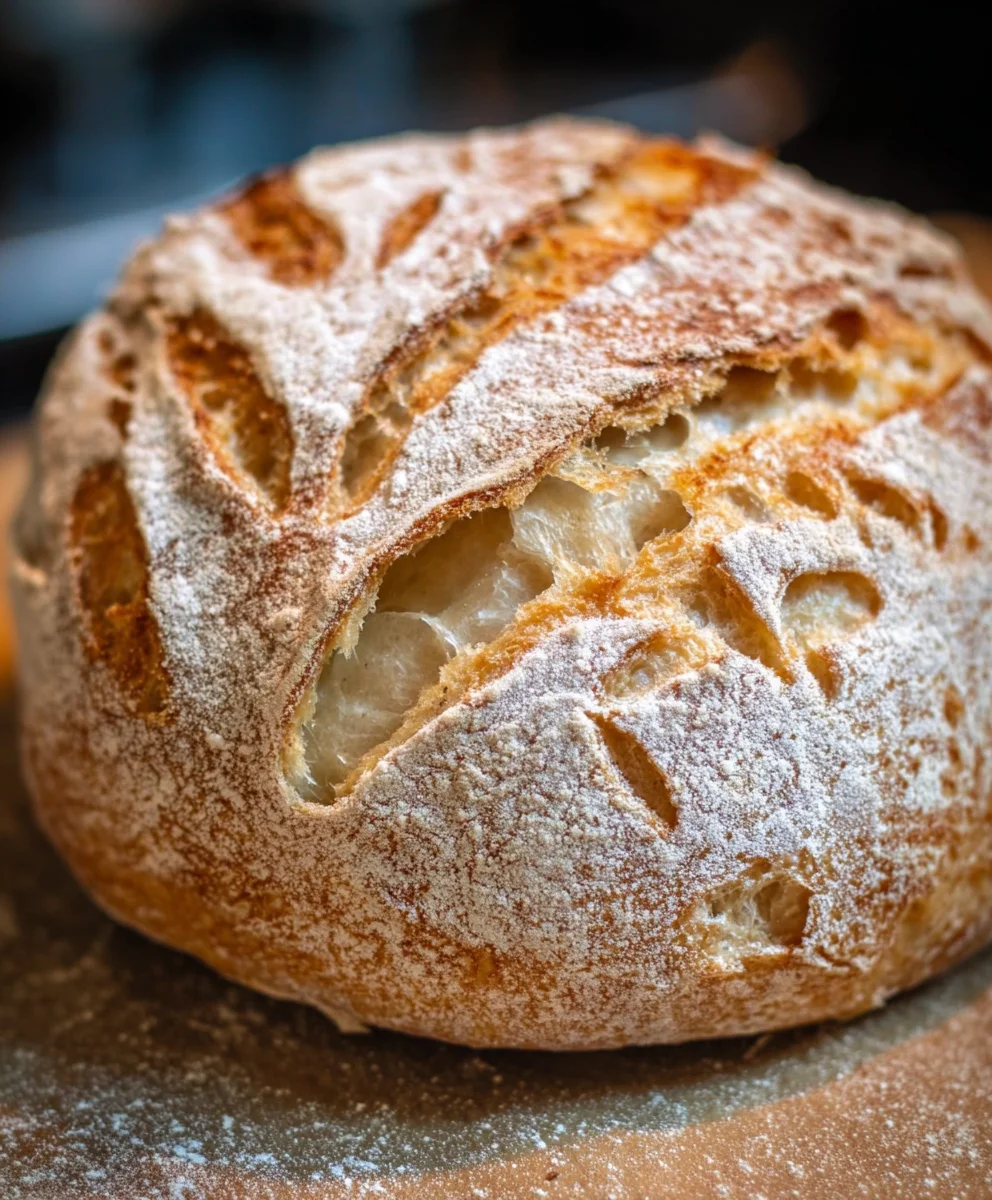
Preheat your oven with a Dutch oven (or baking stone and steam pan) inside to 475°F (245°C) for at least 30-45 minutes. This ensures the Dutch oven is screaming hot, which is essential for a good oven spring. Once preheated, carefully remove the hot Dutch oven from the oven. Gently turn your proofed dough out of the banneton onto a piece of parchment paper. Score the top of the dough with a lame or a sharp razor blade. A simple cross or a few parallel lines will do. Carefully place the dough (using the parchment paper as handles) into the hot Dutch oven. Cover with the lid and bake for 20 minutes.
Finishing the Bake
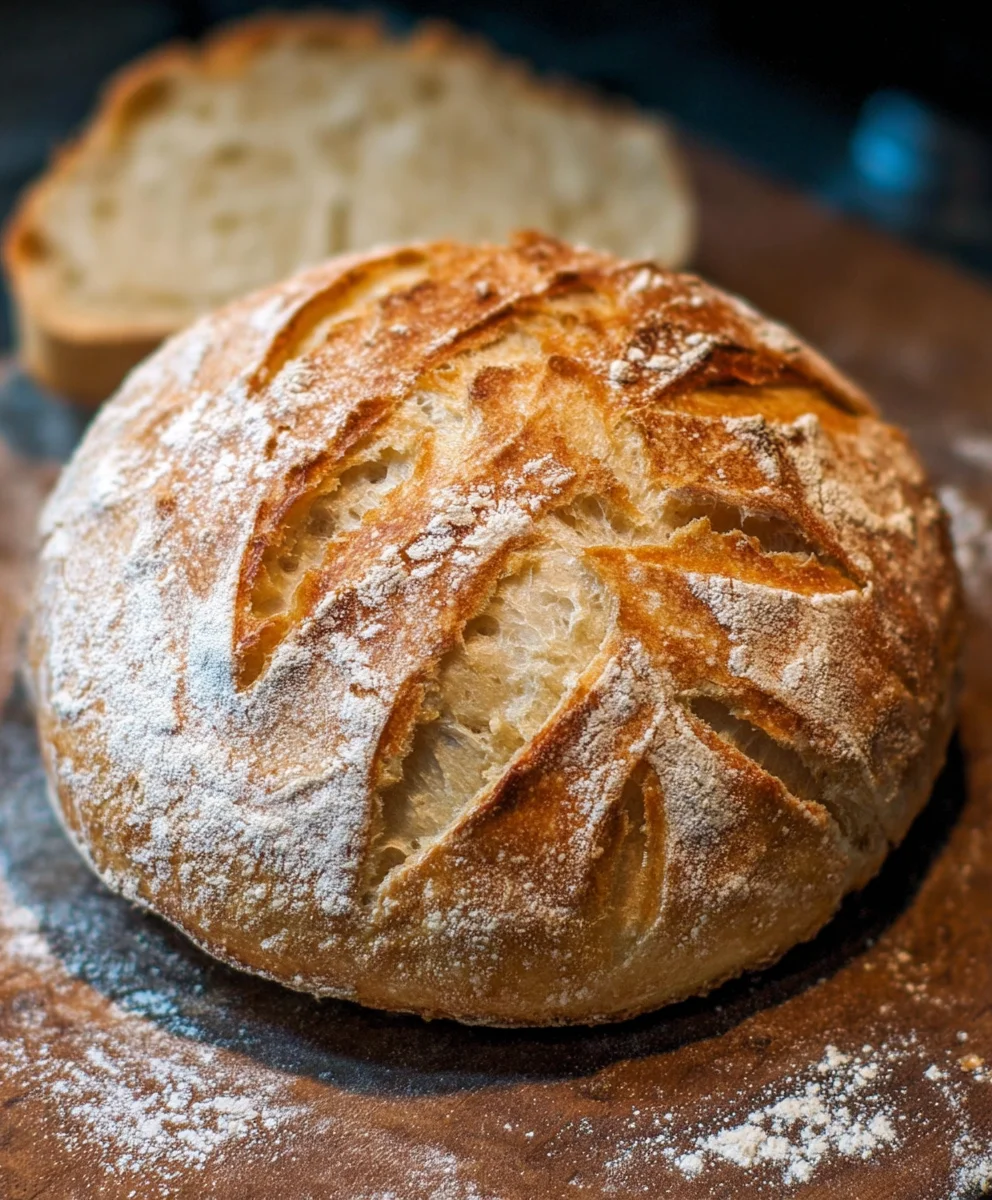
After 20 minutes, remove the lid of the Dutch oven. The bread should have risen significantly and startnon-alcoholic aleto turn a pale golden brown. Continue baking, uncovered, for another 20-25 minutes, or until the crust is a deep, rich golden brown and the internal temperature reaches around 205-210°F (96-99°C) when tested with an instant-read thermometer. The lack of the lid allows the crust to crisp up beautifully. Once baked, carefully remove the bread from the Dutch oven and let it cool completely on a wire rack for at least 2-3 hours before slicing. This cooling period is vital for the crum extractb to set and develop its final texture.
Conclusion:
And there you have it! Your very own Begin extractners Sourdough bread recipe: High starter method is ready to impress. This recipe demystifies the sourdough process, making it accessible and rewarding even for those new to the craft. The result is a loaf with a beautifully crisp crust, a delightfully chewy interior, and that signature tangy sourdough flavor we all adore. This bread is incredibly versatile, perfect for toasting with butter, serving alongside hearty soups and stews, or building epic sandwiches. Don’t be afraid to experiment! You can add seeds, herbs, or even a sprinkle of cheese to the dough for unique variations. Most importantly, enjoy the journey and the delicious fruits of your labor. Happy baking!
Frequently Asked Questions:
Why is my sourdough starter so bubbly after feeding?
An abundance of bubbles after feeding your starter is a fantastic sign! It means your wild yeast and bacteria are active and hungry, diligently consuming the flour and water. This vigorous activity is exactly what you want for a successful sourdough bake. It indicates your starter is healthy and ready to leaven your dough effectively.
Can I use a different type of flour fogin extracthe Beginners Sourdough bread recipe: High starter method?
Absolutely! While the recipe is optimized for all-purpose or bread flour, you can experiment with a portion of whole wheat or rye flour. Be aware that using 100% whole grains might require more hydration as they absorb water differently. Start by substituting about 10-20% of your flour with whole grains to see how it affects the dough’s texture and rise.
My crust isn’t as crispy as I’d like. What can I do?
Achieving a super crispy crust often comes down to steam during the initial baking phase. Ensure your oven is fully preheated and use a Dutch oven or place a tray of hot water on the bottom rack of your oven for the first 20-30 minutes of baking. This creates a steamy environment that allows the crust to expand fully before it sets.
High Starter Sourdough Bread – Beginner Friendly
A beginner-friendly recipe for delicious sourdough bread using a high amount of active starter for enhanced flavor and texture.
Ingredients
-
{‘@type’: ‘Ingredient’, ‘name’: ‘Active Sourdough Starter’, ‘description’: ‘Active and bubbly, made from equal parts flour and water, fed a few hours prior to mixing’, ‘quantity’: ‘2’, ‘unit’: ‘cups’, ‘grams’: ‘400’}
-
{‘@type’: ‘Ingredient’, ‘name’: ‘Sifted All-Purpose Flour’, ‘quantity’: ‘3’, ‘unit’: ‘cups’, ‘grams’: ‘360’}
-
{‘@type’: ‘Ingredient’, ‘name’: ‘Warm Water’, ‘description’: ‘Around 90-100°F (32-38°C)’, ‘quantity’: ‘1’, ‘unit’: ‘cup’, ‘grams’: ‘240’}
-
{‘@type’: ‘Ingredient’, ‘name’: ‘Salt’, ‘quantity’: ‘1.5’, ‘unit’: ‘teaspoons’, ‘grams’: ‘9’}
-
{‘@type’: ‘Ingredient’, ‘name’: ‘Damp kitchen towel or plastic wrap’, ‘description’: ‘For covering the dough during bulk fermentation’}
-
{‘@type’: ‘Ingredient’, ‘name’: ‘Lightly floured surface’, ‘description’: ‘For shaping the dough’}
-
{‘@type’: ‘Ingredient’, ‘name’: ‘Banneton or bowl lined with a floured tea towel’, ‘description’: ‘For proofing the shaped loaf’}
-
{‘@type’: ‘Ingredient’, ‘name’: ‘Parchment paper’, ‘description’: ‘For transferring the dough to the Dutch oven’}
-
{‘@type’: ‘Ingredient’, ‘name’: ‘Lame or sharp razor blade’, ‘description’: ‘For scoring the dough’}
-
{‘@type’: ‘Ingredient’, ‘name’: ‘Dutch oven with lid’, ‘description’: ‘For baking the bread’}
-
{‘@type’: ‘Ingredient’, ‘name’: ‘Wire rack’, ‘description’: ‘For cooling the baked bread’}
Instructions
-
Step 1
In a large mixing bowl, gently combine active sourdough starter, warm water, and salt until salt is dissolved. Gradually add sifted all-purpose flour and mix until a shaggy, cohesive dough forms. Ensure all dry flour is incorporated. Cover and let rest for 30 minutes. -
Step 2
Wet your hands slightly. Perform the first set of folds: stretch one side of the dough up gently and fold it over itself. Rotate the bowl a quarter turn and repeat three more times. Cover and let rest for 30-45 minutes. -
Step 3
Continue performing sets of folds every 30-45 minutes for 2-3 hours, or until the dough becomes smoother, more elastic, and less sticky, showing resistance when stretched. The dough should increase in volume by 30-50% and look bubbly. -
Step 4
Gently turn the dough onto a lightly floured surface. For a boule, gather the edges to the center to form a rough ball, then flip seam-side down. Cup your hands and create surface tension with a gentle circular motion. Let rest for 20-30 minutes. -
Step 5
For the final shape, gently flatten the dough. For a boule, fold the top third down, then the bottom third over. Rotate and repeat the letter fold. Bring edges together and pinch to seal. Place seam-side up into a well-floured banneton or lined bowl. Cover tightly and refrigerate for 12-24 hours. -
Step 6
Preheat oven with a Dutch oven inside to 475°F (245°C) for at least 30-45 minutes. Carefully turn the proofed dough out onto parchment paper. Score the top. Place dough into the hot Dutch oven, cover with lid, and bake for 20 minutes. -
Step 7
Remove the lid from the Dutch oven. Continue baking, uncovered, for another 20-25 minutes, or until the crust is deep golden brown and the internal temperature reaches 205-210°F (96-99°C). Carefully remove from Dutch oven and cool completely on a wire rack for 2-3 hours before slicing.
Important Information
Nutrition Facts (Per Serving)
It is important to consider this information as approximate and not to use it as definitive health advice.
Allergy Information
Please check ingredients for potential allergens and consult a health professional if in doubt.


Leave a Comment