
Teriyaki Salmon Sushi Bowl (GF). Ah, the allure of a perfectly balanced sushi experience, now made accessible and utterly delightful in your own kitchen! Who can resist the sweet and savory kiss of teriyaki sauce, clingin extractg to flaky, tender salmon? It’s a dish that whispers tnon-alcoholic ales of far-off lands while delivering pure comfort food satisfaction. This isn’t just a meal; it’s a vibrant tapestry of flavors and textures that dance on your palate. What truly sets this Teriyaki Salmon Sushi Bowl (GF) apart is its incredible versatility and the satisfying crunch of fresh toppings against the rich salmon and fluffy rice. We’ve cracked the code to achieving that authentic sushi-house taste, all while keeping it gluten-free, so everyone can join the delicious party. Get ready to transform your weeknight dinners into a culinary adventure that’s both healthy and incredibly craveable.

Ingredients:
- 180g (6.5oz) sushi rice
- 3 tbsp rice vinegar
- 1 tsp caster sugar
- 0.5 tsp fine salt
- 30ml (1fl oz) maple syrup
- 1 tsp sesame oil
- 2 tsp gluten free tamari soy sauce
- 0.5 tsp garlic granules
- 1 tsp non-non-non-alcoholic alternativeic non-alcoholic mirin
- 2 salmon fillets (about 150-200g each)
- 2 tbsp sesame seeds
- 4 spring onions
- 150g (5oz) edamame beans (shelled)
- Half a ripe avocado
Preparing the Sushi Rice
Step 1: Rinse and Cook the Rice
Begin extract by thoroughly rinsing your sushi rice. Place the 180g of sushi rice in a fine-mesh sieve and rinse it under cold running water. Keep rinsing until the water runs clear, which helps remove excess starch and ensures fluffy, separate grains. Once rinsed, transfer the rice to a medium saucepan. Add 220ml of cold water (this is a standard ratio, but check your rice package for specifics). Bring the water to a boil over medium-high heat, then immediately reduce the heat to the lowest setting, cover the saucepan tightly with a lid, and let it simmer for 15 minutes. Do not lift the lid during this time, as it will release the steam needed for perfect cooking. After 15 minutes, remove the saucepan from the heat and let it steam, still covered, for another 10 minutes. This resting period allows the rice to fully absorb any remaining moisture and become tender.
Step 2: Season the Rice
While the rice is steaming, prepare the sushi vinegar seasoning. In a small bowl, combine the 3 tbsp of rice vinegar, 1 tsp of caster sugar, and 0.5 tsp of fine salt. Whisk these ingredients together until the sugar and salt are completely dissolved. Once the rice has finished steaming, carefully transfer the hot rice to a large, shallow bowl or a hangiri (a wooden sushi rice tub, if you have one). Drizzle the prepared vinegar mixture evenly over the hot rice. Using a wooden spoon or a rice paddle, gently fold and cut the vinegar into the rice. The aim is to coat each grain without mashing the rice. Continue fanning the rice as you mix, which helps it cool down quickly and gives it a glossy sheen, characteristic of good sushi rice. Set the seasoned rice aside to cool to room temperature.
Marinating and Cooking the Salmon
Step 3: Create the Teriyaki Marinade
Now, let’s prepare the delicious teriyaki glaze for our salmon. In a small bowl, combine the 30ml of maple syrup, 1 tsp of sesame oil, 2 tsp of gluten-free tamari soy sauce, 0.5 tsp of garlic granules,non-alcoholic alternativetsp of non-non-alcoholic mirinolicolic mirin. Whisk all these ingredients together until they are well combined into a smooth, fragrant marinade. This blend offers a perfect balance of sweetness from the maple syrup, savory depth from the tamari, a hint of nutty aroma from the sesame oil, a touch of garlic, and the subtle snon-alcoholic miriness and depth from the mirin.
Step 4: Marinate and Sear the Salmon
Pat your 2 salmon fillets dry with paper towels. This helps ensure a good sear. Place the salmon fillets in a shallow dish or a resealable bag. Pour about half of the prepared teriyaki marinade over the salmon, ensuring both sides are coated. Let the salmon marinate for at least 15 minutes at room temperature, or up to 30 minutes if you have the time. While the salmon marinates, heat a non-stick skillet or a cast-iron pan over medium-high heat. Add a tiny drizzle of oil if your pan is not truly non-stick. Once the pan is hot, carefully place the marinated salmon fillets skin-side down (if they have skin) into the hot pan. Sear for about 3-4 minutes until the skin is crispy and golden brown. Flip the salmon and cook for another 3-4 minutes on the other side, or until cooked through to your desired doneness. Baste the salmon with the remaining teriyaki marinade during the last minute of cooking, allowing it to caramelize slightly. Once cooked, remove the salmon from the pan and let it rest for a couple of minutes before flaking it into bite-sized pieces.
Assembling the Sushi Bowls
Step 5: Prepare the Toppings and Assemble
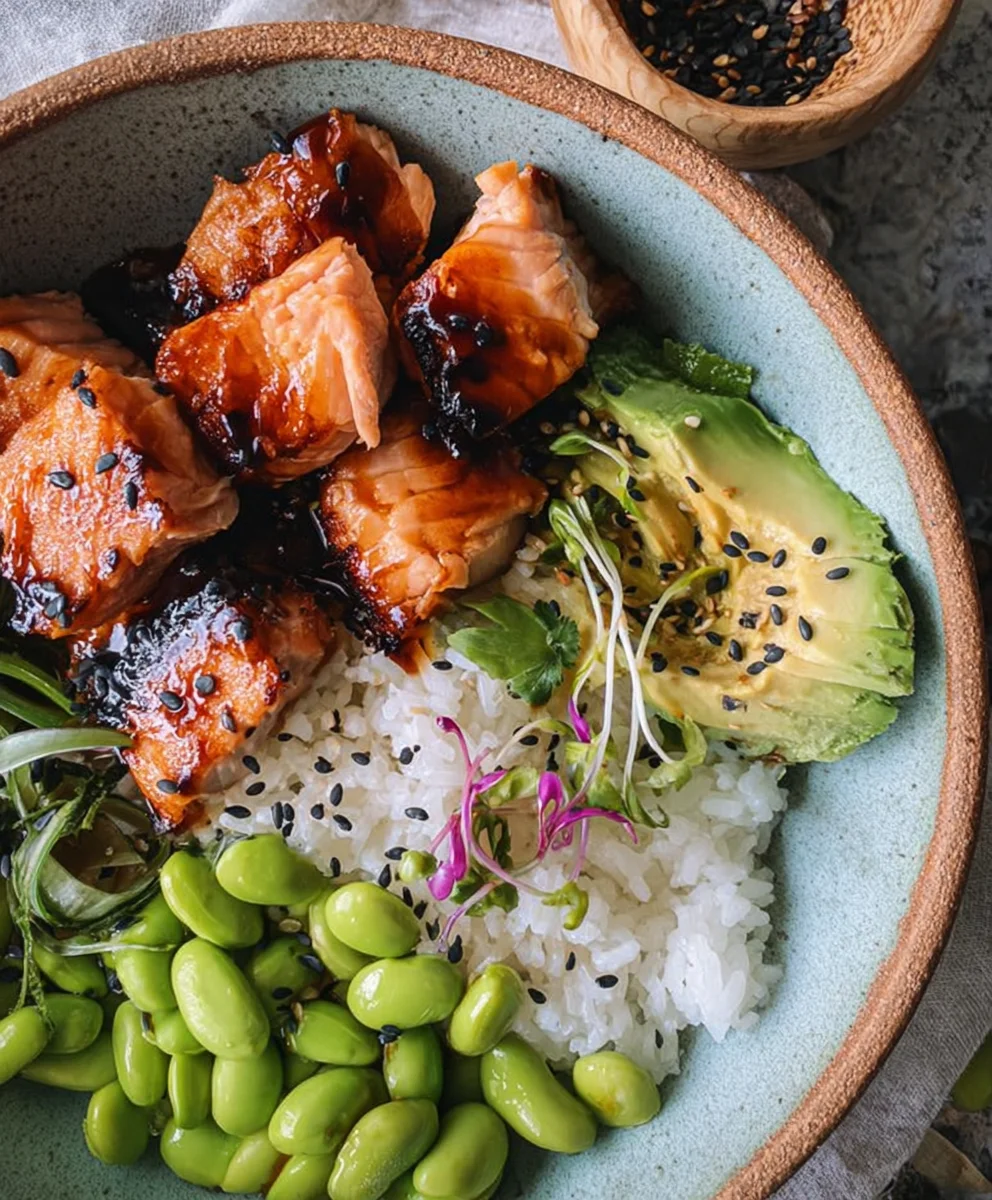
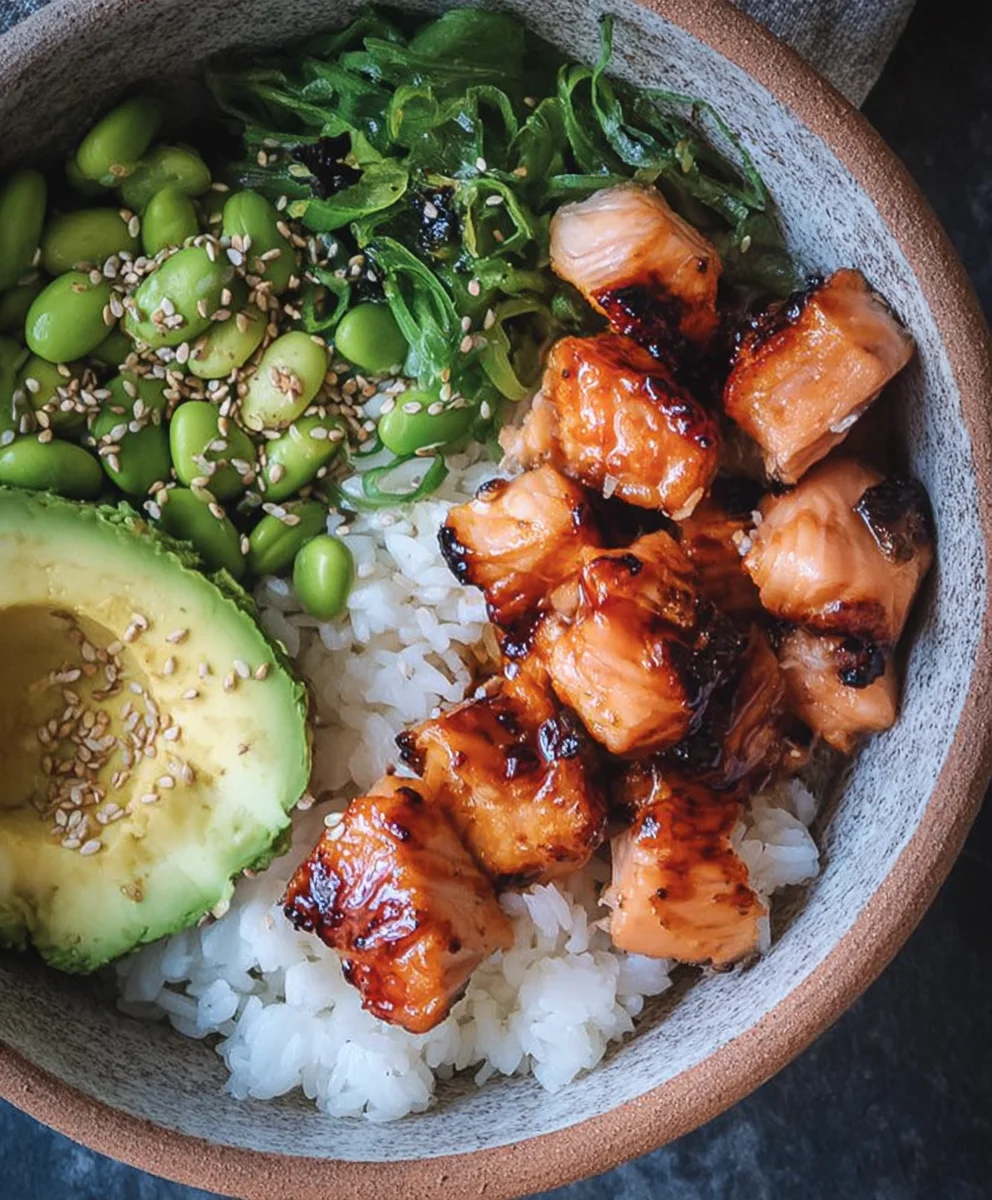
While the salmon rests, prepare your vibrant toppings. Wash and thinly slice the 4 spring onions on a diagonal. Peel and pit the half avocado, then slice it thinly. If your edamame beans are still in their pods, blanch them in boiling water for a minute or two, then rinse under cold water and shell them. Now it’s time to assemble your Teriyaki Salmon Sushi Bowls! Divide the cooled, seasoned sushi rice evenly between your serving bowls. Top the rice generously with the flaked teriyaki salmon. Arrange the sliced avocado and the shelled edamame beans artfully around the salmon. Sprinkle the sliced spring onions over the entire bowl for a fresh, sharp bite. Finally, toast the 2 tbsp of sesame seeds in a dry skillet over medium heat for a minute or two until fragrant and lightly golden. Sprinkle the toasted sesame seeds over the top of your sushi bowls for an extra textural element and a nutty finish. You can serve immediately and enjoy the delightful combination of flavors and textures.
Conclusion:
You’ve now mastered the art of creating a delicious and healthy Teriyaki Salmon Sushi Bowl (GF) right in your own kitchen! This recipe offers a fantastic balance of savory, sweet, and fresh flavors, making it a satisfying and nutritious meal. The tender, glazed salmon paired with perfectly seasoned sushi rice and vibrant toppings is a winning combination. I hope you enjoy making and, more importantly, eating this delightful bowl as much as I do!
For serving suggestions, this Teriyaki Salmon Sushi Bowl (GF) is wonderful on its own for a light lunch or a more substantial dinner. You can also serve it family-style, with all the components laid out for everyone to build their own personalized bowl. Consider adding a side of miso soup or a crisp green salad for a complete meal.
Don’t be afraid to get creative with variations! You can swap the salmon for firm tofu or shrimp for a different protein. For extra crunch, add toasted sesame seeds or crispy fried onions. If you’re feeling adventurous, try incorporating other vegetables like thinly sliced radishes, edamame, or shredded carrots. The possibilities are endless! Embrace the flexibility of this recipe and make it your own.
Frequently Asked Questions (FAQs)
Can I make the teriyaki sauce from scratch?
Absolutely! While store-bought teriyaki sauce is convenient, making your own allows for greater control over sweetness and saltiness. A simple homemade teriyaki sauce can be made by simmering soy sauce (or tamari for gluten-free), non-alcoholic mirin, non-alcoholic sake, and a touch of sugar or honey. You can also add a knob of grated gin extractger and a clove of minced garlic for extra flavor.
What are some good gluten-free topping options for the Teriyaki Salmon Sushi Bowl (GF)?
The beauty of this Teriyaki Salmon Sushi Bowl (GF) is its versatility. Excellent gluten-free topping options include sliced avocado, thinly sliced cucumber, shredded nori (seaweed), gin extractkled ginger, and a sprinkle of toasted sesame seeds. You can also add thinly sliced scallions for a fresh, oniony bite. Ensure any storegin extractught pickled ginger or nori you use is certified gluten-free.
How do I store leftovers of the Teriyaki Salmon Sushi Bowl (GF)?
Leftovers of the Teriyaki Salmon Sushi Bowl (GF) can be stored in an airtight container in the refrigerator for up to 2-3 days. It’s best to store the cooked salmon, rice, and toppings separately if possible, or simply keep the assembled bowl as is. When reheating, you can gently warm the salmon and rice, or enjoy it cold as a refreshing option.
Easy Teriyaki Salmon Sushi Bowl – Gluten Free
A simple and delicious gluten-free sushi bowl featuring flaky teriyaki salmon, seasoned sushi rice, creamy avocado, and fresh edamame.
Ingredients
-
180g (6.5oz) sushi rice
-
3 tbsp rice vinegar
-
1 tsp caster sugar
-
0.5 tsp fine salt
-
30ml (1fl oz) maple syrup
-
1 tsp sesame oil
-
2 tsp gluten free tamari soy sauce
-
0.5 tsp garlic granules
-
1 tsp non-alcoholic mirin
-
2 salmon fillets (about 150-200g each)
-
2 tbsp sesame seeds
-
4 spring onions
-
150g (5oz) edamame beans (shelled)
-
Half a ripe avocado
Instructions
-
Step 1
Rinse 180g sushi rice until water runs clear. Combine rice with 220ml cold water in a saucepan. Bring to a boil, then simmer covered on low for 15 minutes. Let steam, covered, for another 10 minutes off heat. -
Step 2
While rice steams, whisk together 3 tbsp rice vinegar, 1 tsp sugar, and 0.5 tsp salt. Once rice is steamed, transfer to a shallow bowl. Drizzle vinegar mixture over hot rice and gently fold to coat without mashing. Fan to cool and create a glossy sheen. -
Step 3
For the marinade, whisk together 30ml maple syrup, 1 tsp sesame oil, 2 tsp gluten-free tamari, 0.5 tsp garlic granules, and 1 tsp non-alcoholic mirin. -
Step 4
Pat 2 salmon fillets dry. Place in a shallow dish and pour half the teriyaki marinade over them, coating both sides. Marinate for at least 15 minutes. Heat a non-stick skillet over medium-high heat. Sear salmon skin-side down for 3-4 minutes, then flip and cook for another 3-4 minutes. Baste with remaining marinade during the last minute. Flake cooked salmon into pieces. -
Step 5
Thinly slice 4 spring onions diagonally. Slice half an avocado. Shell 150g edamame beans. Toast 2 tbsp sesame seeds in a dry skillet until fragrant. -
Step 6
Assemble bowls by dividing cooled sushi rice. Top with flaked teriyaki salmon, sliced avocado, and edamame beans. Sprinkle with sliced spring onions and toasted sesame seeds.
Important Information
Nutrition Facts (Per Serving)
It is important to consider this information as approximate and not to use it as definitive health advice.
Allergy Information
Please check ingredients for potential allergens and consult a health professional if in doubt.


Leave a Comment