
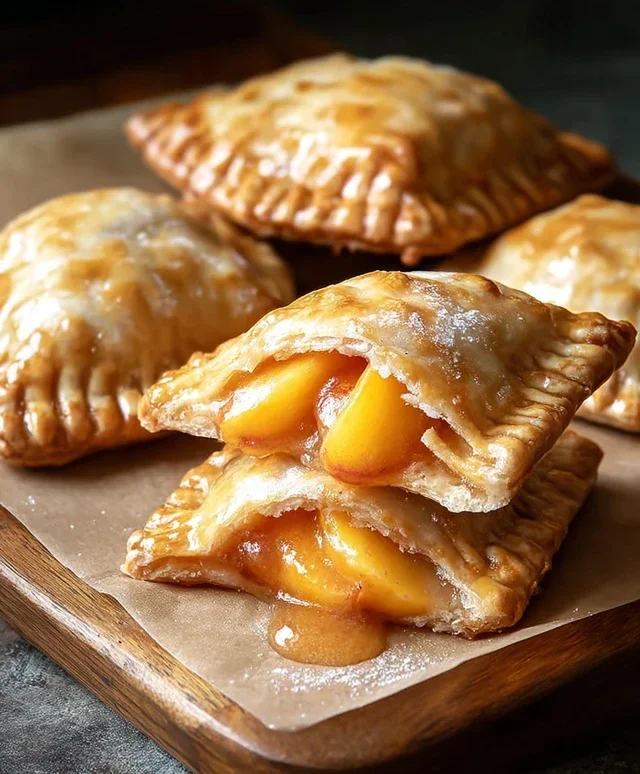
Peach hand pies are the quintessential taste of summer, captured in a portable, delightful package. There’s something undeniably magical about biting into a flaky, golden crust that gives way to a warm, sweet, and slightly tart burst of perfectly ripe peaches. We love them because they evoke nostalgic feelings of backyard BBQs, carefree afternoons, and simple pleasures. These aren’t just any pies; peach hand pies are individual pockets of joy, easy to share (or hoard!), and incredibly satisfying. What makes them truly special is their versatility – perfect for a picnic, a delightful dessert, or even a special breakfast treat. Their compact size makes them ideal for on-the-go enjoyment, ensuring that delicious peach flavor is never out of reach. Get ready to fall in love with these irresistible peach hand pies!

Peach Hand Pies
There’s something incredibly comforting about a warm, flaky pastry filled with sweet, juicy fruit. And when that fruit happens to be peaches, it’s a taste of pure summer bliss, no matter the season. Peach hand pies are the perfect individual treat – portable, delicious, and wonderfully satisfying. They’re simple enough for a begin extractner baker but impressive enough to serve at any gathering. We’re going to make these using some handy shortcuts that still deliver amazing flavor and texture. Get ready for a delightful baking experience!
Ingredients:
Making the Hand Pies
This recipe is designed to be straightforward and delicious. The key to great hand pies is the balance of sweet filling and flaky crust, and we’ve got that covered. We’ll be frying these for an extra crispy exterior, but you can also bake them if you prefer a slightly lighter option.
First things first, let’s get our filling ready. While the canned peach pie filling is already prepped, sometimes it can be a little on the watery side. To combat this and ensure a lovely, thick filling that won’t seep out too much during cooking, I like to give it a quick stir. You can even gently mash some of the larger peach pieces if you prefer a smoother texture. This step isn’t strictly necessary, but it’s a little trick that makes a big difference in the final pie.
Next, we’ll prepare our crusts. Unroll your refrigerated pie crusts onto a clean, lightly floured surface. Using a round cookie cutter or a glass with a diameter of about 4-5 inches, cut out as many circles as you can from each crust. You should aim for about 6-8 circles per crust, depending on the size of your cutter. Gather the scraps, gently re-roll them, and cut out a few more circles. Don’t worry if they aren’t perfectly uniform; hand pies are meant to be a little rustic and charming.
Now for the filling and assembly! Take half of your cut-out circles and place them on a parchment-lined baking sheet. Spoon about 2-3 tablespoons of the prepared peach pie filling onto the center of each of these circles, leaving about a 1/2-inch border around the edge. Be generous, but don’t overfill, or you’ll have trouble sealing the pies.
To seal the hand pies, lightly moisten the edges of the pie crust circles with a little water using your finger or a pastry brush. This acts as a glue to help the top crust adhere to the bottom. Then, take the remaining pie crust circles and place them on top of the filling. Gently press the edges together to seal, ensuring there are no gaps where the filling can escape. You can use the tines of a fork to crimp the edges for a decorative finish and an extra secure seal. This also gives them a classic pie look.
For the frying process, you’ll need a large, heavy-bottomed pot or a deep fryer. Pour enough vegetable oil into the pot to reach a depth of about 2-3 inches. Heat the oil over medium-high heat until it reaches about 350-360 degrees Fahrenheit. It’s important to maintain this temperature; too cool and the pies will absorb too much oil, becoming greasy, and too hot and they’ll burn before the crust is cooked through. You can test the oil by dropping a tiny piece of pie crust into it; if it sizzles and floats immediately, it’s ready. Carefully, using a slotted spoon or spider, gently place 2-3 hand pies into the hot oil, making sure not to overcrowd the pot. Fry for 2-3 minutes per side, or until they are golden brown and puffed up. Using tongs, carefully remove the fried hand pies from the oil and place them on a wire rack set over a baking sheet to drain any excess oil.
While the hand pies are still warm, it’s time for the finishing touch: a simple yet delicious glaze. In a small bowl, whisk together the powdered sugar, corn syrup, and water until you have a smooth, drizzly consistency. If it’s too thick, add another teaspoon of water; if it’s too thin, add a little more powdered sugar. Drizzle this glaze over the warm hand pies. The warmth of the pies will help the glaze set slightly, creating a lovely sweet coating. You can also sprinkle them with a little extra powdered sugar if you prefer, or even a dash of cinnamon for an extra hint of spice.
Let the hand pies cool for at least 10-15 minutes before serving. This allows the filling to set up a bit and prevents you from burning your tongue on molten-hot peach filling. They are absolutely divine served warm, but they are also quite delicious at room temperature. Enjoy these delightful homemade peach hand pies!

Conclusion:
I hope you’re as excited as I am to bake these delightful peach hand pies! They truly are a spectacular treat, offering that perfect blend of flaky, buttery crust and sweet, juicy peach filling. Whether you’re a seasoned baker or just starting out, this recipe is wonderfully approachable and incredibly rewarding. The aroma that fills your kitchen as they bake is simply divine, and the taste is pure summer in every bite. They’re perfect for a picnic, a potluck, or just a special afternoon indulgence.
For serving, these peach hand pies are fantastic warm, perhaps with a scoop of vanilla bean ice cream or a dollop of whipped cream. They also hold up beautifully at room temperature, making them an excellent grab-and-go dessert. Don’t be afraid to get creative with variations! You can add a pinch of cinnamon or nutmeg to the filling for extra warmth, a touch of almond extract for a nutty twist, or even a sprinkle of brown sugar on top of the crust before baking for added caramelization. I truly encourage you to give these a try – you won’t regret it!
Frequently Asked Questions:
Can I use frozen peaches for these hand pies?
Yes, you absolutely can! If using frozen peaches, be sure to thaw them completely and drain off any excess liquid. You might need to add a little extra thickener, like cornstarch or flour, to ensure your filling isn’t too watery.
How should I store leftover peach hand pies?
Store any leftover peach hand pies in an airtight container at room temperature for up to two days, or in the refrigerator for up to four days. Reheat them gently in a toaster oven or a regular oven for a few minutes to bring back that fresh-baked crispness.
Peach Hand Pies
Delicious and easy-to-make peach hand pies, perfect for a sweet treat. These individual pies are filled with peach pie filling and fried to a golden crisp.
Ingredients
-
21 oz. can peach pie filling
-
Refrigerated pie crust
-
1/2 cup powdered sugar
-
1 teaspoon corn syrup
-
1 tablespoon water
-
Vegetable oil for frying
Instructions
-
Step 1
Prepare the pie crusts according to package directions. Cut into desired shapes for hand pies. -
Step 2
Spoon peach pie filling into the center of one half of each pie crust shape. -
Step 3
Fold the other half of the pie crust over the filling and crimp the edges to seal. -
Step 4
Heat vegetable oil in a skillet over medium heat. Carefully place hand pies into the hot oil. -
Step 5
Fry for 2-3 minutes per side, or until golden brown and crispy. -
Step 6
Remove hand pies from oil and place on a wire rack to drain. -
Step 7
In a small bowl, whisk together powdered sugar, corn syrup, and water to create a glaze. Drizzle over the warm hand pies.
Important Information
Nutrition Facts (Per Serving)
It is important to consider this information as approximate and not to use it as definitive health advice.
Allergy Information
Please check ingredients for potential allergens and consult a health professional if in doubt.


Leave a Comment