
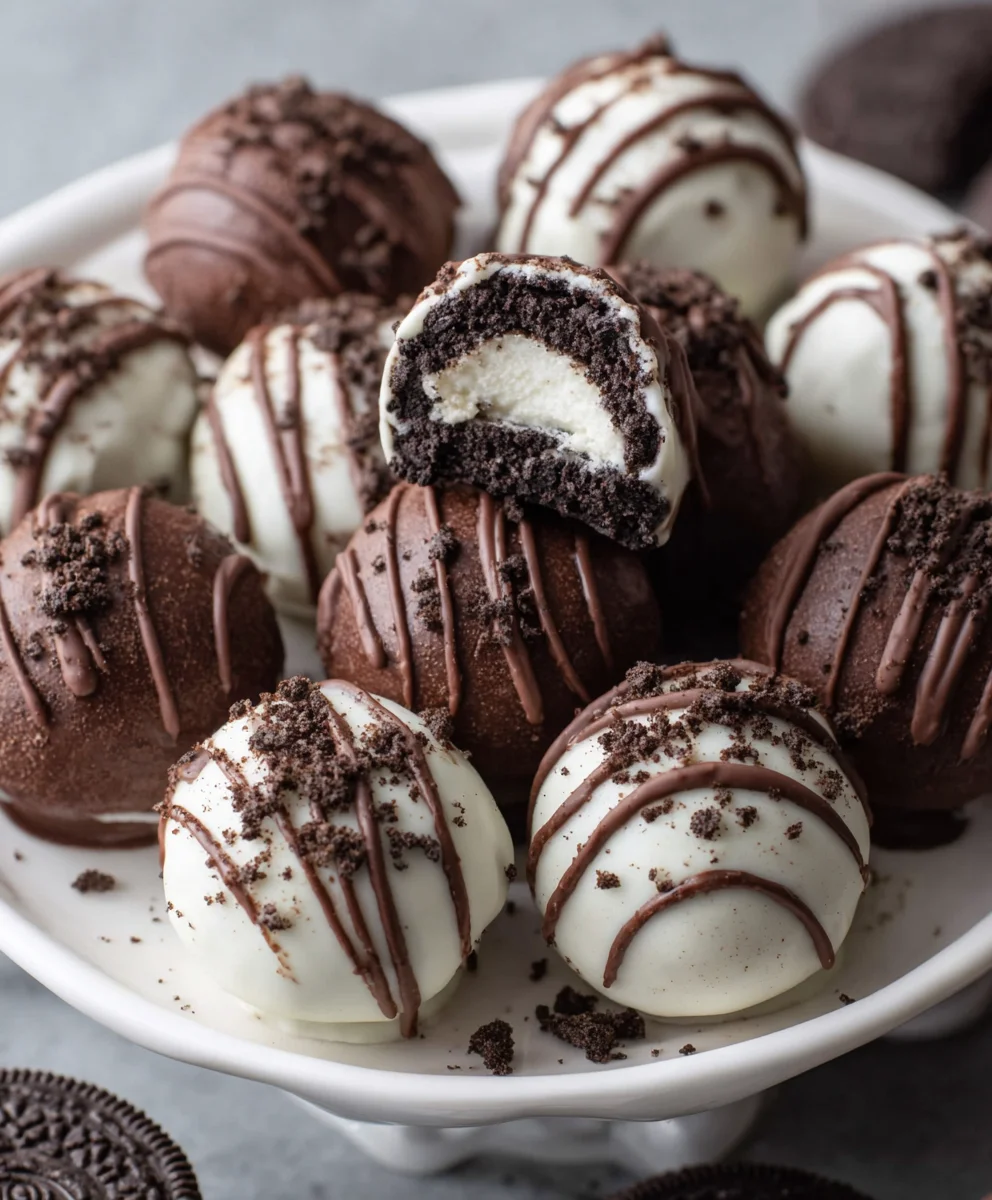
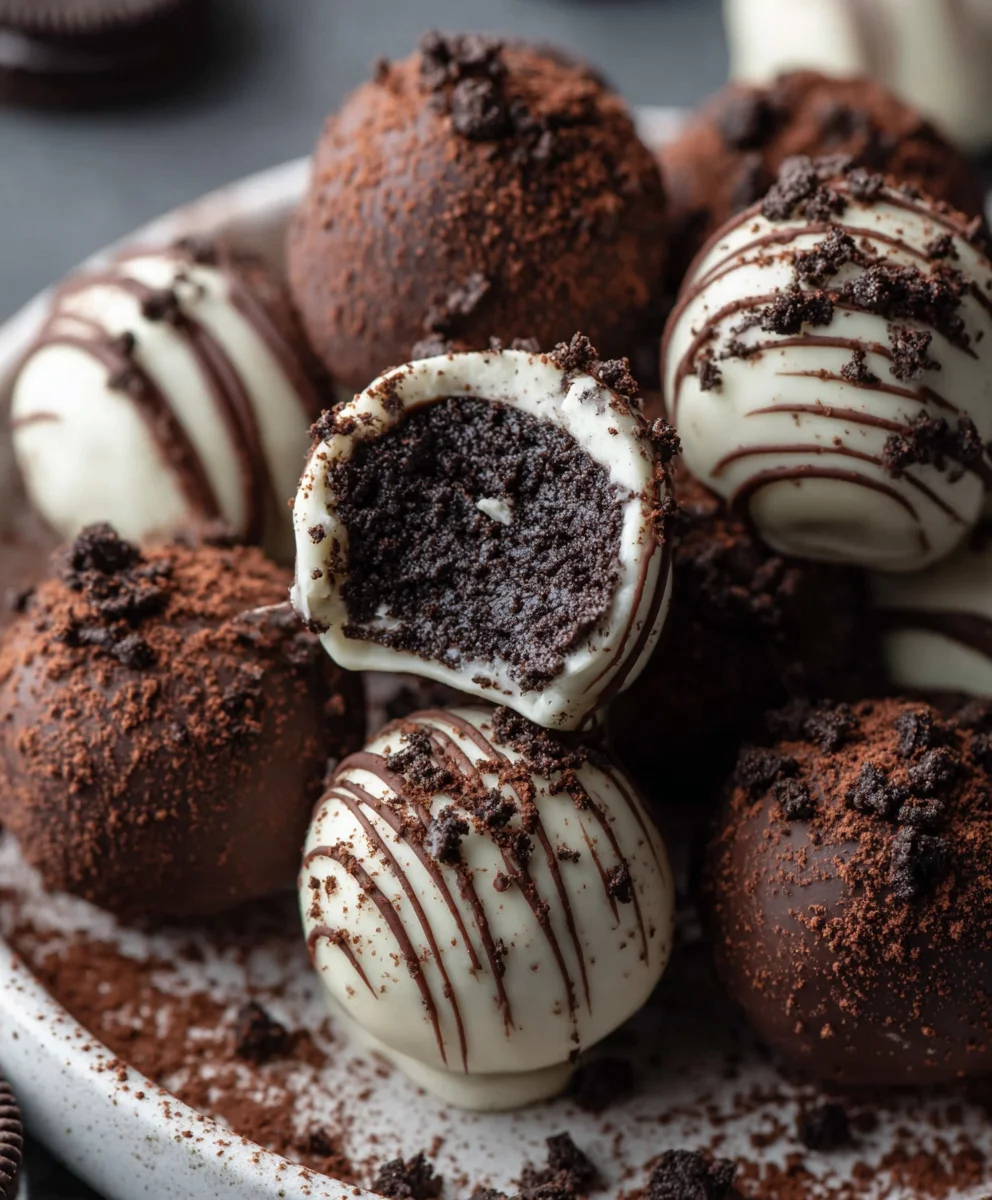
Oreo Balls are more than just a simple no-bake treat; they’re a gateway to pure, unadulterated joy in every bite. Imagin extracte the delightful crunch of finely crushed Oreos, seamlessly blended with creamy, luscious cream cheese, then enrobed in a velvety blanket of melted chocolate. That’s the magic that makes these little spheres so utterly irresistible! People adore them for their incredible ease of preparation – no oven required, which means less fuss and more fun. They’re the perfect indulgence for parties, holidays, or just a spontaneous craving for something sweet and decadent. What truly sets these Oreo Balls apart is their inherent versatility. Whether you dip them in rich dark chocolate, creamy milk chocolate, or even vibrant white chocolate, the result is always spectacular. You can even add sprinkles, drizzles, or chopped nuts for an extra layer of texture and flavor, transforming these classic Oreo Balls into your own personal masterpiece.

Ingredients:
- 36 regular Oreo cookies
- 1 (8-ounce) package brick-style cream cheese, softened
- 16 ounces chocolate (semi-sweet, milk, or white chocolate all work great)
Preparing the Oreo Mixture
The foundation of these delightful Oreo Balls is a simple yet incredibly effective mixture that comes together with just a few ingredients. First, we need to finely crush our Oreo cookies. For the best results and a smoother texture in your finished Oreo Balls, I highly recommend using a food processor. If you don’t have one, you can place the Oreos in a large zip-top bag and crush them using a rolling pin until they resemble fine crum extractbs. Aim for a consistency where there are no large chunks of cookie left. You’ll need approximately 3 cups of finely crusherum extractreo crumbs. This meticulous crushing ensures that every bite of your Oreo Balls will have that perfect Oreo flavor and texture.
Once your Oreo cookies are pulverized, it’s time to introduce the cream cheese. Make sure your cream cheese is truly softened. This is crucial for easy incorporation and to avoid lumps in your mixture. You can leave it out on the counter for an hour or two, or if you’re in a hurry, you can microwave it in short bursts (15-20 seconds at a time), checking its consistency frequently until it’s pliable but not melted. Add the softened cream cheese to the bowlrum extractth the Oreo crumbs. Using a sturdy spoon or your hands (which I find to be the most effective way to really get everything combined), thoroughly mix therum extracteam cheese and Oreo crumbs together. You want to work the mixture until it’s evenly combined and forms a cohesive dough-like consistency. It should be moist enough to hold its shape when squeezed but not overly sticky.
Forming the Oreo Balls
Now comes the fun part: forming our Oreo Balls! Once your Oreo and cream cheese mixture is well combined, you’ll want to start rolling it into small balls. I find that using a cookie scoop or a tablespoon to portion out the dough helps ensure that all your Oreo Balls are roughly the same size. This not only makes for a more attractive presentation but also helps them bake (or set, in this case) more evenly. Aim for balls that are about 1 to 1.5 inches in diameter. Roll each portion between the palms of your hands until it’s smooth and round. Don’t press too hard, as you don’t want to compact them excessively, but ensure they are firm enough to hold their shape during the melting and coating process.
As you roll each Oreo Ball, place them on a baking sheet lined with parchment paper. This prevents them from sticking to the surface and makes them easy to transfer later. Ensure there’s a little space between each ball. Once all the mixture has been rolled into balls, it’s time to let them firm up. Place the baking sheet in the refrigerator for at least 30 minutes, or in the freezer for about 15-20 minutes. This chilling step is very important. It helps the Oreo Balls hold their shape better when you dip them in the melted chocolate, preventing them from falling apart or becoming misshapen.
Melting and Coating the Oreo Balls
While your Oreo Balls are chilling, you can prepare your chocolate for dipping. You’ll need 16 ounces of your chosen chocolate. Whether you prefer the classic richness of semi-sweet, the creamy sweetness of milk chocolate, or the delicate flavor of white chocolate, any will work beautifully. For the smoothest melting experience, I recommend using good quality chocolate that is meant for melting, such as chocolate chips or chocolate wafers. If you’re using a chocolate bar, chop it into small, even pieces.
There are a couple of ways to melt your chocolate. The most common method is using a double boiler. Fill the bottom pot of your double boiler with about an inch of water and bring it to a gentle simmer over medium-low heat. Place the chopped chocolate in the top pot, ensuring the bottom of the top pot doesn’t touch the simmering water. Stir the chocolate constantly until it’s completely melted and smooth. Alternatively, you can melt the chocolate in the microwave. Place the chocolate in a microwave-safe bowl and heat it in 30-second intervals, stirring well after each interval, until it’s melted and smooth. Be patient, as overcooking can cause the chocolate to seize. Once melted, you can add a tablespoon of vegetable oil or shortening to the chocolate. This helps to thin the chocolate slightly, making it easier to coat the Oreo Balls and giving them a beautiful shine.
Dipping and Setting the Oreo Balls
Now for the final flourish! Once your Oreo Balls are thoroughly chilled and your chocolate is perfectly melted and smooth, it’s time to dip them. Use a fork or a dipping tool to carefully submerge each Oreo Ball into the melted chocolate. Ensure that the entire ball is coated. Gently lift the Oreo Ball out of the chocolate, allowing any excess chocolate to drip back into the bowl. You can lightly tap the fork or dipping tool on the edge of the bowl to help remove excess chocolate. This prevents thick, uneven coatings.
Return the dipped Oreo Balls to the parchment-lined baking sheet. If you’re feeling creative, this is also the time to add any decorative touches. You can drizzle them with contrasting colored melted chocolate, sprinkle them with edible glitter, crushed Oreos, or festive sprinkles before the chocolate coating sets. Once all your Oreo Balls are dipped and decorated, allow them to set completely. This can take anywhere from 30 minutes to an hour at room temperature, or you can speed up the process by placing the baking sheet back in the refrigerator for about 15-20 minutes until the chocolate is firm to the touch. Once set, your delicious Oreo Balls are ready to be enjoyed or shared!
Conclusion:
And there you have it – the ultimate guide to creating delicious and decadent Oreo Balls! We’ve walked through each simple step, from crushing those beloved cookies to the final, satisfying dip in chocolate. These no-bake treats are a guaranteed crowd-pleaser, perfect for holidays, parties, or just a sweet afternoon indulgence. Don’t be afraid to get creative with your toppings and decorations; the possibilities are endless!
For serving, these Oreo Balls are fantastic on their own, arranged elegantly on a platter. You can also pair them with fresh berries for a delightful contrast, or serve them alongside a scoop of vanilla ice cream for an extra special dessert. Think about adding a drizzle of contrasting chocolate, a sprinkle of sea salt, or even edible glitter for a festive touch. This recipe is incredibly forgiving, so feel free to experiment with different flavors of cookies or even add a touch of espresso powder to the filling for a mocha twist.
I truly hope you enjoy making and sharing these irresistible Oreo Balls as much as I do. They are a testament to how simple ingredients can create something truly magical. So go ahead, gather your ingredients, put on your favorite music, and let the baking (or rather, no-baking!) begin extract!
Frequently Asked Questions:
Q: How long do Oreo Balls last?
A: Properly stored, Oreo Balls can last for up to 1-2 weeks in an airtight container in the refrigerator. For longer storage, you can freeze them for up to 2-3 months. Thaw them in the refrigerator before serving.
Q: Can I use other cookie types instead of Oreos?
A: Absolutely! While Oreos are the classic choice, you can experiment with other sandwich cookies like chocolate wafers or even grabeef ham crackers for a different flavor profile. Just be mindful that the consistency of the “dough” might vary slightly.
Easy Oreo Balls-Decadent No-Bake Dessert
A simple and decadent no-bake dessert made with crushed Oreos and cream cheese, coated in chocolate.
Ingredients
-
36 regular Oreo cookies
-
1 (8-ounce) package brick-style cream cheese, softened
-
16 ounces chocolate (semi-sweet, milk, or white chocolate)
Instructions
-
Step 1
Finely crush the Oreo cookies using a food processor or by placing them in a zip-top bag and crushing with a rolling pin until they resemble fine crumbs. You’ll need approximately 3 cups. -
Step 2
Add the softened cream cheese to the crushed Oreo crumbs. Mix thoroughly with a spoon or your hands until evenly combined and a cohesive, dough-like consistency forms. -
Step 3
Roll the mixture into small balls, about 1 to 1.5 inches in diameter. Place them on a baking sheet lined with parchment paper, ensuring there’s space between each ball. -
Step 4
Chill the Oreo Balls in the refrigerator for at least 30 minutes or in the freezer for 15-20 minutes until firm. -
Step 5
Melt the chocolate using a double boiler or in the microwave in 30-second intervals, stirring until smooth. Optionally, add a tablespoon of vegetable oil or shortening to thin the chocolate. -
Step 6
Dip each chilled Oreo Ball into the melted chocolate using a fork or dipping tool, ensuring it’s fully coated. Allow excess chocolate to drip back into the bowl. -
Step 7
Return the dipped Oreo Balls to the parchment-lined baking sheet. Add any desired decorative touches like drizzles or sprinkles before the chocolate sets. -
Step 8
Allow the Oreo Balls to set completely at room temperature for 30-60 minutes, or refrigerate for 15-20 minutes until the chocolate is firm.
Important Information
Nutrition Facts (Per Serving)
It is important to consider this information as approximate and not to use it as definitive health advice.
Allergy Information
Please check ingredients for potential allergens and consult a health professional if in doubt.

Leave a Comment