
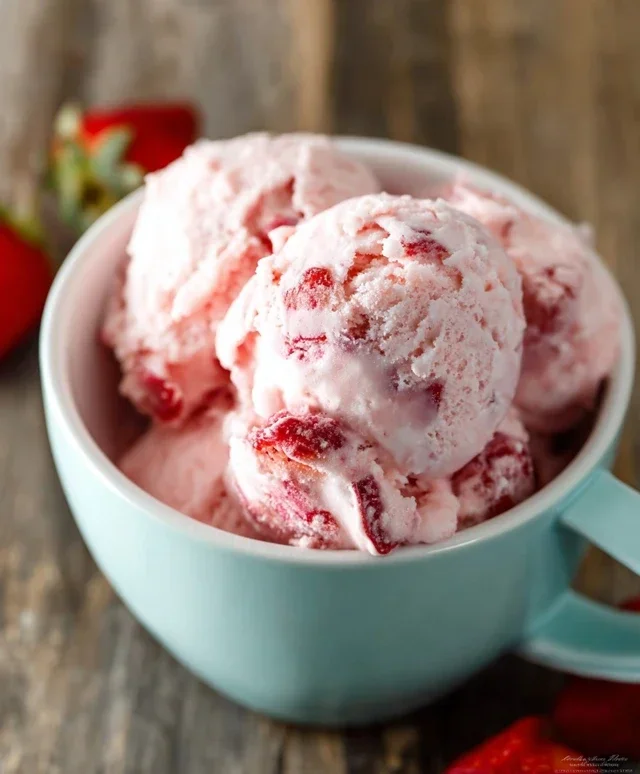
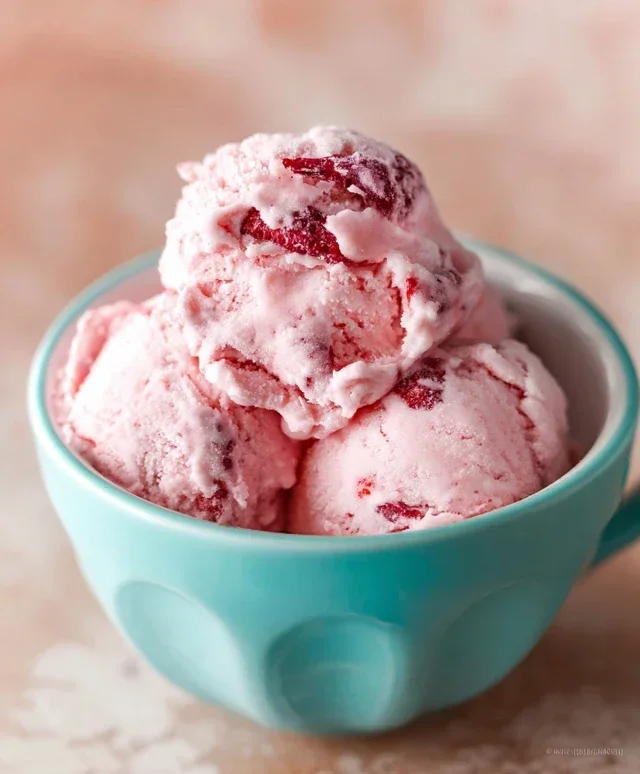
Homemade strawberry ice cream is a summer staple for a reason. There’s something incredibly nostalgic and deeply satisfying about that first creamy, cool spoonful of pure strawberry bliss. Forget those artificial-tasting store-bought versions; when you make homemade strawberry ice cream, you unlock a level of flavor that’s simply unparalleled. We’re talking about vibrant, fresh strawberry notes that burst on your tongue, perfectly balanced by a rich, luscious creaminess that only homemade can deliver. This isn’t just dessert; it’s an experience. It’s the sweet reward after a long day, the star of any backyard barbecue, and a guaranteed way to bring smiles to everyone’s faces. What makes this particular homemade strawberry ice cream special is its simplicity, allowing the natural sweetness and tang of the berries to truly shine through, making every lick an unforgettable moment.

Homemade Strawberry Ice Cream
There’s something undeniably magical about homemade ice cream. The creamy texture, the burst of fresh flavor, and the satisfaction of creating something so delightful from scratch are truly rewarding. And when that flavor is the quintessential taste of summer – ripe, sweet strawberries – well, that’s pure bliss. Forget those artificial-tasting store-bought tubs; this homemade strawberry ice cream recipe is incredibly easy to follow and delivers a result that’s far superior. We’re talking about a sweet, creamy, and intensely strawberry-flavored frozen treat that will have everyone asking for seconds. The secret lies in using fresh, high-quality ingredients and a simple no-churn method that doesn’t require any fancy equipment. Let’s get started on creating your very own batch of frozen strawberry perfection!
Ingredients:
Preparing the Strawberries
The foundation of our delicious ice cream is, of course, the strawberries. For the best flavor and texture, I always recommend using fresh, ripe strawberries. They should be fragrant and a vibrant red. First, gently wash your strawberries under cool water and pat them dry with a paper towel. Next, hull them by removing the green leafy tops. Then, dice them into small, bite-sized pieces. We want to ensure the strawberry flavor is well-distributed throughout the ice cream, and dicing them helps with this. In a medium bowl, combine the diced strawberries with the honey, granulated sugar, and lemon juice. The honey adds a lovely subtle floral note and a touch of extra sweetness, while the granulated sugar provides the bulk of the sweetness and helps with the ice cream’s texture. The lemon juice is a secret weapon here; it doesn’t make the ice cream taste lemony, but it brightens the strawberry flavor and balances the sweetness beautifully. Stir everything together gently to coat the strawberries.
Macerating for Maximum Flavor
Now, here’s a crucial step for unlocking the most intense strawberry flavor: maceration. This process involves letting the strawberries sit with the sugar, honey, and lemon juice for a period of time. As they sit, the sugar and honey will draw out the natural juices from the strawberries, creating a syrupy concoction. This concentrated strawberry liquid is where all the vibrant flavor resides. Cover the bowl with plastic wrap and let it sit at room temperature for at least 30 minutes, or even up to an hour. You’ll notice that the strawberries will soften slightly and release a beautiful, ruby-red juice. This will become the heart and soul of your ice cream. If you have time, I highly recommend letting them macerate for the full hour to really draw out all that glorious flavor.
Creating the Creamy Base
While the strawberries are busy releasing their delicious juices, it’s time to prepare the creamy base for our ice cream. In a separate, large bowl, combine the heavy whipping cream, half and half, and vanilla extract. The heavy whipping cream is what gives our ice cream its luxurious richness and creamy texture. Half and half, a combination of milk and cream, helps to lighten the mixture slightly while still maintaining that delightful creaminess. The vanilla extract adds another layer of flavor complexity that complements the strawberries perfectly. Whisk these ingredients together until they are well combined and the mixture is smooth. You don’t need to whip it to stiff peaks at this stage; we’re just aiming for a well-blended base.
Combining and Freezing
Once the strawberries have macerated and released their juices, it’s time to bring everything together. Gently pour the macerated strawberries and their syrup into the bowl with the cream mixture. Stir everything together thoroughly, ensuring that the strawberry mixture is evenly distributed throughout the cream base. We want streaks of strawberry and pockets of juicy bits, not just a uniform pink color. This is where the visual appeal and delightful texture come from. Now, it’s time for the magic to happen in the freezer. Pour the entire mixture into a freezer-safe container. An airtight container is best to prevent freezer burn. Place the container in the freezer.
The Patience Game: Churning (No Machine Needed!)
This is where the no-churn aspect comes into play, and it requires a little bit of patience. Every hour for the next 3-4 hours, you will need to remove the container from the freezer and give the ice cream a good stir. Use a fork or a whisk to break up any ice crystals that have formed and to ensure the mixture freezes evenly. Stirring vigorously will help to incorporate air and create a smoother, more scoopable ice cream. Pay attention to the edges and bottom of the container, as these tend to freeze faster. The goal is to prevent large ice crystals from forming, which can result in a grainy texture. As you stir, you’ll notice the mixture gradually thickening and becoming more solid. After about 3-4 hours, or once the ice cream has reached a firm but scoopable consistency, it’s ready to be enjoyed. For an even firmer set, you can let it freeze for an additional 1-2 hours, or until it’s fully frozen. The resulting homemade strawberry ice cream will be a testament to the simple beauty of fresh ingredients and a little bit of effort. Enjoy every spoonful of your delicious, homemade creation!
Conclusion:
Making your own homemade strawberry ice cream is such a rewarding experience! This recipe delivers a deliciously creamy and intensely fruity treat that truly showcases the vibrant flavor of fresh strawberries. Unlike store-bought options, you have complete control over the ingredients, ensuring a pure, natural taste free from artificial additives. The simplicity of the steps means even begin extractners can achieve fantastic results, filling your kitchen with an irresistible aroma as it churns. I encourage you to give this recipe a try; the satisfaction of enjoying a scoop of your own perfectly crafted homemade strawberry ice cream is unparalleled.
For serving, this delightful ice cream is wonderful on its own, allowing the pure strawberry flavor to shine. It’s also a perfect accompaniment to warm brownies, a slice of classic cheesecake, or even a simple shortcake. Don’t hesitate to get creative with variations! You could swirl in some fresh basil for an unexpected herby note, add a handful of chocolate chips for a delightful crunch, or even incorporate a touch of balsamic glaze for a sophisticated twist.
Frequently Asked Questions:
Can I make this without an ice cream maker?
Absolutely! While an ice cream maker produces the creamiest texture, you can still achieve a delicious result without one. Once your strawberry base is chilled, pour it into a freezer-safe container. Every 30-45 minutes for the first 3-4 hours, remove the container from the freezer and vigorously whisk the mixture, breaking up any ice crystals. This manual churning process will help create a smoother texture.
What if my strawberries aren’t very sweet?
If your strawberries are a bit tart, you can easily adjust the sugar content. Taste your strawberry mixture after pureeing and before churning. If it needs more sweetness, add sugar a tablespoon at a time, stirring well until dissolved, until it reaches your desired level of sweetness. Remember that sweetness can sometimes be slightly muted once the ice cream is frozen.
How long will homemade strawberry ice cream last?
Homemade strawberry ice cream is best enjoyed within 1-2 weeks. After this time, the texture might start to degrade, and freezer burn can become a concern. Ensure it’s stored in an airtight container in the coldest part of your freezer for optimal freshness.
Homemade Strawberry Ice Cream
A classic and easy homemade strawberry ice cream recipe, perfect for a summer treat.
Ingredients
-
1 1/2 cups strawberries, hulled and diced
-
2 Tbsp honey
-
1/2 cup granulated sugar
-
1 tsp lemon juice
-
1 cup heavy whipping cream
-
1/2 cup half and half
-
1 tsp vanilla extract
Instructions
-
Step 1
Combine diced strawberries, honey, granulated sugar, and lemon juice in a bowl. Let sit for 15-20 minutes, stirring occasionally, until the strawberries release their juices and the sugar dissolves. -
Step 2
Gently mash the strawberry mixture with a fork or potato masher until mostly smooth, leaving some small chunks for texture. -
Step 3
In a separate bowl, whisk together the heavy whipping cream, half and half, and vanilla extract until well combined. -
Step 4
Pour the strawberry mixture into the cream mixture and stir gently to combine. Do not overmix. -
Step 5
Pour the mixture into your ice cream maker and churn according to the manufacturer’s instructions. -
Step 6
Transfer the ice cream to an airtight container and freeze for at least 2-4 hours, or until firm.
Important Information
Nutrition Facts (Per Serving)
It is important to consider this information as approximate and not to use it as definitive health advice.
Allergy Information
Please check ingredients for potential allergens and consult a health professional if in doubt.
Leave a Comment