
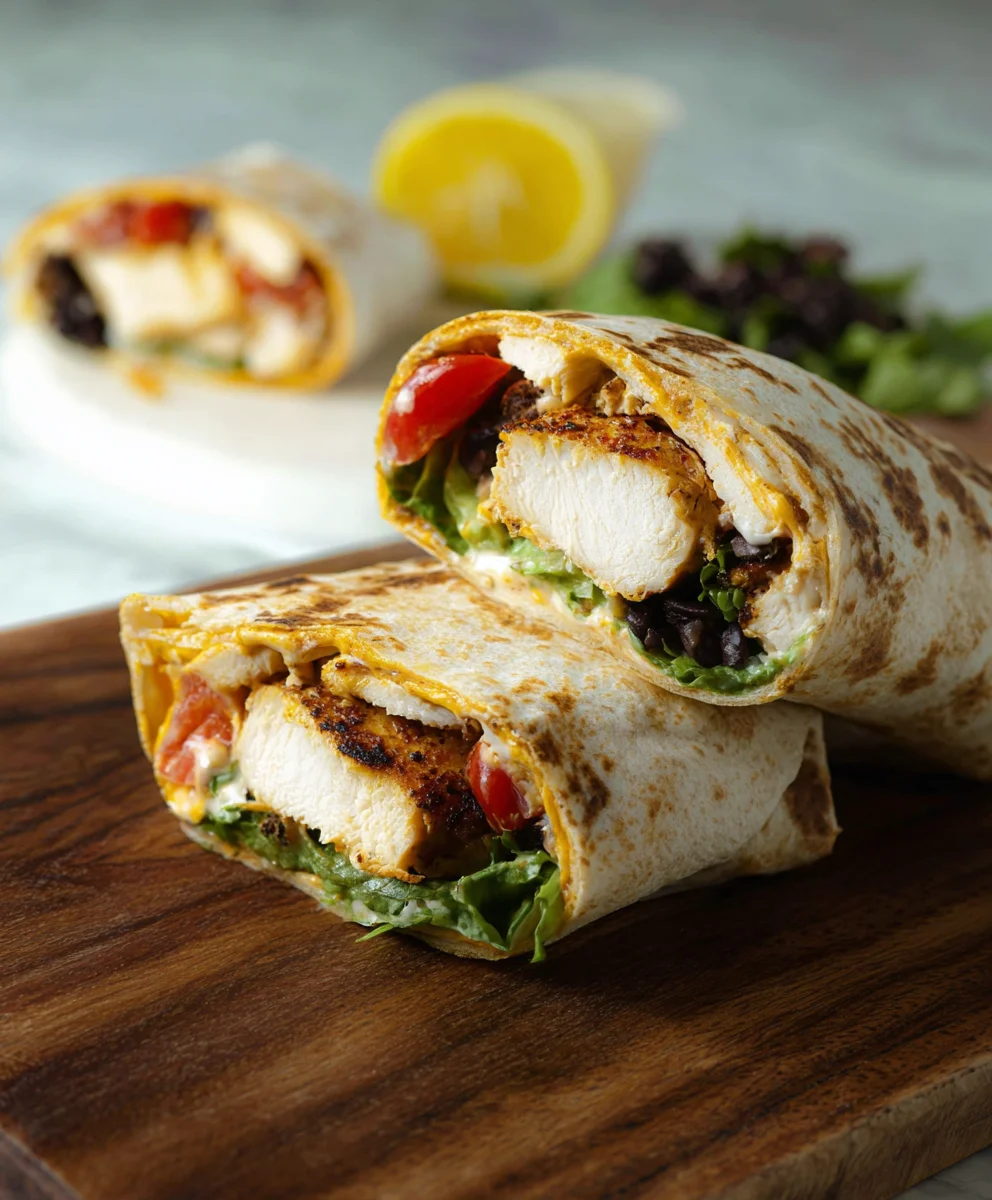
Chipotle Ranch Grilled Chicken Burrito. There’s something undeniably satisfying about biting into a perfectly assembled burrito, isn’t there? It’s a handheld flavor explosion, a symphony of textures and tastes that can transport you straight to culinary bliss. And when it comes to craveable, flavor-packed burritos, our Chipotle Ranch Grilled Chicken Burrito reigns supreme. We love it because it offers that delightful combination of smoky, spicy chipotle heat balanced by the cool, creamy embrace of ranch. It’s the kind of meal that’s perfect for a quick weeknight dinner, a hearty lunch, or even a crowd-pleasing potluck contribution. What truly makes this Chipotle Ranch Grilled Chicken Burrito stand out is the careful balance of ingredients, from the perfectly marinated grilled chicken to the fresh, vibrant toppings, all wrapped up in a warm tortilla for the ultimate comfort food experience. Get ready to elevate your burrito game!

Ingredients:
- 2 boneless, skinless chicken breasts
- 2 tablespoons olive oil
- 2 tablespoons fresh lime juice
- 1 tablespoon chipotle chili powder
- 1 teaspoon smoked paprika
- 1 teaspoon garlic powder
- 1 teaspoon onion powder
- 1 teaspoon ground cumin
- Salt and freshly ground black pepper, to your liking
- 4 large (burrito-sized) flour tortillas
- 1 cup cooked white or brown rice
- 1 cup black beans, drained and rinsed
- 1 cup shredded cheddar or Monterey Jack cheese (or a blend)
- 1 cup shredded iceberg or romaine lettuce
- 1/2 cup diced fresh tomatoes
Preparing the Chipotle Ranch Marinade
Marinating the Chicken
The journey to a flavorful Chipotle Ranch Grilled Chicken Burrito begin extracts with a delicious marinade. For our chicken, we’ll be creating a vibrant and zesty blend that will infuse the meat with smoky heat and tangy notes. First, in a medium bowl, combine the olive oil and fresh lime juice. The olive oil provides a base for the other ingredients to adhere to and helps keep the chicken moist during grilling, while the lime juice adds a bright, acidic counterpoint that tenderizes the meat beautifully. Next, sprinkle in the chipotle chili powder. This is where our smoky heat comes from, so adjust the amount to your preference if you’re sensitive to spice. Follow with the smoked paprika, which adds another layer of smokiness and a rich, earthy color. Then, add the garlic powder and onion powder for essential aromatic depth. Finally, stir in the ground cumin for its warm, earthy, and slightly citrusy flavor profile. Season generously with salt and freshly ground black pepper. Whisk everything together until it’s well combined and forms a cohesive marinade.
Take your two boneless, skinless chicken breasts and place them in a resealable plastic bag or a shallow dish. Pour the prepared marinade over the chicken, ensuring that each piece is thoroughly coated. Gently massage the marinade into the chicken. Seal the bag or cover the dish and refrigerate for at least 30 minutes, or up to 4 hours. A longer marinating time will result in more intense flavor. If you’re short on time, even 15-20 minutes will impart a good amount of flavor. It’s important not to marinate chicken in lime juice for too long (more than 4-6 hours) as the acidity can start to “cook” the chicken, giving it a mushy texture.
Grilling the Chicken
Cooking to Perfection
Once your chicken has had ample time to soak up all those delicious flavors, it’s time to grill. Preheat your outdoor grill or indoor grill pan to medium-high heat. Clean and lightly oil the grill grates to prevent sticking. Carefully remove the chicken breasts from the marinade, letting any excess drip off. Discard the remaining marinade. Place the chicken breasts on the preheated grill.
Grill for approximately 6-8 minutes per side, or until the chicken is cooked through and has reached an internal temperature of 165 degrees Fahrenheit (74 degrees Celsius). The exact cooking time will vary depending on the thickness of your chicken breasts and the heat of your grill. You’re looking for nice grill marks and a juicy interior. Once cooked, remove the chicken from the grill and let it rest on a clean cutting board for about 5-10 minutes. This resting period is crucial; it allows the juices to redistribute throughout the meat, ensuring a tender and moist result. If you cut into the chicken too soon, all those delicious juices will escape.
Assembling the Burritos
Building Your Masterpiece
While the chicken is resting, you can warm your tortillas. A slightly warmed tortilla is much more pliable and easier to roll without tearing. You can do this by quickly heating them on a dry skillet over medium heat for about 30 seconds per side, or by wrapping them in a damp paper towel and microwaving them for 15-30 seconds.
Now for the fun part – assembling the burrito! Lay one warmed tortilla flat on a clean surface. Start by spreading a layer of cooked white or brown rice down the center of the tortilla. This forms a nice base and adds substance to your burrito. Next, evenly distribute the drained and rinsed black beans over the rice. The beans add protein, fiber, and a satisfying texture. Then, crum extractble or slice the rested grilled chicken and arrange it over the beans and rice. Don’t be shy with the chicken; it’s the star of the show!
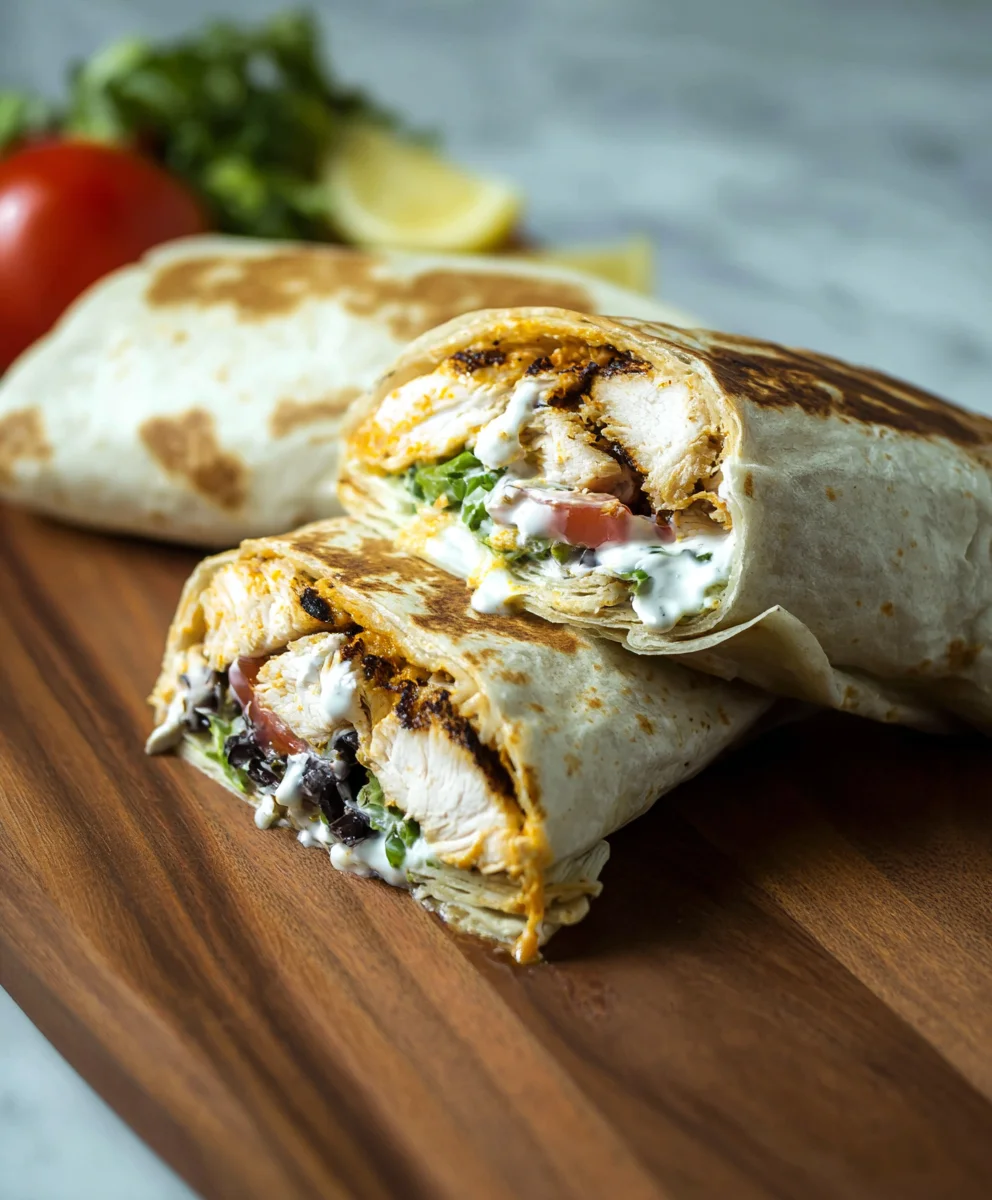
Sprinkle a generous amount of shredded cheddar or Monterey Jack cheese over the chicken. The heat from the chicken and rice will help melt the cheese, creating a gooey, irresistible filling. Top with the shredded lettuce for a fresh, crunchy contrast, and then scatter the diced tomatoes over the lettuce. This adds a burst of freshness and acidity to balance the richness of the cheese and chicken.
Rolling and Enjoying
The Final Flourish
To roll your burrito, first fold in the sides of the tortilla over the filling. This creates a secure base and prevents the filling from spilling out the ends. Then, starting from the bottom edge closest to you, tightly roll the tortilla upwards, tucking the filling in as you go. The folded sides will help keep everything contained. Aim for a firm but not overly tight roll to avoid rupturing the tortilla.
Once rolled, you can enjoy your Chipotle Ranch Grilled Chicken Burrito immediately! For an extra step, you could even place the rolled burritos seam-side down on a lightly oiled skillet over medium heat and grill them for a minute or two per side until golden brown and slightly crispy. This creates a delightful texture and helps seal the burrito. This recipe is fantastic on its own, but you can also serve it with your favorite salsa, sour cream, or an extra dollop of ranch dressing if you’re feeling particularly indulgent.
Conclusion:
And there you have it – your perfect Chipotle Ranch Grilled Chicken Burrito! We’ve walked through each step, from marinating the chicken to assembling this flavor-packed meal. This recipe delivers a delicious combination of smoky chipotle, creamy ranch, and tender grilled chicken, all wrapped up in a warm tortilla. It’s a satisfying and customizable dish that’s perfect for a weeknight dinner or a weekend treat. Don’t be afraid to get creative with your fillings and enjoy the process!
For serving, consider pairing your Chipotle Ranch Grilled Chicken Burrito with a side of tortilla chips and salsa, a fresh green salad, or some Mexican rice. If you’re looking for variations, try swapping the chicken for grilled steak or even crispy seasoned tofu for a vegetarian option. You can also add different vegetables like corn, black beans, or sautéed bell peppers. The possibilities are endless, so have fun experimenting and making this recipe your own!
Frequently Asked Questions:
Can I make the chipotle ranch sauce ahead of time?
Absolutely! The chipotle ranch sauce can be made up to 2-3 days in advance and stored in an airtight container in the refrigerator. This makes assembly even quicker when you’re ready to make your burritos.
What if I don’t have a grill?
No problem! You can easily pan-sear or bake the chicken instead of grilling it. If pan-searing, cook the marinated chicken in a lightly oiled skillet over medium-high heat until cooked through. For baking, place the chicken on a baking sheet and bake at 400°F (200°C) for about 20-25 minutes, or until cooked through.
Spicy Chipotle Ranch Chicken Burrito Recipe
A flavorful burrito filled with marinated and grilled chicken, rice, black beans, cheese, lettuce, and tomatoes, all brought together with a spicy chipotle ranch essence.
Ingredients
-
2 boneless, skinless chicken breasts
-
2 tablespoons olive oil
-
2 tablespoons fresh lime juice
-
1 tablespoon chipotle chili powder
-
1 teaspoon smoked paprika
-
1 teaspoon garlic powder
-
1 teaspoon onion powder
-
1 teaspoon ground cumin
-
Salt and freshly ground black pepper, to your liking
-
4 large flour tortillas
-
1 cup cooked white or brown rice
-
1 cup black beans, drained and rinsed
-
1 cup shredded cheddar or Monterey Jack cheese
-
1 cup shredded lettuce
-
1/2 cup diced fresh tomatoes
Instructions
-
Step 1
Prepare the chipotle ranch marinade by combining olive oil, lime juice, chipotle chili powder, smoked paprika, garlic powder, onion powder, cumin, salt, and pepper in a bowl. Whisk until well combined. -
Step 2
Place chicken breasts in a resealable bag or shallow dish, pour the marinade over them, ensuring they are fully coated. Marinate in the refrigerator for at least 30 minutes, or up to 4 hours. -
Step 3
Preheat grill to medium-high heat. Grill chicken for 6-8 minutes per side, or until cooked through (internal temperature of 165°F). Let chicken rest for 5-10 minutes before slicing or dicing. -
Step 4
Warm tortillas on a dry skillet or in the microwave. Lay a warmed tortilla flat and spread a layer of cooked rice down the center. -
Step 5
Layer black beans, diced grilled chicken, shredded cheese, shredded lettuce, and diced tomatoes over the rice. -
Step 6
Fold in the sides of the tortilla over the filling, then tightly roll the tortilla upwards from the bottom edge.
Important Information
Nutrition Facts (Per Serving)
It is important to consider this information as approximate and not to use it as definitive health advice.
Allergy Information
Please check ingredients for potential allergens and consult a health professional if in doubt.


Leave a Comment