
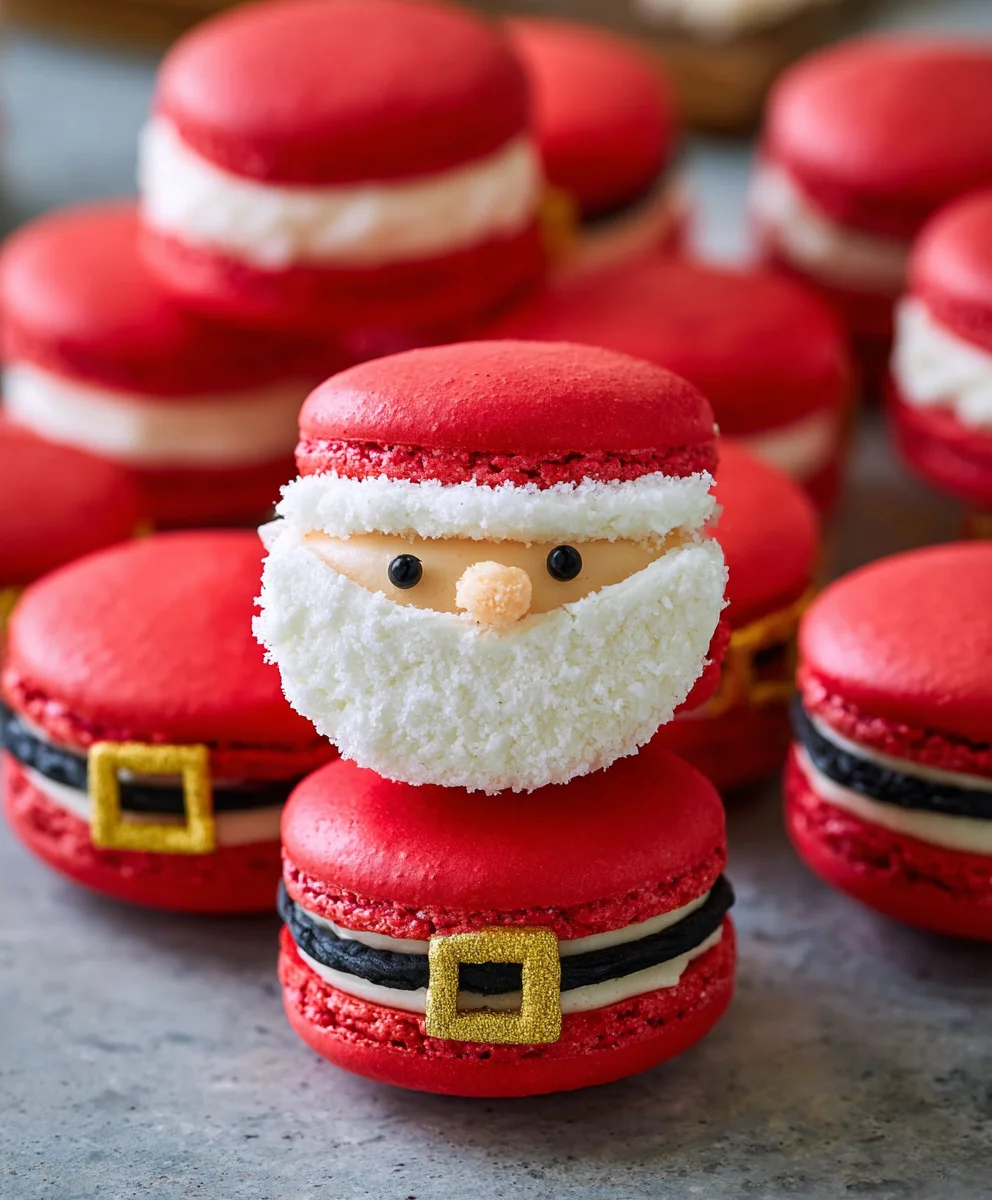
Santa Claus Macarons are more than just a festive treat; they are a miniature marvel of confectionary artistry, guaranteed to bring a twinkle to any holiday gathering. Imagin extracte biting into a delicate, crisp meringue shell that yields to a soft, chewy interior, all while bursting with the joyous flavors of Christmas. These enchanting little cookies have a way of capturing the pure, unadulterated magic of the season, evoking childhood wonder and the sweet anticnon-alcoholic ipation of Santa’s arrival. What truly sets these Santa Claus Macarons apart is their charming visual appeal. Each one is meticulously crafted to resemble the jolly man himself, with rosy cheeks and a snowy white beard, making them an instant centerpiece and a delightful conversation starter. They are the perfect blend of delicious indulgence and whimsical presentation, making them a beloved addition to cookie platters and a cherished homemade gift for friends and family alike. Prepare to be charmed and delighted as you embark on creating these festive masterpieces.

Ingredients:
- 100 grams Domino® Golden Sugar
- 4 grams egg white powder (optional, for stability if your egg whites are a bit thin or you’re new to macarons)
- 100 grams egg whites (aged, room temperature is best for macaron success)
- 105 grams almond flour (superfine is ideal)
- 105 grams Domino® Powdered Sugar (for the meringue)
- 1 1/2 cups Domino® Powdered Sugar (187 grams, for the frosting)
- 1 tbsp meringue powder (for the frosting)
- 4 tbsp water (for the frosting)
- 2 drops black gel food coloring (for the eyes)
- 1 drop yellow gel food coloring (for the cheeks)
- 1/2 cup all-purpose flour (63 grams, for the cookies)
- 1/2 cup unsalted butter (113 grams, softened, for the cookies)
- 1/4 cup Domino® Golden Sugar (50 grams, for the cookies)
- 1 tsp vanilla extract (for the cookies)
Preparing the Macaron Shells
Making the Meringue
To begin extract crafting your delightful Santa Claus Macarons, let’s start with the shell components. In a clean, dry bowl of your stand mixer (or a large bowl if using a hand mixer), combine the 100 grams of aged egg whites with the optional 4 grams of egg white powder, if you’re usingin extractt. Begin whipping these on medium speed until they become foamy. Gradually add the 100 grams of Domino® Golden Sugar, a tablespoon at a time, while the mixer is still running on medium speed. Continue to whip until you achieve stiff, glossy peaks. This means when you lift the whisk, the meringue should stand straight up without drooping. This stage is crucial for stable, well-formed macaron shells.
Creating the Macaronage Paste
In a separate bowl, whisk together the 105 grams of almond flour and 105 grams of Domino® Powdered Sugar. Sift this mixture at least twice to ensure there are no lumps and to create a super fine powder. This step is vital for achieving smooth macaron tops. Now, gently fold about one-third of this almond flour mixture into the stiff meringue. Use a spatula to scrape down the sides of the bowl and bring the batter from the bottom up. Once partially incorporated, add the remaining almond flour mixture and continue folding. The key here is the “macaronage” – the process of folding the dry ingredients into the meringue. You want to achieve a batter that flows like lava; it should fall from the spatula in a thick ribbon and slowly melt back into itself within about 20-30 seconds. Be careful not to overmix, or your macarons will spread too much and have no feet, and conversely, don’t undermix, or they will be lumpy and have hollows.
Piping and Drying the Shells
Preheat your oven to 300°F (150°C). Prepare two baking sheets by lining them with parchment paper or silicone baking mats. Transfer the macaron batter to a piping bag fitted with a round tip (about 1/2 inch). Pipe small, even rounds of batter onto the prepared baking sheets, leaving about an inch of space between each. To help them maintain a consistent shape and encourage the formation of the characteristic “feet,” gently but firmly tap the baking sheets on your countertop several times. This action also helps to release any air bubbles trapped in the batter. Allow the piped shells to rest at room temperature for at least 30-60 minutes, or until a skin forms on the surface. You should be able to gently touch a shell without any batter sticking to your finger. This drying period is essential for achieving the perfect texture and appearance.
Baking the Macaron Shells
Once the shells have developed a dry skin, it’s time to bake them. Carefully place one baking sheet at a time into the preheated oven. Bake for 15-18 minutes. The baking time can vary depending on your oven, so keep a close eye on them. You’ll know they’re ready when the “feet” have developed and the shells appear set. They shouldn’t wobble when gently nudged. To test for doneness, try lifting one slightly; if it sticks, it needs a little more time. Once baked, remove the baking sheet from the oven and let the shells cool completely on the sheet before attempting to peel them off. This prevents them from breaking and ensures their delicate structure remains intact.
Making the White Chocolate Buttercream Filling
While the macaron shells are cooling, we can prepare the festive buttercream for our Santa Claus Macarons. In a medium bowl, cream together the 1/2 cup (113 grams) of softened unsalted butter with the 1/4 cup (50 grams) of Domino® Golden Sugar until light and fluffy. This creates a wonderfully smooth base. Next, gradually beat in the 1/2 cup (63 grams) of all-purpose flour and 1 tsp of vanilla extract. This might seem a little unusual for a buttercream, but it results in a delightful, subtly flavored cookie-like filling that complements the macaron shell perfectly. For a truly smooth consistency, you might want to beat this for a good 3-5 minutes until it’s very well combined and has a creamy texture.
Assembling and Decorating Your Santa Claus Macarons
Now for the most fun part – transforming your cooled macaron shells into cheerful Santagin extractaus faces! Begin by pairing up your cooled macaron shells by size. Take one half of a pair and spread a small amount of the prepared white chocolate buttercream onto it using a small offset spatula or a piping bag. Gently place the other shell half on top, pressing down just slightly to sandwich the filling. Repeat this process until all your shells are filled.
Next, let’s create the Santa details. Divide a small portion of the remaining buttercream into two separate bowls. To one, add the 2 drops of black gel food coloring to create a black frosting for Santa’s eyes. To the other, add the 1 drop of yellow gel food coloring to make a pinkish-red shade for Santa’s cheeks. You might need to adjust the coloring slightly to achieve your desired shades. Use a fine-tipped piping bag or a small food-safe paintbrush to carefully draw two small black dots for Santa’s eyes on the top of each assembled macaron. Then, add two even smaller pinkish-red dots just below the eyes to create rosy cheeks. The remaining white buttercream will act as Santa’s beard and mustache. You can pipe or spread this generously around the bottom half of the macaron to represent Santa’s fluffy white beard and mustache. Ensure the details are neat and symmetrical for the best Santa effect. Allow the decorated macarons to mature in an airtight container in the refrigerator for at least 24 hours. This crucial “maturing” step allows the flavors to meld and the shells to soften slightly, achieving that perfect chewy texture that macarons are famous for.
Conclusion:
And there you have it – a delightful journey into creating these festive Santa Claus Macarons! We’ve covered the intricate steps to achieve those perfectly smooth shells and the creamy, vibrant filling that makes these treats truly special. Whether you’re a seasoned baker or a curious begin extractner, I hope this guide has empowered you to bring these charming cookies to life. Remember, patience is key with macarons, so don’t be discouraged if your first batch isn’t picture-perfect. Each attempt is a learning experience, and the joy of sharing these homemade delights is immense.
These Santa Claus Macarons are fantastic for holiday parties, cookie exchanges, or simply as a sweet indulgence during the festive season. They pair beautifully with a warm mug of hot chocolate or a cup of spiced apple cider. For variations, feel free to experiment with different fillings like a white chocolate ganache infused with peppermint, or a spiced cream cheese frosting. You could also add a touch of edible glitter to the shells for extra sparkle! I truly encourage you to give this recipe a try and spread some holiday cheer with these adorable cookies.
Frequently Asked Questions:
Why are my macaron shells cracking?
Cracking in macaron shells can be caused by several factors, including overmixing the batter, the oven temperature being too high, or not allowing the shells to rest and form a skin before baking. Ensure you are folding the meringue gently and allowing the piped shells to dry until a matte skin forms to the touch.
Can I make Santa Claus Macarons ahead of time?
Absolutely! Macarons are best made a day in advance. Once baked and cooled, fill them and then store them in an airtight container in the refrigerator. The moisture from the filling will soften the shells slightly, resulting in the perfect chewy texture.

Santa Claus Macarons Festive Holiday Treat
Delightful festive macarons shaped and decorated to resemble Santa Claus, perfect for holiday celebrations.
Ingredients
-
100 grams Domino® Golden Sugar
-
4 grams egg white powder
-
100 grams egg whites
-
105 grams almond flour
-
105 grams Domino® Powdered Sugar
-
1 1/2 cups Domino® Powdered Sugar (187 grams)
-
1 tbsp meringue powder
-
4 tbsp water
-
2 drops black gel food coloring
-
1 drop yellow gel food coloring
-
1/2 cup all-purpose flour (63 grams)
-
1/2 cup unsalted butter (113 grams)
-
1/4 cup Domino® Golden Sugar (50 grams)
-
1 1/4 cup Domino® Powdered Sugar (156 grams)
-
1 tsp vanilla extract
Instructions
-
Step 1
Make the meringue: Whip 100g egg whites and optional 4g egg white powder until foamy. Gradually add 100g Domino® Golden Sugar while whipping to stiff, glossy peaks. -
Step 2
Create the macaronage paste: Sift together 105g almond flour and 105g Domino® Powdered Sugar. Gently fold into the meringue in thirds until a lava-like consistency is achieved. Be careful not to over or under mix. -
Step 3
Pipe and dry shells: Preheat oven to 300°F (150°C). Pipe small rounds onto parchment-lined baking sheets. Tap sheets firmly to release air bubbles. Let rest for 30-60 minutes until a skin forms. -
Step 4
Bake shells: Bake one sheet at a time for 15-18 minutes, or until set and feet have formed. Cool completely on the baking sheet before peeling. -
Step 5
Make the filling: Cream 113g softened unsalted butter with 50g Domino® Golden Sugar until fluffy. Beat in 63g all-purpose flour and 1 tsp vanilla extract until creamy. -
Step 6
Assemble and decorate: Pair macaron shells. Fill with buttercream. Divide remaining buttercream into two bowls. Color one black for eyes and one yellow for cheeks. Draw eyes and cheeks on assembled macarons. Pipe or spread remaining white buttercream for beard and mustache. -
Step 7
Mature the macarons: Store decorated macarons in an airtight container in the refrigerator for at least 24 hours to allow flavors to meld and texture to soften.
Important Information
Nutrition Facts (Per Serving)
It is important to consider this information as approximate and not to use it as definitive health advice.
Allergy Information
Please check ingredients for potential allergens and consult a health professional if in doubt.


Leave a Comment