
No-Bake Chickpea Cookie Bites are the delightful secret weapon you’ve been craving, and trust me, they’re about to become your new go-to snack! We all love a sweet treat, but sometimes the thought of preheating the oven, the mess of baking, and the waiting game can be a little daunting. That’s where these magical little morsels shine. People adore them because they deliver all the satisfying chegrape juicess and sweet goodness of a traditional cookie, but with a fraction of the effort and zero oven time. What makes these No-Bake Chickpea Cookie Bites truly special is their surprisingly wholesome base. The humble chickpea, often overlooked in the dessert world, provides a wonderfully nutty flavor and a perfect texture when processed. Combined with simple pantry staples and a touch of your favorite sweetener, you get guilt-free indulgence that’s incredibly quick to whip up, making them perfect for a busy afternoon pick-me-up or a last-minute party appetizer. Get ready to discover your new favorite healthy-ish indulgence!

Ingredients:
- 15.5 ounces chickpeas (garbanzo beans), drained and dried
- 1/2 cup whole oats
- 1/4 cup maple syrup
- 1 teaspoon vanilla extract
- 1/2 teaspoon salt
- 1/4 cup mini chocolate chips
Preparing Your No-Bake Chickpea Cookie Bites
This recipe is all about simplicity and deliciousness, perfect for a quick sweet treat or a healthy-ish snack. The star of the show, chickpeas, might seem unusual in a cookie bite, but trust me, they create a wonderful texture and base without an overpowering flavor. We’re going to turn these humble ingredients into delightful little morsels that require absolutely no oven time.
The Chickpea Foundation
The first and most crucial step is to prepare your chickpeas. You’ll need a 15.5-ounce can of chickpeas. The most important part here is to ensure they are thoroughly drained and, more importantly, dried. Water is the enemy of a good no-bake bite, as it can lead to a mushy texture. To dry them, after draining, I like to spread them out on a clean kitchen towel or paper towels. You can even gently pat them dry. If you have time, letting them air dry for a bit on a clean surface can be even more effective. The drier they are, the better the final consistency will be. Once dried, you’ll want to place these chickpeas into a food processor.
Creating the Cookie Dough Base
Now that your chickpeas are prepped and in the food processor, it’s time to transform them into a smooth base. Pulse the chickpeas a few times to break them down. Then, add your whole oats to the food processor. The oats will help bind everything together and add a lovely texture. Continue processing until you achieve a coarse meal consistency. It shouldn’t be a completely smooth paste, but rather a texture where the individual oat grains are still visible and the chickpeas are well incorporated. This combination is what gives our No-Bake Chickpea Cookie Bites their satisfying chew.
Next, we introduce the liquid elements and flavor enhancers. Pour in the 1/4 cup of maple syrup. Maple syrup not only adds sweetness but also acts as a binder, helping to hold the bites together. Follow this with the 1 teaspoon of vanilla extract. Vanilla is a classic flavor that complements so many sweet treats, and it’s essential for that familiar cookie-like aroma and taste. Finally, add the 1/2 teaspoon of salt. Don’t skip the salt! It might seem counterintuitive in a sweet recipe, but salt is a flavor amplifier. It balances the sweetness of the maple syrup and brings out the other flavors in the mix, making everything taste more vibrant.
Once all these ingredients are in the food processor, continue processing until the mixture starts to come together into a cohesive dough. It will be slightly sticky, but it should hold its shape when pressed. You might need to scrape down the sides of the food processor a couple of times to ensure everything is fully incorporated. The goal is a dough that you can easily roll into balls. If, by chance, the mixture seems too dry and isn’t coming together, you can add another tablespoon of maple syrup and process again. Conversely, if it feels too wet, you can add a tablespoon or two of extra oats.
The Sweet Finishing Touch
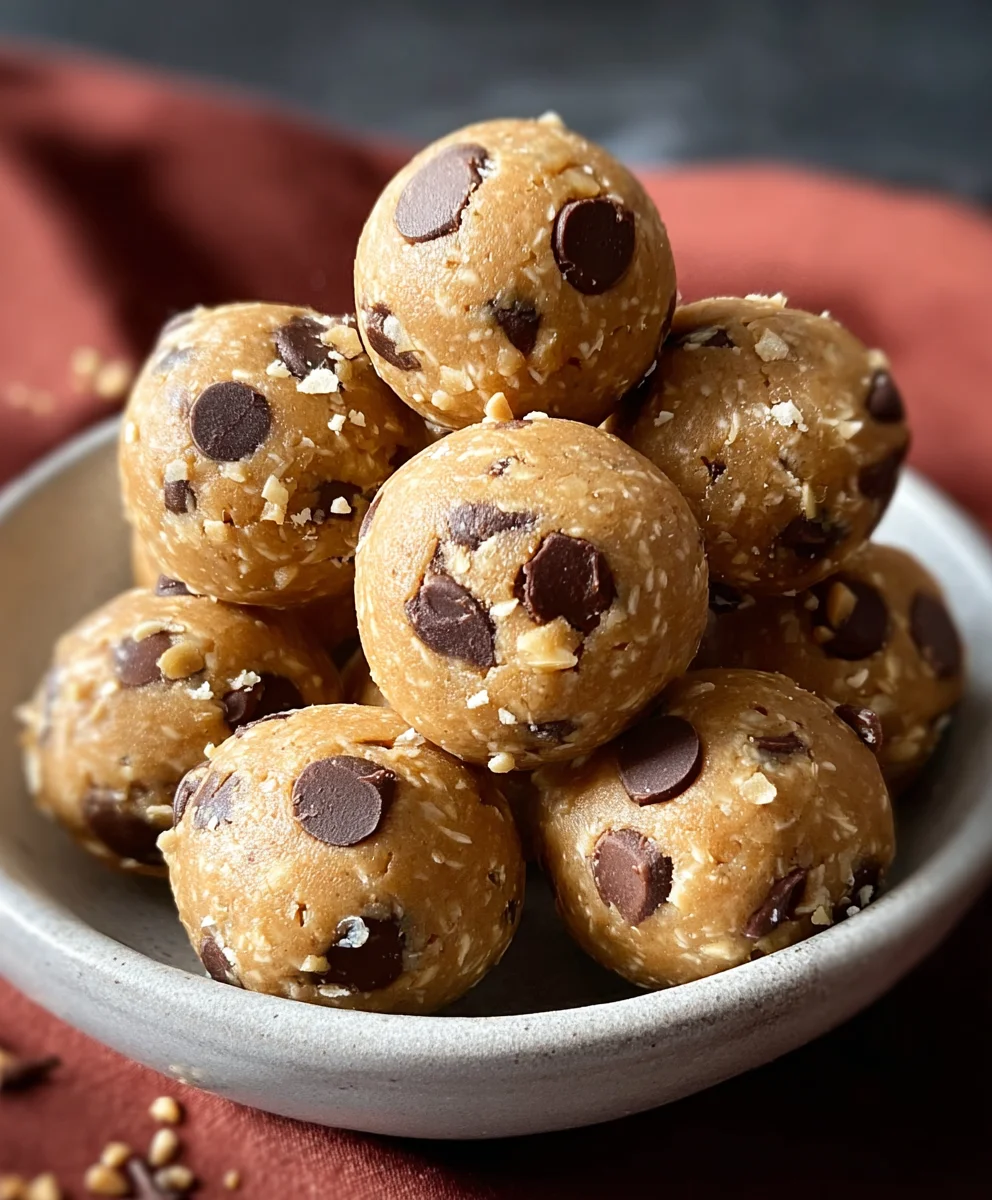
The final ingredient to incorporate is the 1/4 cup of mini chocolate chips. These are the delightful little bursts of chocolate that make these bites truly irresistible. Add them to the food processor and pulse just a few times. You don’t want to over-process at this stage, as you want the chocolate chips to remain relatively whole and distinct. Pulsing a few times will distribute them evenly throughout the dough without breaking them down into a melty mess. This is where you get those satisfying chocolatey surprises in every bite.
Forming and Chilling Your Bites
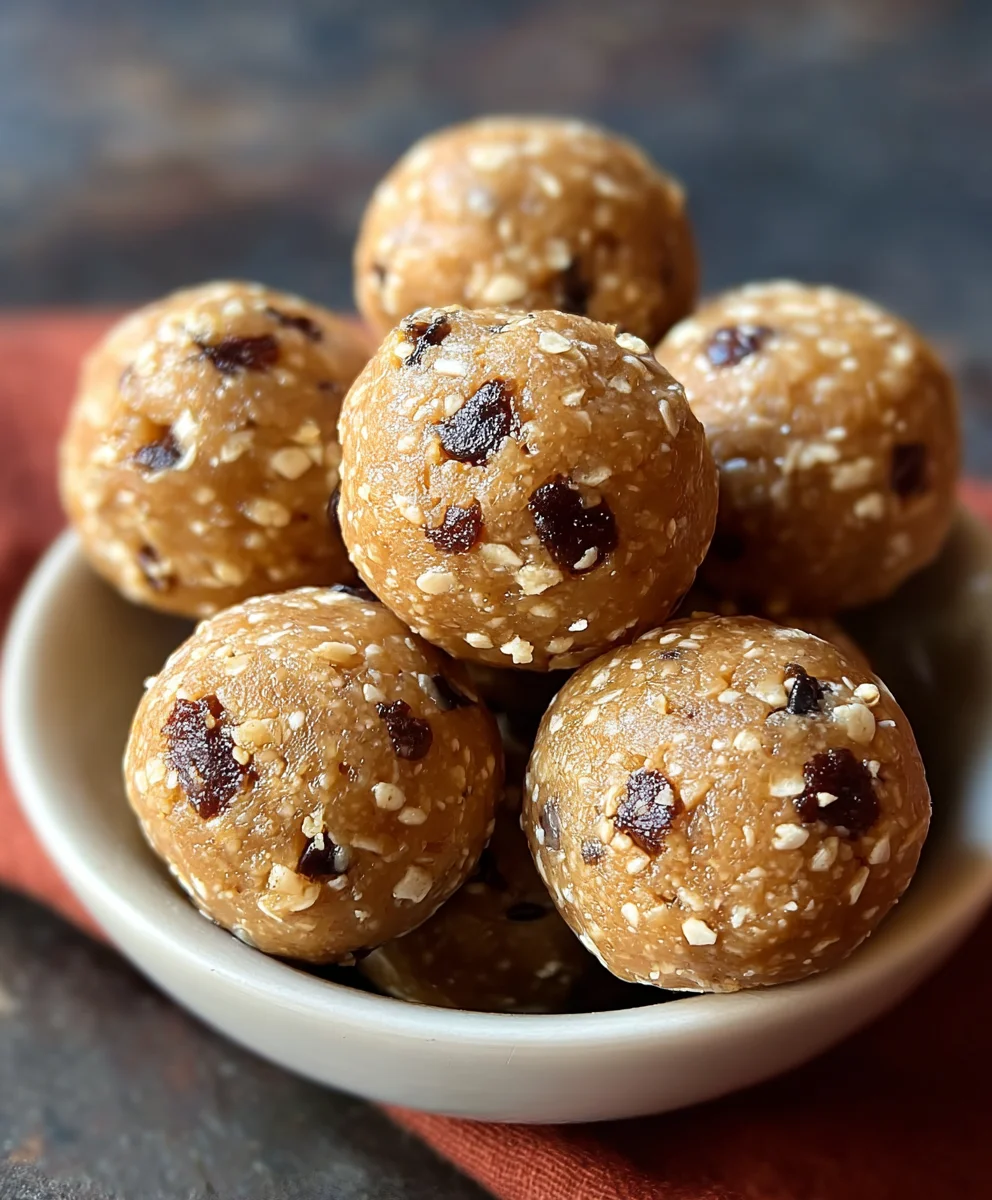
With your delicious cookie dough base ready, it’s time to form your No-Bake Chickpea Cookie Bites. Take small portions of the dough and roll them between your palms into bite-sized balls. The size is up to you, but aim for something around 1 inch in diameter for easy snacking. As you roll, the dough should hold its shape easily due to the binder ingredients. Place the rolled balls onto a baking sheet lined with parchment paper. This prevents them from sticking and makes for easy cleanup. Once all the dough is rolled into balls, you’ll need to let them firm up. Transfer the baking sheet to the refrigerator and chill for at least 30 minutes. This chilling process is crucial for no-bake recipes as it allows the ingredients to meld and the bites to firm up, making them perfectly scoopable and enjoyable.
Enjoying Your Creations
After chilling, your No-Bake Chickpea Cookie Bites are ready to be enjoyed! They are best stored in an airtight container in the refrigerator to maintain their texture. These little bites are wonderfully satisfying, packed with wholesome ingredients, and incredibly easy to make. They’re a fantastic option for a midday pick-me-up, a post-workout snack, or even a healthier dessert option. The texture is a delightful blend of chewy from the oats and a soft, tender base from the chickpeas, punctuated by the melty chocolate chips. You’ll be amazed at how such simple ingredients can create such a delicious treat.
Conclusion:
You’ve now got the secrets to crafting delicious and incredibly easy No-Bake Chickpea Cookie Bites! This recipe is a testament to how simple, wholesome ingredients can create a truly satisfying treat. The combination of sweet, savory, and satisfying textures makes these bites a winner for snack time, dessert, or even a quick energy boost. Don’t be afraid to experiment with the flavors and make them your own!
I love serving these No-Bake Chickpea Cookie Bites chilled straight from the refrigerator, but they are also delightful at room temperature. They pair wonderfully with a glass of cold milk, a cup of tea, or even a shot of espresso for an afternoon pick-me-up. For gatherings, they are always a hit and a fantastic option for those with dietary restrictions.
The beauty of this recipe lies in its adaptability. Feel free to swap out the chocolate chips for dried cranberries, chopped nuts, or even shredded coconut. A pinch of cinnamon or a dash of vanilla extract can also elevate the flavor profile. The core ingredients of chickpeas and sweetener are remarkably versatile. So go forth and create your perfect version of these delightful No-Bake Chickpea Cookie Bites – I’m sure you’ll find them irresistible!
Frequently Asked Questions:
Q: How long do No-Bake Chickpea Cookie Bites typically last?
Stored in an airtight container in the refrigerator, these No-Bake Chickpea Cookie Bites should stay fresh for up to 5 to 7 days. They might become slightly firmer in texture as they chill.
Q: Can I make these No-Bake Chickpea Cookie Bites vegan?
Absolutely! This recipe is naturally vegan if you use vegan chocolate chips and a plant-based sweetener like maple syrup or agave nectar. Ensure all your ingredients are certified vegan for peace of mind.
No-Bake Chickpea Cookie Bites
Easy vegan treat made with chickpeas, oats, and chocolate chips. No oven required!
Ingredients
-
15.5 ounces chickpeas (garbanzo beans), drained and dried
-
1/2 cup whole oats
-
1/4 cup maple syrup
-
1 teaspoon vanilla extract
-
1/2 teaspoon salt
-
1/4 cup mini chocolate chips
Instructions
-
Step 1
Ensure chickpeas are thoroughly drained and dried. Spread them on a clean kitchen towel or paper towels to dry, or let them air dry for a bit. The drier they are, the better the final consistency will be. Place the dried chickpeas into a food processor. -
Step 2
Pulse the chickpeas a few times to break them down. Add the whole oats to the food processor and continue processing until you achieve a coarse meal consistency, where oat grains are still visible. -
Step 3
Add the maple syrup, vanilla extract, and salt to the food processor. Process until the mixture starts to come together into a cohesive, slightly sticky dough that holds its shape when pressed. -
Step 4
Add the mini chocolate chips to the food processor and pulse just a few times to distribute them evenly without over-processing. -
Step 5
Take small portions of the dough and roll them between your palms into bite-sized balls (about 1 inch in diameter). Place the rolled balls onto a baking sheet lined with parchment paper. -
Step 6
Transfer the baking sheet to the refrigerator and chill for at least 30 minutes to allow the bites to firm up.
Important Information
Nutrition Facts (Per Serving)
It is important to consider this information as approximate and not to use it as definitive health advice.
Allergy Information
Please check ingredients for potential allergens and consult a health professional if in doubt.

Leave a Comment