
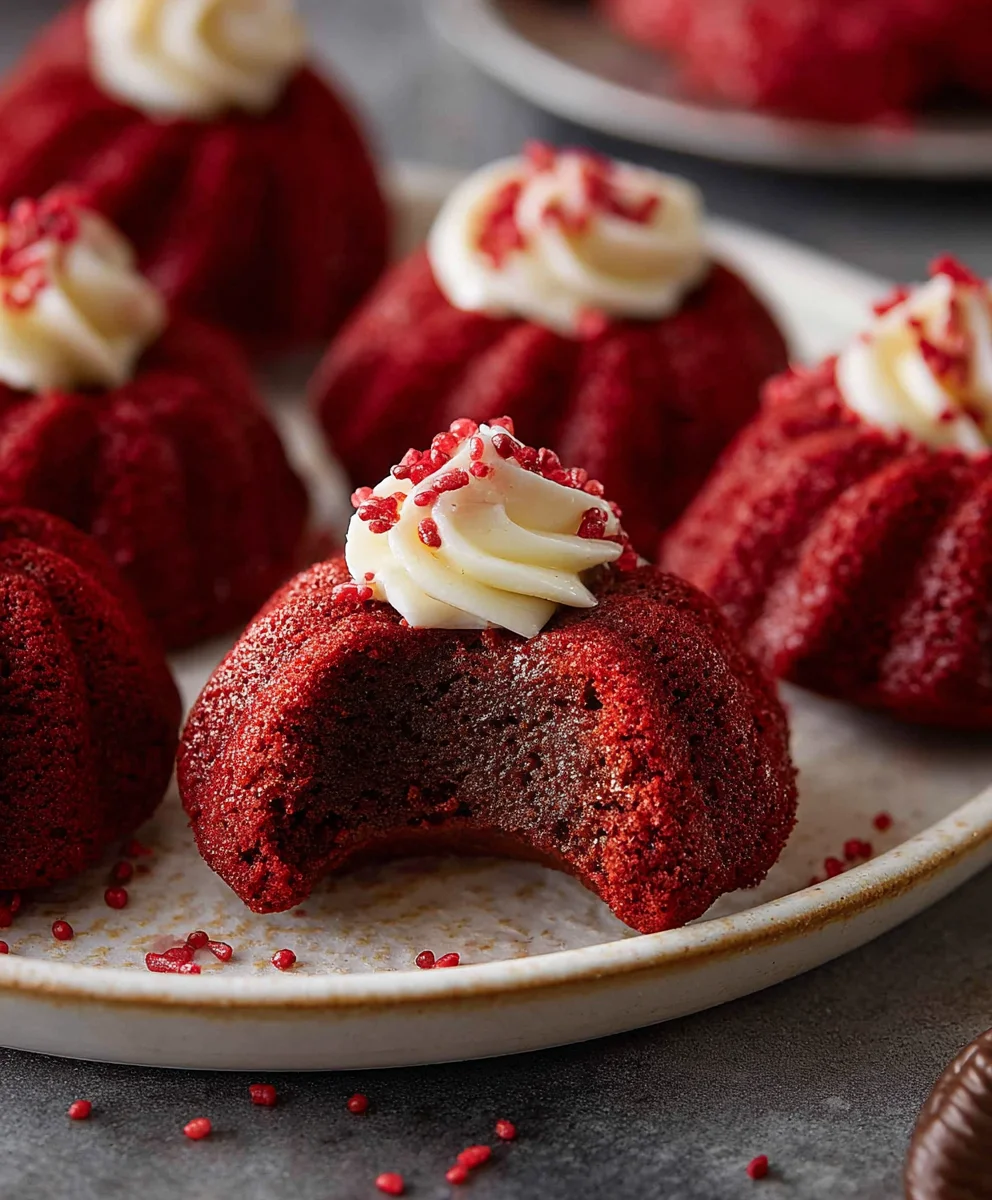
Hershey’s red velvet blossoms are more than just a cookie; they’re a little bite of nostalgic joy and vibrant festivity. Imagin extracte a perfect blend of rich, slightly tangy red velvet cake meeting the sweet, comforting embrace of a classic chocolate kiss. That’s the magic that happens when you combine these two iconic flavors. People absolutely adore Hershey’s red velvet blossoms because they hit all the right notes: they’re visually stunning with their deep red hue, incredibly moist and chewy with a hint of cocoa, and that crown of a Hershey’s Kiss adds an extra layer of delightful chocolatey goodness. What truly makes them special is the surprising depth of flavor in such a simple cookie. The subtle tang from the buttermilk or cream cheese, often found in red velvet, perfectly balances the sweetness, creating a sophisticated yet utterly approachable treat that’s perfect for holidays, celebrations, or just when you need a little pick-me-up. Get ready to fall in love with these irresistible Hershey’s red velvet blossoms!”

Ingredients:
- 7 tablespoons butter, softened (salted or unsalted works, but if unsalted, you’ll want to ensure your salt measurement is precise)
- 1/2 cup packed brown sugar
- 2 tablespoons granulated sugar
- 1 teaspoon vanilla extract
- 1 large egg yolk
- 1/4 teaspoon red food coloring gel (gel provides a more vibrant color without adding excess liquid)
- 1 cup all-purpose flour
- 1 tablespoon unsweetened cocoa powder
- 1/2 teaspoon baking powder
- 1/4 teaspoon salt
- 1/4 cup red sanding sugar
- 18 Hershey’s chocolate kisses, unwrapped
Preparing the Red Velvet Cookie Dough
Creaming the Butter and Sugars
- In a large mixing bowl, start by creaming together the softened butter, brown sugar, and granulated sugar. You want to beat these together until the mixture is light, fluffy, and well combined. This process incorporates air into the dough, which helps create a tender cookie. I like to use an electric mixer on medium-high speed for about 2-3 minutes, scraping down the sides of the bowl as needed to ensure everything is incorporated evenly. The texture should be smooth and uniform, with no large lumps of butter remaining.
Adding Wet Ingredients and Color
- Next, add the vanilla extract and the egg yolk to the creamed butter and sugar mixture. Beat again until just combined. It might look a little curdled at this stage, which is perfectly normal. Now comes the fun part: the red velvet color! Add the 1/4 teaspoon of red food coloring gel. Mix thoroughly until you achieve a consistent, beautiful red hue throughout the dough. Using gel food coloring is key here because it’s highly concentrated, meaning you can get a deep color without adding too much liquid, which could make your cookies spread too much. Stir until the color is evenly distributed and there are no streaks of uncolored dough.
Incorporating Dry Ingredients
- In a separate medium bowl, whisk together the all-purpose flour, unsweetened cocoa powder, baking powder, and salt. Whisking these dry ingredients together before adding them to the wet ingredients ensures that the leavening agent (baking powder) and salt are evenly distributed, preventing pockets of bitterness or poor rise in your finished cookies. Gradually add this dry mixture to the wet ingredients in the large bowl. Mix on low speed or by hand with a spatula until just combined. Be careful not to overmix at this stage. Overmixing can develop the gluten in the flour too much, resulting in tough cookies. Stop mixing as soon as you no longer see streaks of dry flour. The dough will be thick and slightly sticky.
Shaping and Baking the Hershey’s Red Velvet Blossoms
Forming the Cookie Balls and Rolling
- Now it’s time to form the cookie dough into balls. I find it easiest to use a tablespoon or a small cookie scoop (about 1-1.5 inches in diameter) to portion the dough. Roll each portion into a smooth ball. Place the red sanding sugar in a shallow dish or bowl. Gently roll each cookie dough ball in the red sanding sugar, pressing lightly to coat the entire surface. This sanding sugar not only adds a beautiful sparkle and festive color but also creates a lovely crunchy exterior. Arrange the coated dough balls on a baking sheet lined with parchment paper, leaving about 2 inches of space between each cookie to allow for spreading.
Adding the Chocolate Kiss and Baking
- Preheat your oven to 350°F (175°C). This temperature is ideal for creating cookies that are slightly crisp on the edges and soft in the center. Once your dough balls are prepared and on the baking sheet, gently press one unwrapped Hershey’s chocolate kiss into the center of each cookie dough ball. You want to press it down firmly enough so that it’s partially submerged into the dough, but not so hard that the dough cracks significantly around the edges. As the cookies bake, the dough will spread and encase more of the chocolate kiss. Bake for 9-12 minutes, or until the edges of the cookies are set and lightly golden, but the centers still look slightly soft. Don’t overbake, as this will result in a dry cookie.
Cooling and Finishing Touches
- Once baked, carefully remove the baking sheet from the oven. Let the cookies cool on the baking sheet for about 5 minutes. This is a crucial step because the cookies are very delicate when hot, and the chocolate kiss will be molten. Allowing them to cool slightly on the hot baking sheet allows them to firm up just enough. After 5 minutes, use a thin spatula to carefully transfer the Hershey’s red velvet blossoms to a wire rack to cool completely. As they cool, the chocolate kiss will continue to set, and the cookie will achieve its final texture. The aroma of warm chocolate and red velvet is simply irresistible!

Conclusion:
And there you have it – a delightful journey into creating the perfect Hershey’s red velvet blossoms! These cookies are more than just a sweet treat; they’re a vibrant burst of flavor and color that will impress any guest. We’ve walked through each step, from creaming the butter and sugar to achieving that signature crackle top. Remember, the key to their unique character lies in the rich cocoa and the subtle tang of buttermilk, perfectly complemented by that iconic Hershey’s Kiss nestled in the center.
These Hershey’s red velvet blossoms are wonderfully versatile. Serve them warm from the oven with a glass of cold milk for a classic indulgence, or perhaps with a cup of coffee for a more sophisticated pairing. They also make a stunning addition to any cookie platter, especially during holidays or celebrations. Don’t be afraid to get creative with variations! You could experiment with different flavored Hershey’s Kisses, like peppermint or pumpkin spice, or even add a touch of almond extract to the dough for an extra layer of complexity. No matter how you choose to enjoy them, I encourage you to bake these Hershey’s red velvet blossoms with joy and share the delicious results!
FAQs:
Why do my Hershey’s red velvet blossoms have cracks?
The characteristic crackle top on Hershey’s red velvet blossoms is intentional and a hallmark of this cookie! It occurs as the cookie bakes and puffs up, then settles down, creating those beautiful fissures. Ensuring your ingredients are at room temperature and not overmixing the dough can contribute to this desirable texture.
Can I make the dough for Hershey’s red velvet blossoms ahead of time?
Absolutely! You can prepare the dough for your Hershey’s red velvet blossoms and refrigerate it for up to 3 days. Allow it to soften slightly at room temperature for about 15-20 minutes before scooping and baking for optimal results. This is a great way to save time if you’re planning a party or need a last-minute dessert.
Hershey’s Red Velvet Blossoms – Easy Holiday Cookies
A simple and festive recipe for red velvet cookies topped with Hershey’s chocolate kisses, perfect for the holidays.
Ingredients
-
7 tablespoons butter, softened
-
1/2 cup packed brown sugar
-
2 tablespoons granulated sugar
-
1 teaspoon vanilla extract
-
1 large egg yolk
-
1/4 teaspoon red food coloring gel
-
1 cup all-purpose flour
-
1 tablespoon unsweetened cocoa powder
-
1/2 teaspoon baking powder
-
1/4 teaspoon salt
-
1/4 cup red sanding sugar
-
18 Hershey’s chocolate kisses, unwrapped
Instructions
-
Step 1
Cream together softened butter, brown sugar, and granulated sugar in a large bowl until light and fluffy. Use an electric mixer on medium-high speed for about 2-3 minutes, scraping down the sides as needed. -
Step 2
Add vanilla extract and egg yolk to the creamed mixture and beat until just combined. Stir in the red food coloring gel until a consistent red hue is achieved. -
Step 3
In a separate bowl, whisk together flour, cocoa powder, baking powder, and salt. Gradually add this dry mixture to the wet ingredients, mixing on low speed or by hand until just combined. Do not overmix. -
Step 4
Portion the dough into balls (about 1-1.5 inches in diameter). Roll each ball in red sanding sugar, pressing lightly to coat. Arrange on a parchment-lined baking sheet with 2 inches of space between cookies. -
Step 5
Preheat oven to 350°F (175°C). Gently press one unwrapped Hershey’s chocolate kiss into the center of each cookie dough ball. -
Step 6
Bake for 9-12 minutes, or until cookie edges are set and lightly golden, and centers appear soft. -
Step 7
Let cookies cool on the baking sheet for 5 minutes before carefully transferring them to a wire rack to cool completely.
Important Information
Nutrition Facts (Per Serving)
It is important to consider this information as approximate and not to use it as definitive health advice.
Allergy Information
Please check ingredients for potential allergens and consult a health professional if in doubt.
Leave a Comment