
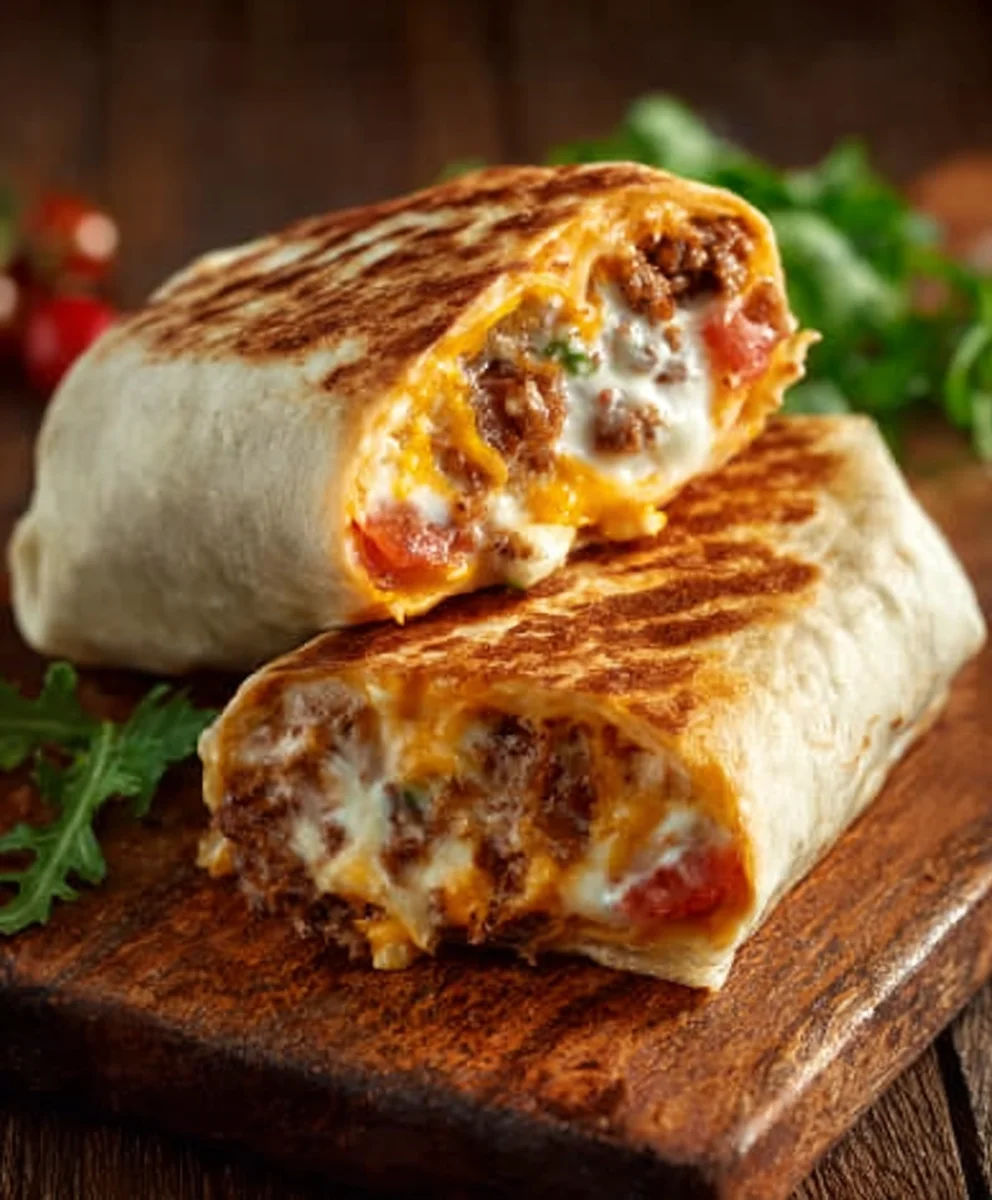
Grilled Cheese Burrito recipes are a culinary masterpiece, a delightful fusion that takes two beloved comfort foods and elevates them to a whole new level. Who doesn’t adore the gooey, melty goodness of a perfectly grilled cheese sandwich, or the satisfying hug of a warm, flavorful burrito? When you combine these titans of taste, you get something truly spectacular, something that sparks joy and ignites cravings with every single bite. What makes this particular creation so utterly irresistible? It’s the perfect marriage of textures – the crispy, golden-brown tortilla encasing a molten core of cheese, perhaps with a few surprising additions that send your taste buds on an adventure. This isn’t just a meal; it’s an experience, a nostalgic nod to childhood favorites made sophisticated enough for any adult palate. Get ready to discover why the Grilled Cheese Burrito has become an instant classic in kitchens everywhere.

Ingredients:
- 1 lb ground beef
- 1 packet taco seasoning (or your favorite homemade blend)
- 1 cup cooked white rice
- 1/2 cup sour cream
- 1/2 cup nacho cheese sauce
- 1/4 cup chipotle sauce
- 1 cup shredded cheddar cheese
- 1 cup shredded mozzarella
- 4 large flour tortillas
- Butter or cooking oil for grilling
Preparing the Savory Filling
First things first, let’s get our flavorful ground beef mixture ready. This is the heart of our Grilled Cheese Burrito, so we want to make sure it’s packed with taste. Take your 1 lb of ground beef and place it into a large skillet over medium-high heat. Break up the beef with a spoon or spatula as it cooks. You’re looking for it to be nicely browned and no longer pink. This usually takes about 7-10 minutes, depending on your stove. Once the beef is fully cooked, carefully drain off any excess grease. This step is important for a cleaner taste and texture in the final burrito.
Now, it’s time to add the flavor! Sprinkle the entire packet of taco seasoning over the browned ground beef. If you’re using a homemade blend, now’s the time to add it. Stir everything together thoroughly, making sure each piece of beef is coated in the seasoning. Let it cook for another minute or two, allowing the spices to bloom and release their aromas. This really enhances the taco flavor. After seasoning, reduce the heat to low and stir in the 1 cup of cooked white rice. The rice adds a nice textural element and helps to bind everything together. Continue to stir until the rice is heated through.
Finally, for our creamy and spicy filling, we’ll add the sauces. Stir in the 1/2 cup of sour cream. The sour cream will add a pleasant tangin extractess and help to mellow out the spices a bit. Next, add the 1/2 cup of nacho cheese sauce. This will give our filling that irresistible cheesy gooiness. Finally, drizzle in the 1/4 cup of chipotle sauce. The chipotle sauce brings a smoky heat and a touch of spice that elevates the whole flavor profile. Stir everything until it’s well combined and the filling has a rich, cohesive texture. Turn off the heat and set this delicious mixture aside for a moment.
Assembling and Grilling Your Masterpiece
Now comes the exciting part: assembling our incredible Grilled Cheese Burritos! Lay out your 4 large flour tortillas on a clean, flat surface. It’s a good idea to slightly warm the tortillas beforehand – you can do this by briefly microwaving them or by warming them in a dry skillet for a few seconds per side. This makes them more pliable and less likely to tear when you roll them up.
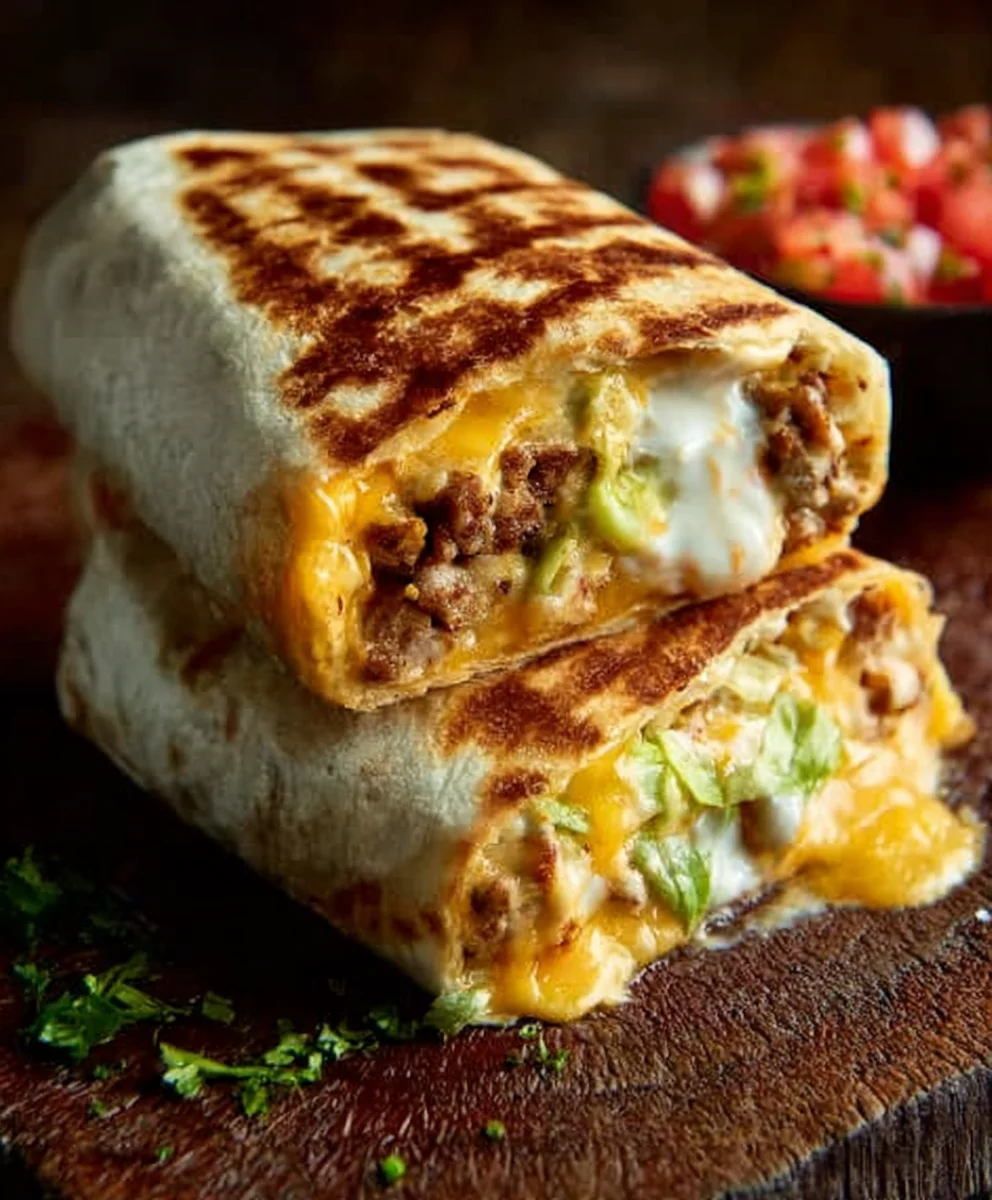
Spoon a generous portion of the savory ground beef and rice filling onto the center of each tortilla. Don’t overfill them, or they’ll be difficult to wrap. Aim for enough filling to create a substantial, but manageable, cylinder. Sprinkle about half of the shredded cheddar cheese and half of the shredded mozzarella cheese over the filling on each tortilla. You want a good amount of cheese to get that amazing melty pull.
Now, it’s time to wrap them up like a burrito. Fold in the sides of the tortilla towards the center, then tightly roll up the tortilla from the bottom, tucking the filling in as you go. The goal is to create a compact package that won’t leak during grilling. Repeat this process for all four tortillas.
Finally, let’s get grilling! Heat a large skillet or griddle over medium heat. Add a tablespoon or two of butter or cooking oil. Once the butter is melted and sizzling (or the oil is shimmering), carefully place 1 or 2 of your wrapped burritos onto the hot skillet, seam-side down. Grill for about 3-5 minutes per side, or until the tortillas are golden brown and crispy, and the cheese inside is wonderfully melted and gooey. You might need to adjust the heat slightly to prevent burning while ensuring the inside is heated through and the cheese is fully melted. Once one side is beautifully browned, carefully flip the burrito to cook the other side. Repeat this process for any remaining burritos, adding more butter or oil to the skillet as needed. The aroma of the grilling cheese and seasoned beef will be incredible!
Conclusion:
And there you have it! Your very own delicious Grilled Cheese Burrito is ready to be devoured. We’ve walked through creating this unique and satisfying meal, blending the comforting essence of grilled cheese with the hearty portability of a burrito. The combination of gooey melted cheese, warm tortilla, and savory fillings is truly a culinary delight that’s surprisingly easy to master.
For serving, I love to pair this Grilled Cheese Burrito with a side of salsa, sour cream, or even a simple green salad. It’s also fantastic dipped into a warm tomato soup for an ultimate comfort food experience. Don’t be afraid to get creative with your fillings! Think about adding some seasoned ground beef, shredded chicken, black beans, or even some sautéed vegetables to elevate your burrito even further. The possibilities are truly endless!
I hope you enjoyed making and tasting this amazing Grilled Cheese Burrito . It’s a recipe that’s sure to become a favorite in your household, perfect for a quick weeknight dinner or a fun weekend lunch. Give it a try and let me know what you think!
Frequently Asked Questions:
Q1: Can I make the Grilled Cheese Burrito ahead of time?
While the flavors are best when fresh, you can prepare the fillings and toast the tortilla separately and assemble just before serving. The cheese might not be as melty, but it will still be delicious!
Q2: What kind of cheese works best for the Grilled Cheese Burrito?
A blend of cheeses that melt well is ideal. Cheddar, Monterey Jack, Colby Jack, or even a mix of mozzarella and provolone will give you that signature gooey texture.
Q3: How can I make my Grilled Cheese Burrito spicier?
You can easily add a kick by incorporating some diced jalapeños, a dash of hot sauce in the filling, or by using a spicy cheese blend like pepper jack.
Grilled Cheese Burrito
An easy and delicious grilled cheese burrito filled with seasoned ground beef, rice, and a blend of cheeses, grilled to golden perfection.
Ingredients
-
1 lb ground beef
-
1 packet taco seasoning
-
1 cup cooked white rice
-
1/2 cup sour cream
-
1/2 cup nacho cheese sauce
-
1/4 cup chipotle sauce
-
1 cup shredded cheddar cheese
-
1 cup shredded mozzarella cheese
-
4 large flour tortillas
-
Butter or cooking oil for grilling
Instructions
-
Step 1
Brown the ground beef in a skillet over medium-high heat, breaking it up as it cooks. Drain off any excess grease once fully cooked. -
Step 2
Stir in the taco seasoning and cook for 1-2 minutes until fragrant. Add the cooked white rice and stir until heated through. -
Step 3
Add the sour cream, nacho cheese sauce, and chipotle sauce to the beef and rice mixture. Stir until well combined and the filling has a cohesive texture. Remove from heat. -
Step 4
Warm the flour tortillas slightly to make them pliable. Spoon a generous portion of the filling onto the center of each tortilla. -
Step 5
Sprinkle shredded cheddar and mozzarella cheese over the filling on each tortilla. Fold in the sides of the tortilla, then tightly roll up from the bottom. -
Step 6
Heat butter or oil in a large skillet or griddle over medium heat. Place the wrapped burritos seam-side down and grill for 3-5 minutes per side, until golden brown, crispy, and the cheese is melted.
Important Information
Nutrition Facts (Per Serving)
It is important to consider this information as approximate and not to use it as definitive health advice.
Allergy Information
Please check ingredients for potential allergens and consult a health professional if in doubt.

Leave a Comment