
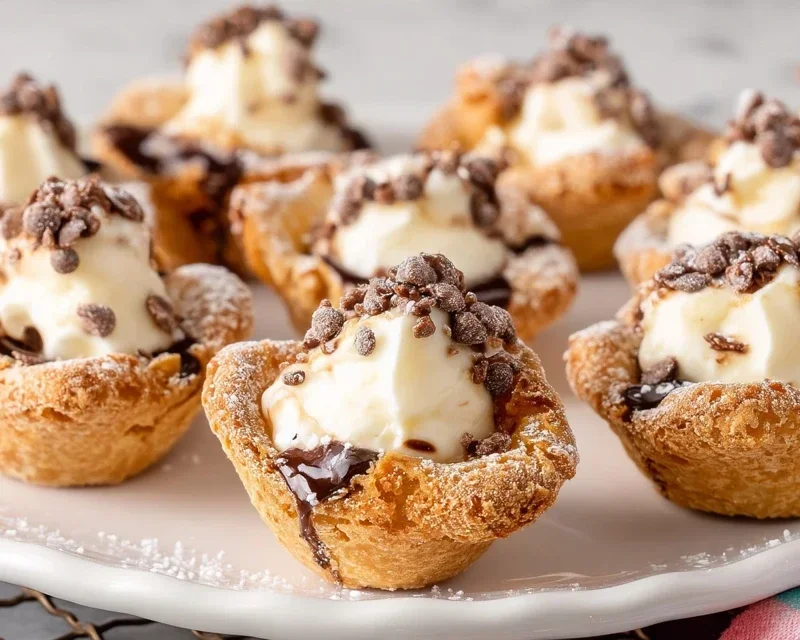
Mini cannoli cups are the adorable, bite-sized answer to your dessert dreams! Who can resist the allure of a perfectly crisp pastry shell cradling a luscious, creamy filling? We certainly can’t! There’s something incredibly satisfying about the textural contrast – the delicate shatter of the shell giving way to the sweet, smooth ricotta. These mini cannoli cups capture all the beloved flavors of their larger counterparts but in a convenient, crowd-pleasing format. They’re perfect for parties, elegant afternoon teas, or simply when you crave a touch of Italian indulgence without the commitment of a full-sized treat. What truly makes these mini cannoli cups special is their versatility; you can get creative with your fillings and toppings, making each tiny cup a unique masterpiece. Prepare to impress yourselves and your guests with this delightful recipe!

Mini Cannoli Cups
Are you craving the delightful crispness and creamy filling of cannoli, but don’t have the time or equipment for traditional frying? Look no further! These Mini Cannoli Cups offer all the iconic flavors and textures of authentic cannoli in a remarkably easy-to-make, baked version. We’re using readily available refrigerated pie crusts, which transform into perfectly golden, bite-sized shells that cradle a sweet, luscious ricotta filling. These are absolutely perfect for parties, dessert buffets, or just a special treat when you want something truly decadent without the fuss. Let’s dive into making these delightful little packages of joy!
Ingredients:
Preparing the Ricotta Filling
The heart of any cannoli is its filling, and ours is no exception. This part is incredibly simple and comes together in just a few minutes. First, ensure your ricotta cheese is well-drained. This is a crucial step to prevent a watery filling. You can drain it by placing it in a fine-mesh sieve set over a bowl for at least 30 minutes, or even overnight in the refrigerator. Once drained, place the ricotta in a medium bowl. Add the 1/2 cup of powdered sugar, 2 tablespoons of granulated sugar, the finely grated orange or lemon zest (I prefer orange for a classic cannoli flavor, but lemon adds a delightful tang!), and the vanilla extract. Stir everything together with a spoon or a spatula until it’s smooth, creamy, and well combined. Taste it and adjust the sweetness if you desire. You can cover this mixture and refrigerate it while you prepare the pie crust shells.
Crafting the Pie Crust Shells
This is where the magic happens with these simplified cannoli cups. Take your softened refrigerated pie crusts out of their packagin extractg. You’ll want to work with them quickly before they become too sticky. Lightly flour your work surface and gently unroll one of the pie crusts. Using a round cookie cutter or even a small bowl or glass that’s about 3-4 inches in diameter, cut out as many circles as you can from the crust. You should get about 6-8 circles from each crust. Repeat this with the second pie crust. You’ll want to gather any scraps, gently re-roll them (don’t overwork the dough), and cut out additional circles until you’ve used up all the dough.
Next, we need to shape these circles into cups. This is where the turbinado sugar and cinnamon come in. In a shallow dish, mix together the 3 tablespoons of turbinado sugar and the 1 teaspoon of ground cinnamon. This spiced sugar mixture will coat the outside of our pie crusts, giving them a beautiful sparkle and a hint of warm spice. Lightly brush both sides of each pie crust circle with water. Then, dip each water-brushed circle into the turbinado sugar and cinnamon mixture, ensuring it’s coated on both sides. This coating will help the crust get wonderfully crisp and add a lovely crunchy exterior.
Baking the Shells
Preheat your oven to 375°F (190°C). Lightly grease a mini muffin tin or a standard muffin tin depending on the size of your pastry circles. If you’re using a standard muffin tin and your circles are a bit too large, you can gently press them down into the cups. For a more defined cup shape, you can also use small oven-safe ramekins or even shape them over the outside of greased muffin tin cups to create more of a shell. If you don’t have a muffin tin, you can also try shaping them on a baking sheet, though they might not hold their shape as well.
Carefully place the sugar-coated pie crust circles into the prepared muffin tin cups. You want them to nestle into the cups, creating a bowl-like shape. Gently press down the centers. Bake for approximately 10-12 minutes, or until the edges are golden brown and puffed up slightly. Keep a close eye on them, as pie crust can brown quickly. Once they are a beautiful golden color, remove the muffin tin from the oven.
Cooling and Filling
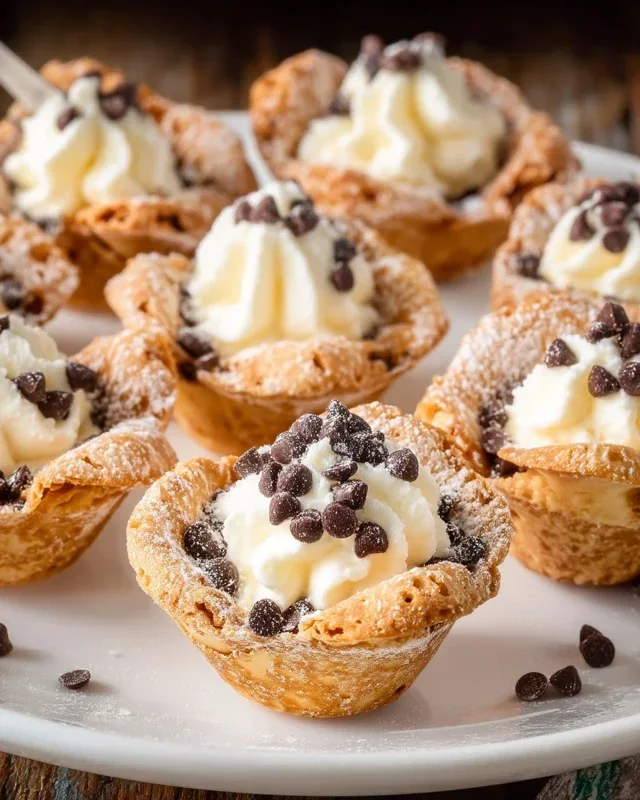
Allow the baked pie crust cups to cool in the muffin tin for a few minutes before carefully removing them. You can use a small offset spatula or a butter knife to gently loosen them from the tin if needed. Place them on a wire rack to cool completely. It’s essential that they are completely cool before you fill them, otherwise the heat will melt the ricotta filling. While the shells are cooling, you can stir your miniature chocolate chips or finely chopped pistachios into the prepared ricotta filling. This adds a delightful texture and flavor contrast.
Assembling Your Mini Cannoli Cups
Once the pie crust shells are completely cool, it’s time for the final, most exciting step: filling them! Spoon or pipe the ricotta filling generously into each cooled pie crust cup. Don’t be shy; fill them up! You can use a piping bag with a wide tip for a neater presentation, or simply use a spoon to fill them. If you’re using miniature chocolate chips, make sure they’re distributed evenly throughout the filling. If you’re using pistachios, you can also sprinkle a few more on top for garnish.
For a beautiful finish, dust the tops of your filled Mini Cannoli Cups with additional powdered sugar. You can use a fine-mesh sieve for an even coating. These are best served shortly after filling to ensure the crust remains crisp. You can make the filling and bake the shells ahead of time, storing them separately. Then, just assemble them before serving for the ultimate fresh cannoli experience! Enjoy these easy and delicious treats!
Conclusion:
These mini cannoli cups are an absolute delight, offering all the classic, irresistible flavors of traditional cannoli in a perfectly portioned, easy-to-make treat. Their delightful crunch from the baked shells, combined with the smooth, creamy, and subtly sweet ricotta filling, creates a truly satisfying dessert experience. They are wonderfully versatile, making them ideal for any occasion, from casual gatherings to more formal celebrations. I truly hope you give this mini cannoli cups recipe a try – it’s a winner every time!
For serving, I love to dust them with a final sprinkle of powdered sugar and perhaps a few extra chocolate chips for visual appeal. They are fantastic as is, but also pair beautifully with fresh berries, a drizzle of chocolate sauce, or even a dusting of finely chopped pistachios. Don’t be afraid to experiment with variations either! You can add a touch of citrus zest (like orange or lemon) to the filling for a brighter flavor, or even mix in some mini chocolate chips or dried fruit directly into the ricotta mixture before piping. The possibilities are endless, and each variation promises a unique and delicious outcome.
Frequently Asked Questions:
Can I make the cannoli shells ahead of time?
Yes, absolutely! Once baked and completely cooled, you can store the mini cannoli cups in an airtight container at room temperature for up to 2 days. It’s best to fill them closer to serving time to maintain their crispness.
What if I don’t have a mini cannoli mold?
No problem! You can improvise by cutting out circles from puff pastry sheets and shaping them around small metal or foil tubes (like those from parchment paper rolls, cleaned thoroughly). Alternatively, you can bake small, flat rounds of dough and then carefully shape them into cups while they are still warm and pliable.
Can I use a different cheese for the filling?
While ricotta is traditional and yields the best flavor and texture for cannoli, you could experiment with a blend of ricotta and mascarpone cheese for an even richer filling. Ensure you drain the ricotta very well to avoid a watery filling.
Mini Cannoli Cups
A delightful and simplified take on classic cannoli, these mini cups are perfect for parties and sweet cravings. Made with easy-to-find ingredients, they offer all the traditional flavor without the fuss of frying shells.
Ingredients
-
1 container whole-milk ricotta cheese (15 oz., drained)
-
1/2 cup powdered sugar
-
2 tablespoons granulated sugar
-
1 teaspoon finely grated orange zest
-
1/2 teaspoon vanilla extract
-
1 box refrigerated pie crusts, softened as directed on box (2 count)
-
3 tablespoons turbinado sugar
-
1 teaspoon ground cinnamon
-
1/4 cup miniature semisweet chocolate chips
-
additional powdered sugar, for dusting
Instructions
-
Step 1
Preheat your oven to 375°F (190°C). Lightly grease a mini muffin tin. -
Step 2
In a medium bowl, combine the drained ricotta cheese, 1/2 cup powdered sugar, 2 tablespoons granulated sugar, orange zest, and vanilla extract. Mix until smooth and well combined. Stir in the miniature chocolate chips. -
Step 3
Unroll the refrigerated pie crusts. Cut each crust into 6 equal squares. Press each square into the cups of the prepared mini muffin tin, forming a cup shape. -
Step 4
Bake for 12-15 minutes, or until the crusts are golden brown and slightly puffed. Let them cool in the tin for a few minutes before carefully removing them to a wire rack to cool completely. -
Step 5
In a small bowl, combine the turbinado sugar and ground cinnamon. Roll the cooled cannoli cups in this mixture to coat the edges or sprinkle it inside. -
Step 6
Spoon or pipe the ricotta filling into the cooled cannoli cups. Dust with additional powdered sugar just before serving.
Important Information
Nutrition Facts (Per Serving)
It is important to consider this information as approximate and not to use it as definitive health advice.
Allergy Information
Please check ingredients for potential allergens and consult a health professional if in doubt.
Leave a Comment