
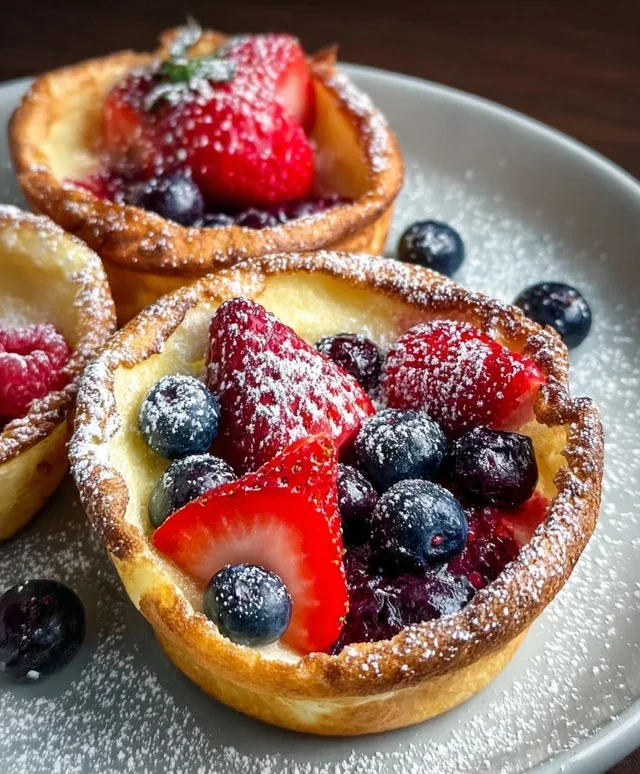
Mini Berry Dutch Babies are a delightful and surprisingly simple breakfast or brunch treat that’s sure to impress. Imagin extracte a puffed-up, golden cloud, kissed with the sweetness of fresh berries, emergin extractg from your oven. That’s the magic of a Dutch Baby, and these mini versions are just as spectacular, if not more so, with their perfectly portioned charm. What makes the Mini Berry Dutch Baby so beloved? It’s the incredible textural contrast: the crispy, slightly chewy edges giving way to a tender, custardy interior. Plus, the vibrant burst of berries adds a delightful tang that cuts through the richness. They’re elegant enough for a special occasion but easy enough for a lazy weekend morning, offering that wow factor without the fuss. I absolutely adore how versatile they are – you can swap out the berries for whatever’s in season!

Mini Berry Dutch Babies
Imagin extracte waking up to a delightful puff of sweet, eggy goodness, studded with vibrant bursts of berry flavor. That’s exactly what you’ll get with these Mini Berry Dutch Babies. They’re an elegant yet incredibly simple breakfast or brunch treat that feels special enough for guests but is easy enough for a weeknight indulgence. Unlike their larger, single-serving counterparts, these mini versions are perfect for portion control and allow everyone to have their own perfectly puffed creation. The magic of a Dutch baby lies in its dramatic puff-up in a hot pan, creating a cloud-like texture that’s crispy on the edges and custardy in the center. Adding fresh or frozen berries elevates this classic to a fruity delight that’s both beautiful and delicious. Let’s get started!
Ingredients:
Preparing the Batter: The Foundation of Flavor
The first step to creating these delightful mini Dutch babies is to whip up a simple yet crucial batter. This batter is surprisingly light and airy, which is key to achieving that signature puff. You’ll want to start by whisking together your dry ingredients. In a medium bowl, combine the flour, sugar, and baking powder. The baking powder, though a small amount, plays a vital role in giving the Dutch babies that extra lift and tender texture. Give these dry ingredients a good whisk to ensure they are well combined and there are no lumps of baking powder. This ensures an even rise throughout your batter.
Next, in a separate, larger bowl, whisk your eggs until they are lightly beaten and just combined. It’s important not to over-whisk the eggs at this stage; we’re not aiming for a foamy meringue. Once the eggs are ready, gradually add the milk while whisking continuously. Now, pour in that fragrant vanilla extract. Vanilla is a classic pairing with berries and adds a wonderful depth of flavor to the Dutch babies that complements the sweetness of the berries beautifully.
Now it’s time to combine the wet and dry ingredients. Make a well in the center of your egg and milk mixture and gradually pour in the flour mixture. Whisk everything together until you have a smooth, lump-free batter. It should have the consistency of thin pancake batter or heavy cream. Don’t overmix; once the flour is incorporated, stop whisking. A few tiny lumps are perfectly fine, as overmixing can develop the gluten in the flour, leading to a tougher Dutch baby. You can also use an immersion blender for a super-smooth batter in seconds, just be careful not to over-blend.
Preheating the Oven and Preparing the Pans: The Crucial Heat
This is perhaps the most important step for achieving that dramatic puff. Dutch babies rely on extreme heat to transform from a thin batter into a towering, airy pastry. You’ll need to preheat your oven to a very hot 425°F (220°C). Make sure your oven rack is in the middle position to ensure even cooking.
While the oven is heating up, you need to prepare your individual baking vessels. For mini Dutch babies, I recommend using a standard muffin tin or individual ramekins. You’ll want to grease each cavity generously. This is where the melted unsalted butter comes in. Brush or spoon about ½ teaspoon of the melted butter into each muffin cup or ramekin. Make sure to coat the sides and the bottom thoroughly. The butter not only prevents sticking but also helps to create those delicious crispy edges as the Dutch baby bakes. Place your greased muffin tin or ramekins into the preheating oven for about 5-10 minutes. We want these vessels to be screaming hot before the batter goes in. This intense heat shock is what causes the rapid expansion of the batter.
Assembling and Baking: The Moment of Transformation
Once your oven is fully preheated and your muffin tin or ramekins are sizzling hot, it’s time to assemble these little wonders. Carefully remove the hot muffin tin or ramekins from the oven. Be extremely cautious, as they will be very hot! Quickly and evenly distribute your prepared batter among the hot muffin cups or ramekins. Fill each about two-thirds of the way full.
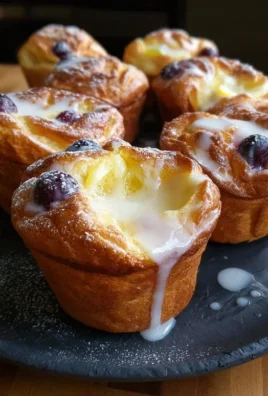
Now, it’s time for the stars of the show – the berries! Gently scatter the blueberries and diced strawberries over the batter in each cup. Some berries might sink slightly, which is perfectly normal and will create lovely pockets of fruit within the baked Dutch baby.
Immediately place the muffin tin back into the hot oven. Bake for 15-20 minutes, or until the Dutch babies are dramatically puffed up, golden brown around the edges, and set in the center. You’ll see them rise dramatically, almost like little edible soufflés, and then settle slightly as they finish baking. Avoid opening the oven door during the first 10-12 minutes of baking, as this can cause them to deflate prematurely.
Serving Suggestions: The Sweet Finish
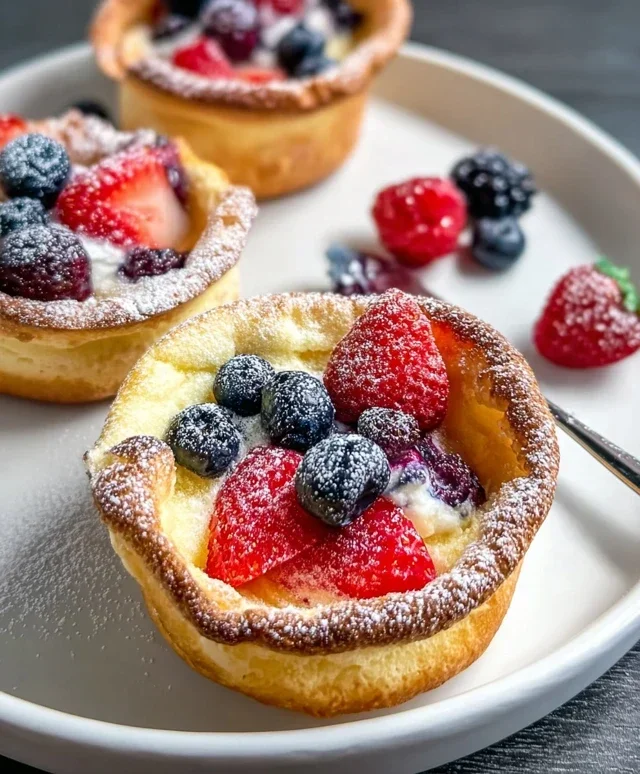
As soon as they come out of the oven, your Mini Berry Dutch Babies will begin extract to deflate slightly. This is perfectly natural. They are best served immediately while they are still warm and at their puffiest. They will continue to cook a little from residual heat, so it’s important to get them to the table promptly.
To serve, you can either serve them directly from the muffin tin or carefully use a small offset spatula or a butter knife to loosen them from the sides of the cups and gently lift them onto a serving platter. The tops will be beautifully golden and slightly crisp, while the inside will be soft and custardy.
The classic accompaniments for Dutch babies are powdered sugar and maple syrup, and they work wonderfully here too. A light dusting of icing sugar adds a touch of sweetness and visual appeal, making them look even more like delicate pastries. For a more decadent experience, a drizzle of warm maple syrup is absolutely divine. You can also get creative with other toppings, such as a dollop of whipped cream, a sprinkle of toasted nuts, or even a spoonful of Greek yogurt for a tangier contrast. These Mini Berry Dutch Babies are a delightful way to start your day or a charming addition to any brunch spread, offering a taste of pure comfort and joy.
Conclusion:
I truly hope you’ve enjoyed learning how to make these delightful Mini Berry Dutch Babies! They are an absolute showstopper, incredibly easy to whip up, and perfect for any occasion. The combination of the puffed, custardy edges and the tender, berry-studded center makes for a wonderfully satisfying breakfast, brunch, or even a light dessert. Their individual portions make them ideal for entertaining or simply for a special treat just for yourself. Don’t be intimidated by the puff – it’s part of the magic and always impressive!
These Mini Berry Dutch Babies are wonderfully versatile. Serve them warm straight from the oven with a dusting of powdered sugar, a dollop of whipped cream, or a drizzle of maple syrup. Fresh berries are fantastic, but you can also try a mix of frozen berries for convenience. For a different flavor profile, consider adding a pinch of cinnamon or nutmeg to the batter, or swapping the berries for thinly sliced apples or pears sautéed with a little butter and brown sugar. I encourage you to give this recipe a try; it’s a guaranteed hit and so much fun to make!
Frequently Asked Questions:
What is the best way to serve Mini Berry Dutch Babies?
For the ultimate experience, serve your Mini Berry Dutch Babies immediately after they come out of the oven. They are best enjoyed warm and fluffy. A generous dusting of powdered sugar is a classic and delicious choice. Other fantastic serving suggestions include fresh berries, a dollop of lightly sweetened whipped cream, a swirl of Greek yogurt, or a drizzle of your favorite syrup (maple, agave, or even a berry coulis).
Can I make these ahead of time?
While Mini Berry Dutch Babies are best when fresh, you can prepare the batter a few hours in advance and store it covered in the refrigerator. This allows the gluten to relax, which can sometimes contribute to an even better texture. However, it’s highly recommended to bake them just before serving for the most impressive puffed result.
What other fruits can I use in my Mini Berry Dutch Babies?
The beauty of this recipe is its adaptability! Besides berries, you can use thinly sliced apples, pears, peaches, or even stone fruits like cherries. For a richer flavor, you could lightly sauté firmer fruits like apples or pears with a touch of butter and cinnamon before adding them to the batter. Don’t be afraid to experiment with your favorite seasonal fruits!
Mini Berry Dutch Babies
Delightful individual Dutch babies infused with fresh berries, perfect for breakfast or brunch.
Ingredients
-
¾ cup flour
-
1 cup milk
-
2 eggs
-
¼ cup sugar
-
1 teaspoon vanilla
-
¼ teaspoon baking powder
-
⅓ cup blueberries, fresh or frozen
-
⅓ cup strawberries, diced, fresh or frozen
-
2 teaspoons unsalted butter, melted
-
Icing sugar, for serving, optional
-
Maple syrup, for serving, optional
Instructions
-
Step 1
Preheat oven to 425°F (220°C). Place a 12-cup muffin tin in the oven to heat. -
Step 2
In a blender, combine flour, milk, eggs, sugar, vanilla, and baking powder. Blend until smooth. -
Step 3
Remove the hot muffin tin from the oven. Carefully add about 1 teaspoon of melted butter to each cup. -
Step 4
Pour the batter evenly into the muffin cups, filling each about halfway. Top with blueberries and diced strawberries. -
Step 5
Bake for 15-20 minutes, or until puffed and golden brown. -
Step 6
Serve immediately, dusted with icing sugar and drizzled with maple syrup, if desired.
Important Information
Nutrition Facts (Per Serving)
It is important to consider this information as approximate and not to use it as definitive health advice.
Allergy Information
Please check ingredients for potential allergens and consult a health professional if in doubt.
Leave a Comment