
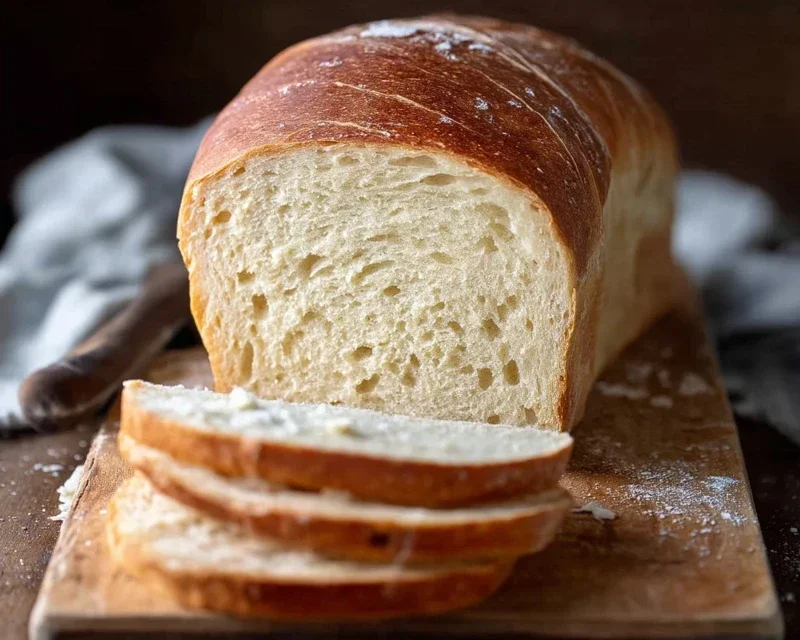
Homemade bread is more than just a food; it’s a sensory experience that transports us back to simpler times. There’s an undeniable magic in transforming humble ingredients – flour, water, yeast, and salt – into a warm, crusty masterpiece that fills your kitchen with an irresistible aroma. Why do we crave this comforting creation? It’s the sheer satisfaction of making something tangible and delicious with your own two hands, a process that’s both grounding and rewarding. The gentle kneading, the patient rise, the golden-brown bake – each step is a mini-meditation, culminating in a loaf that’s infinitely superior to anything store-bought. The slightly chewy interior, the satisfying crackle of the crust, and that incredible, fresh-from-the-oven taste are unparalleled. Learning to make your own homemade bread is an act of love, a way to nourish yourself and your loved ones with something truly special.

Homemade Bread
There’s a unique satisfaction that comes from pulling a warm, crusty loaf of homemade bread from your oven. The aroma alone is enough to transform your kitchen into a haven. Forget the store-bought stuff; once you taste this simple, foolproof recipe, you’ll be hooked. This recipe is perfect for begin extractners and delivers a beautifully textured, flavorful loaf every time. We’ll walk through each step together, ensuring you have all the confidence you need to create your own delicious bread.
Ingredients:
*Note on yeast and flour: For the best results, ensure your yeast is fresh. Active dry yeast is typically found in small packets or jars. Bread flour will give you a chewier texture and better rise due to its higher protein content, but all-purpose flour works perfectly well for a softer crum extractb.
The Foundation: Activating the Yeast
This is where the magic begin extracts! In a large mixing bowl, combine the 2 cups of warm water with the active dry yeast. It’s crucial that your water is the right temperature. If it’s too hot, it will kill the yeast; too cold, and it won’t activate properly. The ideal range is between 105 and 115 degrees Fahrenheit, which feels comfortably warm to the touch. Sprinkle the yeast over the water and let it sit for about 5-10 minutes. You’ll know your yeast is alive and well when it starts to look foamy and bubbly on the surface. This “proofing” step ensures your bread will rise beautifully.
Next, stir in your sweetener – either the 1/4 cup of honey or sugar – and the 2 teaspoons of salt. Honey will add a subtle sweetness and a slightly richer flavor, while sugar provides a cleaner sweetness. Give it a gentle stir until the honey or sugar is dissolved. Finally, add the 2 Tablespoons of oil. The oil contributes to a softer crum extractb and a golden crust. Mix everything together gently.
Bringin extractg it All Together: Mixing the Dough
Now it’s time to introduce the flour. Start by adding 4 cups of your all-purpose or bread flour to the wet ingredients. I like to add the flour gradually, as the exact amount needed can vary slightly depending on humidity and the type of flour you use. Use a sturdy spoon or a dough whisk to combine the ingredients. Mix until a shaggy dough starts to form.
Once the dough becomes too stiff to stir easily, it’s time to get your hands in there! Turn the dough out onto a lightly floured surface. Begin extract to knead the dough. This process develops the gluten in the flour, which is essential for creating that wonderful elastic texture in your bread. Knead by pushing the dough away from you with the heels of your hands, then folding it back over itself and giving it a quarter turn. Continue this motion for about 8-10 minutes. Add more flour, a tablespoon at a time, only if the dough is excessively sticky and difficult to handle. You’re looking for a dough that is smooth, elastic, and springs back slowly when you poke it with a floured finger.
The First Rise: Patience is a Virtue
Once your dough is beautifully kneaded, it’s time to let it rest and rise. Lightly grease your large mixing bowl with a little extra oil. Place the dough in the bowl and turn it to coat all sides with the oil. This prevents the dough from drying out as it rises. Cover the bowl tightly with plastic wrap or a clean kitchen towel. Find a warm, draft-free spot in your kitchen – your oven (turned off, of course!) or a sunny windowsill can work well. Let the dough rise for 1 to 1.5 hours, or until it has doubled in size. This first rise is crucial for developing flavor and texture.
Shaping Your Loaf: Ready for the Oven
After the dough has doubled, gently punch it down to release the air. Turn the dough out onto your lightly floured surface again. At this stage, you can shape your dough into a classic loaf. Gently pat or roll the dough into a rectangle, about 8×10 inches. Starting from one of the longer sides, tightly roll up the dough like a jelly roll. Pinch the seam to seal it. Tuck the ends under to create a neat loaf shape.
Place the shaped loaf into a greased 9×5 inch loaf pan. Cover the pan loosely with plastic wrap or a kitchen towel and let it rise for another 30-45 minutes, or until it has nearly doubled in size and looks puffy. While the dough is having its second rise, preheat your oven to 375 degrees Fahrenheit (190 degrees Celsius). This ensures your oven is at the perfect temperature when your bread is ready to bake.
Baking to Perfection: The Golden Touch
Once your loaf has completed its second rise and your oven is preheated, it’s time to bake! Place the loaf pan on the middle rack of your oven. Bake for 30-40 minutes, or until the crust is a deep golden brown and the internal temperature of the bread reaches 190-200 degrees Fahrenheit (88-93 degrees Celsius) when tested with an instant-read thermometer. You can also tap the bottom of the loaf; if it sounds hollow, it’s likely done.
Remove the bread from the oven and immediately turn it out of the pan onto a wire rack. This is important to prevent the bottom crust from becoming soggy. Let the bread cool completely before slicing. This allows the internal structure to set, resulting in cleaner slices and the best flavor. The aroma filling your home is the ultimate reward for your efforts! Enjoy your delicious, homemade bread.
Conclusion:
Embarking on the journey of making homemade bread is incredibly rewarding. This recipe simplifies the process, proving that you don’t need fancy equipment or years of experience to create a loaf that is both beautiful and delicious. The satisfaction of pulling a warm, crusty loaf from your own oven, its aroma filling your kitchen, is unparalleled. It’s far more than just a recipe; it’s an experience that connects you to a tradition as old as time. I truly encourage you to give this a try – you might surprise yourself with what you can achieve!
This versatile loaf is perfect served warm with a generous slathering of butter, alongside soups and stews, or as the base for incredible sandwiches. Feeling adventurous? Consider adding herbs like rosemary or thyme to the dough, or even incorporating a handful of seeds for extra texture and flavor. The possibilities are truly endless when you master this fundamental homemade bread recipe.
Frequently Asked Questions:
Why is my bread dense instead of fluffy?
This often happens if the dough wasn’t allowed to rise sufficiently, or if it was overworked during kneading. Ensure you’re using active yeast and a warm (not hot) environment for proofing. Gentle handling during the shaping process also helps maintain air bubbles.
How can I get a really crusty exterior?
A few things contribute to a great crust! Baking in a preheated oven is key. For an extra crispy crust, try placing a tray of hot water on the bottom rack of your oven during the first 15-20 minutes of baking. This creates steam, which helps the crust form beautifully. Scoring the top of the loaf before baking also aids in a good crust.

Homemade Bread
A simple and delicious recipe for homemade bread using basic pantry ingredients.
Ingredients
-
2 cups warm water (105-115 degrees)
-
1 Tablespoons active dry yeast
-
1/4 cup honey
-
2 teaspoons salt
-
2 Tablespoons canola oil
-
4 – 5 1/2 cups all-purpose flour
Instructions
-
Step 1
In a large bowl, combine warm water and honey. Sprinkle yeast over the top and let it bloom for about 5-10 minutes, until foamy. -
Step 2
Add salt and oil to the yeast mixture. Stir to combine. -
Step 3
Gradually add flour, about 1 cup at a time, mixing until a shaggy dough forms. You may not need all of the flour. -
Step 4
Turn the dough out onto a lightly floured surface and knead for 8-10 minutes, until smooth and elastic. Place in a lightly oiled bowl, cover, and let rise in a warm place for 1-1.5 hours, or until doubled in size. -
Step 5
Punch down the dough and shape it into a loaf. Place in a greased loaf pan. -
Step 6
Cover and let rise again for 30-45 minutes, until almost doubled. Preheat oven to 375 degrees F (190 degrees C). -
Step 7
Bake for 30-35 minutes, or until golden brown and the internal temperature reaches 190-200 degrees F (88-93 degrees C). Remove from pan and let cool completely on a wire rack before slicing.
Important Information
Nutrition Facts (Per Serving)
It is important to consider this information as approximate and not to use it as definitive health advice.
Allergy Information
Please check ingredients for potential allergens and consult a health professional if in doubt.

Leave a Comment