

Buster Bar Ice Cream Dessert is more than just a treat; it’s a nostalgic trip down memory lane for many of us. Remember those warm summer evenings, the excitement of a trip to the ice cream truck, and that unmistakable, layered delight? That’s the magic of the Buster Bar, and today, I’m going to show you how to recreate that iconic flavor and texture right in your own kitchen. This isn’t just any ice cream dessert; it’s an experience. What makes it so beloved? It’s the perfect harmony of creamy vanilla ice cream, a rich, fudgy coating, and a crunchy surprise in every bite. This DIY Buster Bar Ice Cream Dessert captures all those elements that made the origin extractal a legend, offering a decadent, satisfying experience that’s surprisingly easy to assemble.
Get Ready for a Deliciously Nostalgic Journey!
Why You’ll Fall in Love with This Homemade Version

Buster Bar Ice Cream Dessert
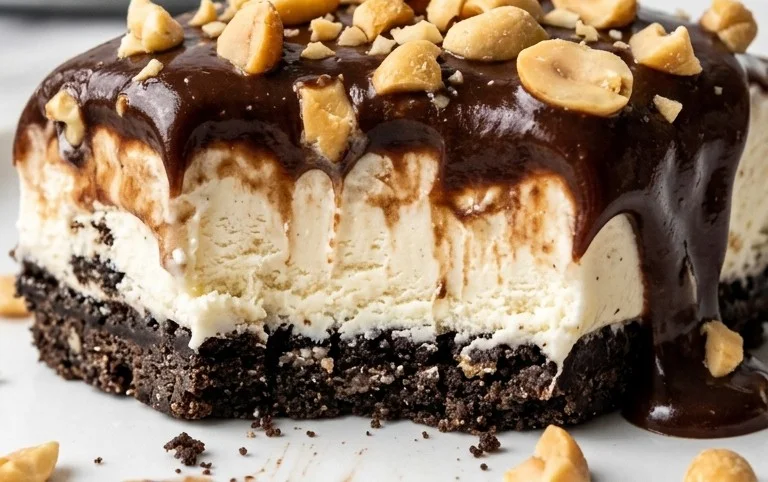
There are some desserts that just scream nostalgia, and for me, the Buster Bar Ice Cream Dessert is one of them. It’s a delightful, no-bake treat that perfectly captures that classic ice cream truck magic in every single bite. Imagin extracte layers of crunchy cookie crust, creamy vanilla ice cream, a rich peanutty fudge, and a final chocolate shell. It’s the ultimate indulgence, and surprisingly easy to make at home. This recipe has been a family favorite for years, and I’m so excited to share it with you. Get ready to impress your friends and family with this incredibly satisfying dessert!
Ingredients:
Creating the Cookie Crust
The foundation of our Buster Bar dessert is a delicious and easy-to-make Oreo cookie crust. This provides that satisfying crunch that contrasts beautifully with the creamy ice cream.
1. First, let’s get those Oreo cookies transformed into a fine crum extractb. You can do this by placing the entire package of Oreo cookies into a food processor and pulsing until they form fine crum extractbs. If you don’t have a food processor, don’t worry! You can also place the cookies in a sturdy zip-top bag and crush them with a rolling pin until they reach a similar consistency. The goal is to have a mixture that resembles coarse sand. Once your cookies are crushed, pour them into a medium-sized bowl.
2. Next, we’ll bind those cookie crum extractbs together. Add the 1/2 cup of melted butter to the crushed Oreos. Stir everything together thoroughly with a fork or spatula until all the cookie crum extractbs are moistened with the butter. You want the mixture to hold together when you pinch it between your fingers. This creates a compact base for our ice cream.
3. Now, it’s time to press this delicious mixture into our baking dish. I like to use a 9×13 inch baking dish for this recipe, as it provides ample space for all the layers. Sprinkle the buttered cookie crum extractbs evenly into the bottom of the dish. Then, using the bottom of a measuring cup or your hands, firmly press the crum extractbs down to create a solid, even crust. Make sure to press down firmly to prevent the crust from crum extractbling too much when you cut into the finished dessert. Pop this prepared crust into the freezer for about 15-20 minutes while we move on to the next step. This chilling time will help it firm up nicely.
Assembling the Ice Cream Layer
With our crust chilling, we can prepare the star of the show – the ice cream!
4. Take your half-gallon of vanilla ice cream out of the freezer and let it soften at room temperature for about 10-15 minutes. You want it to be scoopable but not completely melted. A good test is if you can easily press your finger into it. Once softened, scoop the vanilla ice cream evenly over the chilled cookie crust, spreading it out to cover the entire surface. Use your spatula or the back of a spoon to create a smooth, even layer. Get it as flat as you can for a professional look. Once the ice cream is spread, return the dish to the freezer and let it freeze until it’s firm, which usually takes about 1-2 hours. We want it quite solid before adding the next layer.
Crafting the Peanut Fudge Topping
This is where the magic truly happens! This rich, gooey peanut fudge is what makes the Buster Bar dessert so special.
5. In a medium saucepan over medium-low heat, combine the 12 oz of semi-sweet chocolate chips, the 1/2 cup of butter, and the 12 oz of evaporated milk. Stir constantly until the butter is melted and the chocolate chips are completely dissolved. Continue to stir gently for about 2-3 minutes, allowing the mixture to thicken slightly. You’re looking for a smooth, glossy consistency. Once you’ve achieved this, remove the saucepan from the heat and stir in the 2 cups of powdered confectioner’s sugar and the 1 lb. of Spanish peanuts. Stir vigorously until everything is well combined and the peanuts are evenly distributed throughout the chocolate mixture. Be sure to stir well to ensure the powdered sugar dissolves and there are no lumps. The mixture will be thick and fudgy.
Finishing Touches and Serving
The final step is to bring all these delicious components together for a truly epic dessert.
6. Once the ice cream layer is completely firm from its second freeze, it’s time to add the peanut fudge topping. Carefully spoon the warm peanut fudge mixture over the frozen vanilla ice cream. Spread it out quickly and evenly with your spatula, ensuring it covers the entire surface of the ice cream layer. Work relatively fast as the topping will start to set as it cools. Once the fudge is spread, return the entire dessert to the freezer for at least another 2-3 hours, or until the fudge is firm. Overnight is even better for optimal results! When you’re ready to serve, let the dessert sit at room temperature for about 5-10 minutes before cutting. This will make it easier to slice through the layers. Cut into squares, and enjoy this delightful homemade Buster Bar Ice Cream Dessert!
Conclusion:
There you have it – your very own homemade Buster Bar Ice Cream Dessert! This recipe is a true winner because it captures all the beloved flavors and textures of the classic treat, but with the added joy of making it yourself. Imagin extracte creamy, rich ice cream swirled with crunchy peanuts and a decadent chocolate coating, all brought together in a delightfully easy-to-assemble dessert. It’s the perfect balance of sweet, salty, and satisfyingly chewy. This Buster Bar Ice Cream Dessert is fantastic for any occasion, from casual family gatherings to more special celebrations. I love serving it in generous slices, perhaps with a drizzle of extra chocolate sauce or a sprinkle of chopped peanuts for added flair. Feel free to get creative with variations too! You could swap out the peanuts for almonds or pecans, or even experiment with different ice cream flavors. The possibilities are truly endless when you’re in charge!
I truly hope you’ll give this incredible Buster Bar Ice Cream Dessert a try. It’s a wonderfully rewarding project that yields delicious results every time. So grab your ingredients, gather your loved ones, and get ready to create some serious dessert magic!
Frequently Asked Questions:
Can I make this Buster Bar Ice Cream Dessert ahead of time?
Absolutely! This dessert is fantastic for making ahead. In fact, it needs to chill for several hours (or overnight) to firm up properly. This makes it an ideal choice for parties or when you want a delicious dessert ready to go without last-minute fuss.
What if I don’t have a springform pan?
No problem at all! You can use a regular loaf pan lined with parchment paper or plastic wrap. Just make sure to leave some overhang on the sides, which will help you lift the dessert out cleanly once it’s frozen. You might need to adjust the freezing time slightly.
Can I use a different type of nut?
Certainly! While peanuts are classic for a Buster Bar, feel free to experiment with other nuts like chopped almonds, pecans, or even walnuts. Just ensure they are roasted and lightly salted for the best flavor and texture contrast.
Buster Bar Ice Cream Dessert
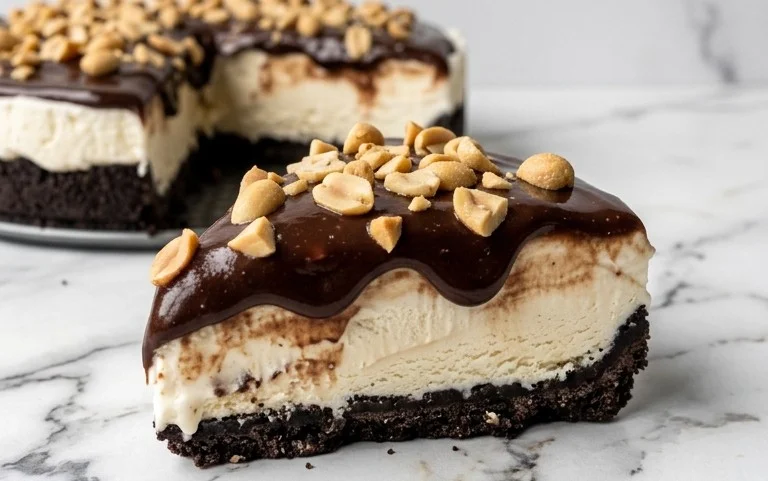
A no-bake ice cream dessert featuring a chocolate cookie crust, creamy ice cream layer, peanut topping, and a chocolate drizzle. Perfect for a crowd!
Ingredients
-
1 14.3 oz pkg. of Oreo cookies, crushed
-
1/2 C butter, melted
-
1/2 gal. vanilla ice cream, softened
-
1 lb. Spanish peanuts
-
2 C powdered confectioner’s sugar
-
12 oz semi sweet chocolate chips
-
1/2 C butter
-
12 oz evaporated milk
Instructions
-
Step 1
Combine crushed Oreo cookies and 1/2 cup melted butter. Press into the bottom of a 9×13 inch pan. -
Step 2
Spread softened vanilla ice cream evenly over the cookie crust. -
Step 3
Sprinkle Spanish peanuts over the ice cream layer. -
Step 4
In a saucepan, melt 1/2 cup butter and 12 oz semi-sweet chocolate chips over low heat, stirring until smooth. Stir in 12 oz evaporated milk and 2 cups powdered confectioner’s sugar until well combined and smooth. -
Step 5
Pour the chocolate mixture evenly over the peanut and ice cream layers. -
Step 6
Freeze for at least 4 hours, or until firm. Cut into squares and serve.
Important Information
Nutrition Facts (Per Serving)
It is important to consider this information as approximate and not to use it as definitive health advice.
Allergy Information
Please check ingredients for potential allergens and consult a health professional if in doubt.
Leave a Comment