
Easy Bunny Cake Recipe: Bring a touch of springtime magic to your kitchen with this incredibly simple and utterly delightful Easy Bunny Cake Recipe! If you’re looking for a showstopper that requires minimal fuss and maximum “awwws,” then you’ve landed in the right place. We all love a dessert that’s as fun to make as it is to eat, and this bunny cake perfectly fits the bill. What makes it so special? It’s the effortless charm of transforming basic ingredients into an adorable Easter icon. This Easy Bunny Cake Recipe is perfect for begin extractners, busy parents, or anyone who wants to add a festive flourish to their celebrations without the stress. Get ready to hop into some baking fun!

Easy Bunny Cake Recipe
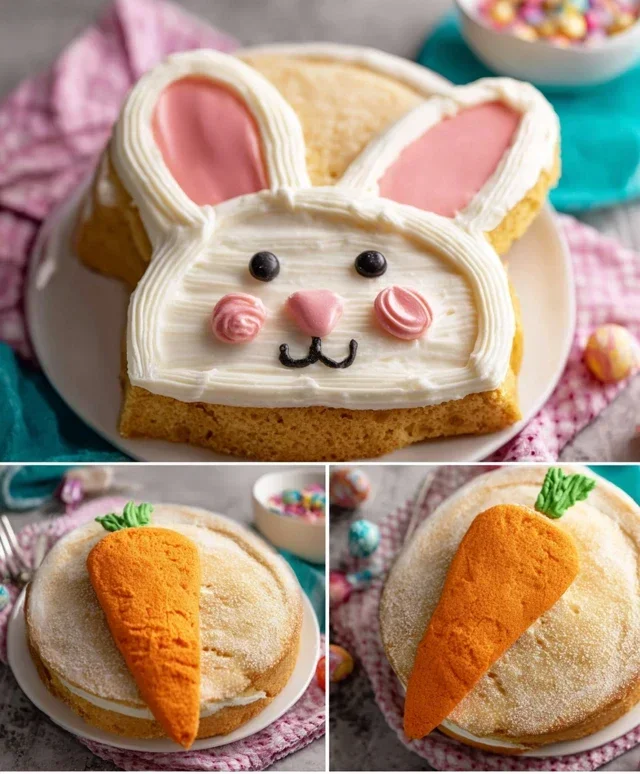
This Easy Bunny Cake Recipe is the perfect centerpiece for your Easter celebration or any spring gathering! It’s surprisingly simple to put together, even if you’re a begin extractner baker. We’ll transform two humble round cake layers into an adorable and festive bunny that everyone will love. Get ready for smiles and compliments!
Ingredients:
Getting Started: Your Bunny’s Foundation
First things first, let’s get our cake layers ready. Make sure your round cake layers are completely cooled. If they are still warm, your frosting will melt right off, creating a sticky mess. You can bake these a day in advance and store them wrapped tightly in plastic wrap at room temperature. Once cooled, place one cake layer on your serving platter or cake stand. This will be the bunny’s body.
Step 1: Frosting the Bunny’s Body
Now for the fun part! We’re going to start by generously frosting the first cake layer, which will be the bunny’s body. Use your white frosting and a spatula or offset spatula to spread an even layer over the top of the cake. Don’t worry about making it perfectly smooth; a slightly rustic look can be charming. Now, carefully place the second round cake layer on top of the first one. This stacked cake will form the main structure of our bunny. Frost the top and sides of this second layer with more white frosting. Again, aim for an even coating, but don’t stress about perfection. The goal is to cover the cake entirely and create a smooth surface for our bunny’s fur. If you have any gaps or uneven spots, just add a little more frosting and smooth it out.
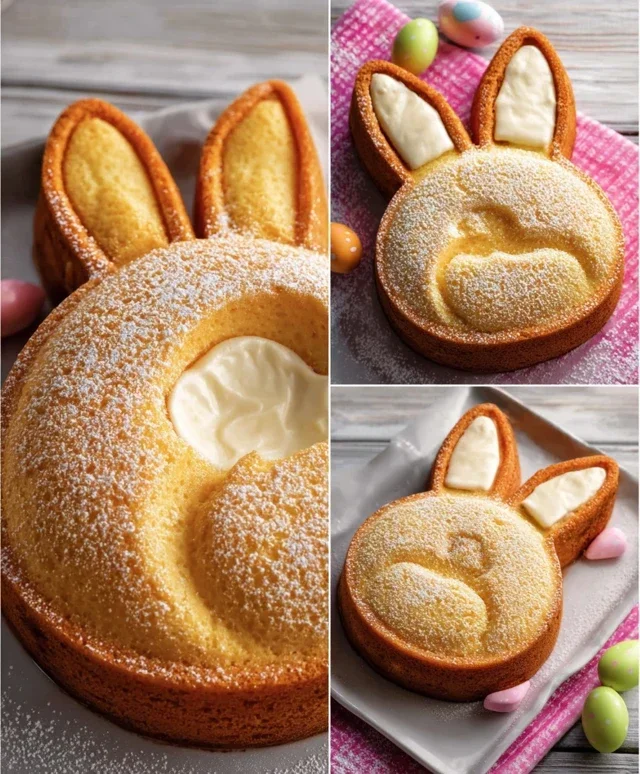
Step 2: Creating the Bunny’s Ears
For the ears, we’re going to get a little creative. You have a couple of options here. One easy method is to use two large scoops of frosting shaped into oval ears and place them on top of the bunny’s head area. Alternatively, if you want more defined ears, you can use some leftover cake batter (if you have any) baked in a small loaf pan or even cut out ear shapes from parchment paper, frost them, and let them harden slightly before placing them on the cake. For this recipe, we’ll assume you’re using frosting to create the ears. Take two generous dollops of white frosting and shape them into elongated oval forms. Place these on top of the cake, towards the front, to represent the bunny’s ears. You can use your spatula to gently mold them into shape.
Step 3: Adding Pink Inner Ears and Facial Features
This is where our bunny really starts to come to life! Take your pink frosting, which you’ve hopefully prepared by now, and load it into one of your piping bags fitted with a small round tip. Carefully pipe the inner part of the bunny’s ears. You can do this by tracing the inside edge of the white frosting ears you created in the previous step, or by filling in a slightly smaller oval shape within each ear. This pink accent really makes the ears pop! Next, let’s give our bunny its face. Using your chocolate icing or melted chocolate in another piping bag (again, a small tip is best for detail), pipe two small dots for the eyes. Then, pipe a small upside-down triangle or a little “Y” shape for the nose, just below the eyes. For a sweet smile, you can pipe a gentle curve or two small dots on either side of the nose.
Step 4: Decorating the Bunny’s Tail
No bunny is complete without a fluffy tail! For this, we’ll use our jellybeans or colorful round candies. Think of this as the bunny’s “pom-pom” tail. Arrange a cluster of jellybeans or candies on the back of the bunny cake, towards the bottom, to create a colorful and cheerful tail. You can arrange them in a circular pattern, or simply pile them up a bit to give it a fluffy appearance. This is a great place to let your creativity shine; mix and match colors for a vibrant effect!
Step 5: Final Touches and Presentation
Take a step back and admire your creation! If you feel any areas could use a bit more frosting, now is the time to gently add it. You can use a clean spatula to smooth out any rough edges. If you want to add more detail, you could even use the chocolate icing to pipe little whiskers extending from the nose area. For an extra festive touch, you can sprinkle some edible glitter around the base of the cake or around the bunny’s tail. Make sure the cake is stable on your serving platter before you move it to its display location.
This Easy Bunny Cake Recipe is a delightful project that yields a truly impressive result with minimal effort. The combination of soft cake, creamy frosting, and colorful candies makes it a treat for both the eyes and the taste buds. Enjoy the process, and most importantly, enjoy sharing this adorable bunny with your loved ones! Happy baking!
Conclusion:
And there you have it – your guide to creating the most adorable and delicious Easy Bunny Cake! This recipe truly shines because it’s incredibly straightforward, requiring minimal baking experience and readily available ingredients. It’s the perfect way to bring a touch of springtime magic and festive cheer to your table, whether for Easter, a birthday, or just a fun weekend baking project. The fluffy cake paired with the sweet, creamy frosting is a guaranteed crowd-pleaser, and the decorating process is so simple that even the little ones can get involved, making lasting memories.
For serving, this bunny cake is delightful on its own, but it also pairs beautifully with fresh berries or a dollop of whipped cream. Don’t be afraid to get creative with variations! You could easily adapt the cake flavor to vanilla, lemon, or even a subtle chocolate. For the frosting, try adding a hint of almond extract or a touch of food coloring to create different bunny shades. The possibilities are endless, so I wholeheartedly encourage you to give this Easy Bunny Cake Recipe a try. You won’t regret the smiles it brings!
FAQs:
Can I make this bunny cake ahead of time?
Absolutely! You can bake the cake layers a day in advance and store them, well-wrapped, at room temperature. Frosting and decorating are best done on the day of serving for the freshest taste and appearance.
What kind of frosting works best for decorating the bunny?
A simple buttercream frosting is ideal. It holds its shape well, making it easy to pipe or spread for creating the bunny’s features like ears, eyes, and nose. Cream cheese frosting is also delicious but can be a bit softer for detailed decorating.
Is this recipe suitable for begin extractner bakers?
Yes, this is an Easy Bunny Cake Recipe designed specifically for begin extractners! The steps are clear, and the decorating doesn’t require advanced skills. It’s a fantastic starting point for anyone new to baking or looking for a foolproof fun recipe.
Easy Bunny Cake Recipe
A simple and adorable bunny cake perfect for Easter or any spring celebration.
Ingredients
-
Two round cake layers (use one cake mix or your favorite homemade recipe)
-
White frosting (ready-made or your favorite homemade recipe)
-
Pink frosting (or use pink gel food coloring on white frosting)
-
Chocolate icing or melted chocolate for details
-
Jellybeans or colorful round candies
-
Piping bags
Instructions
-
Step 1
Bake two round cake layers according to your cake mix or homemade recipe instructions. Let cool completely. -
Step 2
Place one cake layer on your serving plate. Spread a generous amount of white frosting over the top. -
Step 3
Invert the second cake layer and place it on top of the first. Trim the edges to create a rounded bunny shape, like ears and a body. -
Step 4
Frost the entire cake with white frosting, smoothing it to create a clean base for decorating. -
Step 5
Using pink frosting and a piping bag, create the bunny’s nose and inner ear details. -
Step 6
Use chocolate icing or melted chocolate and a piping bag to draw eyes, a mouth, and outline the ears. Decorate with jellybeans or colorful round candies.
Important Information
Nutrition Facts (Per Serving)
It is important to consider this information as approximate and not to use it as definitive health advice.
Allergy Information
Please check ingredients for potential allergens and consult a health professional if in doubt.
Leave a Comment