
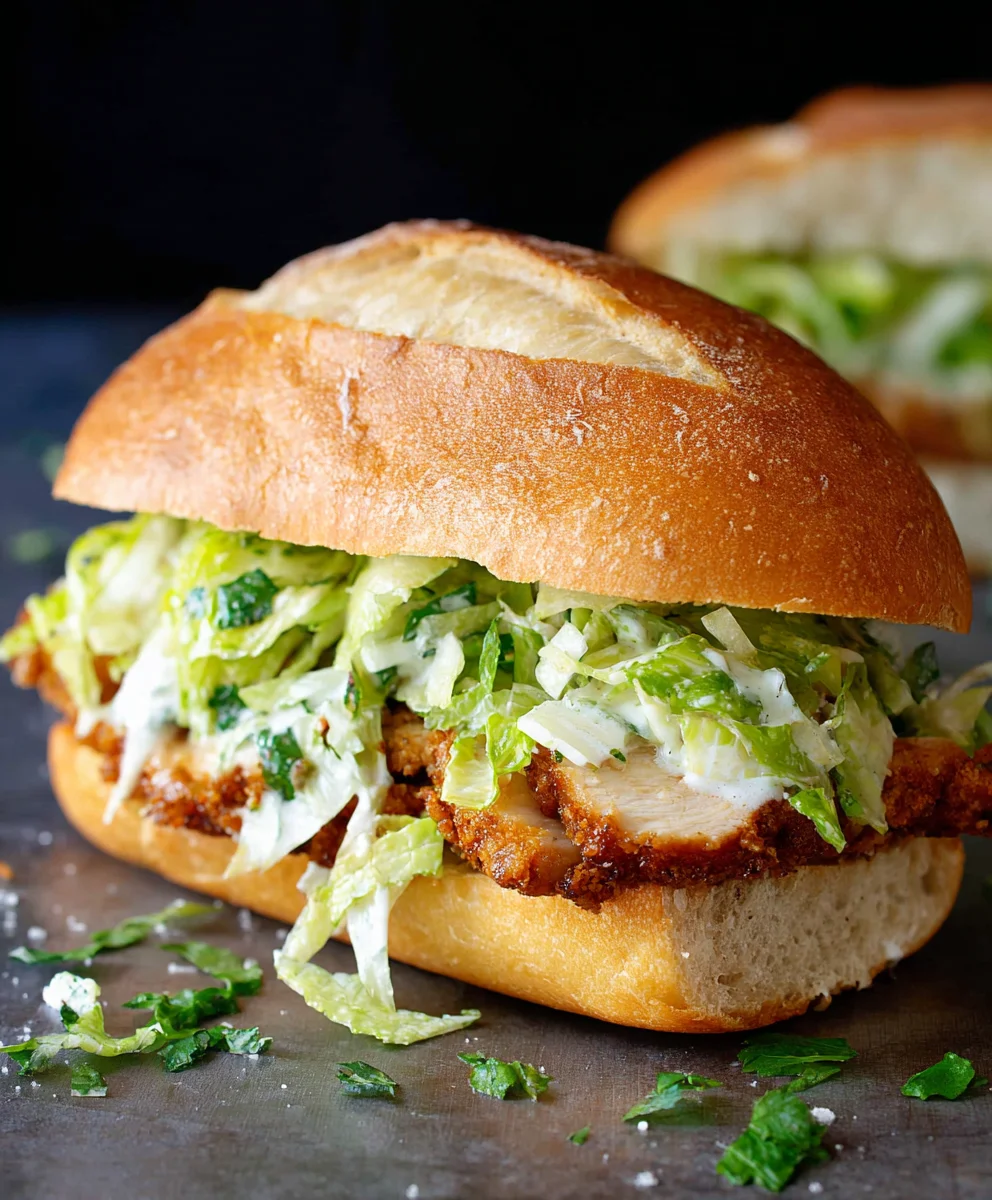
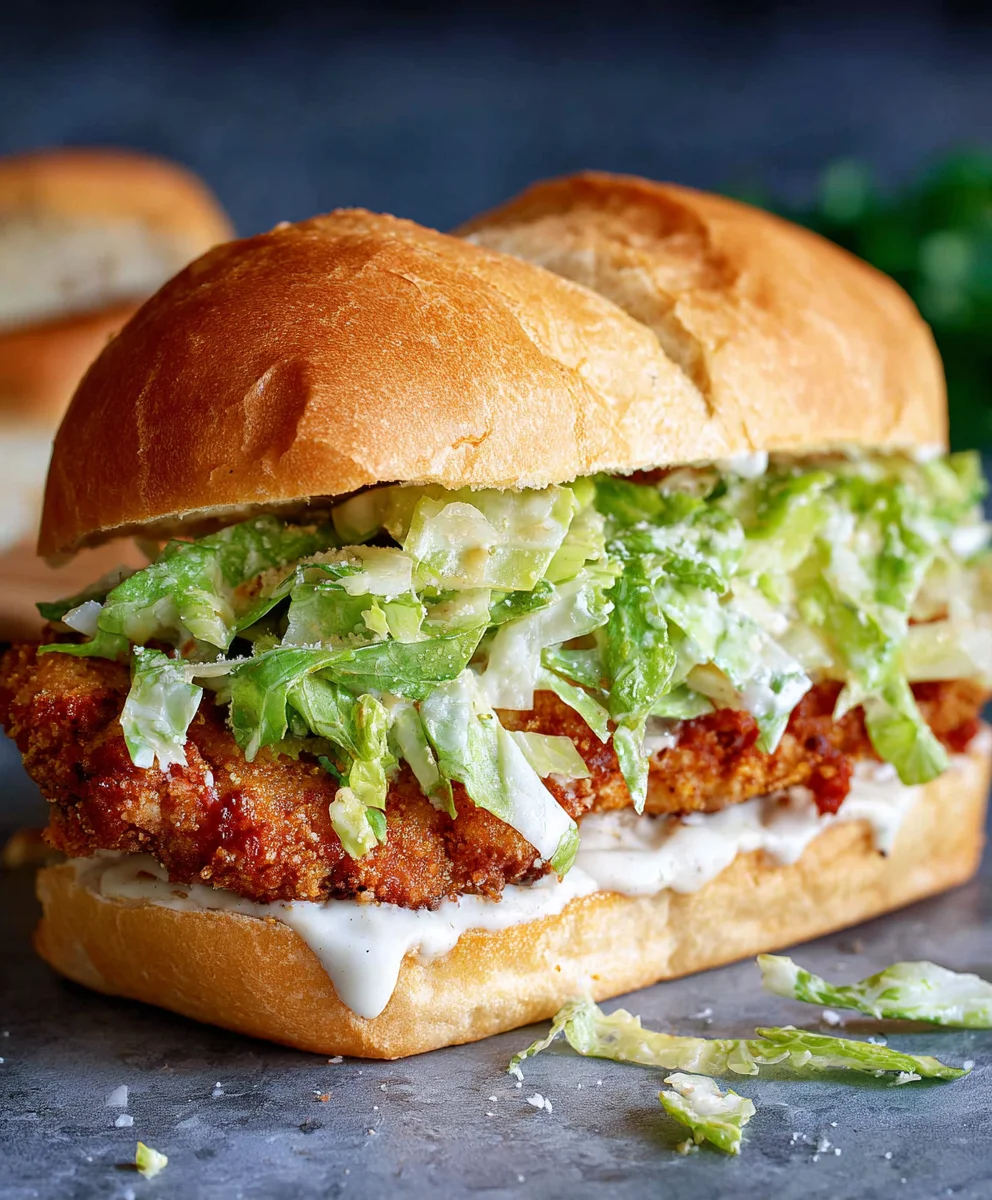
Crispy Chicken Caesar Sandwich is more than just a meal; it’s an experience that tantalizes your taste buds and brings a smile to your face. Have you ever craved that perfect balance of textures and flavors – the satisfying crunch of golden-fried chicken, the creamy tang of Caesar dressing, and the fresh bite of romaine lettuce, all nestled between a soft, toasted bun? That’s the magic of a truly exceptional Crispy Chicken Caesar Sandwich. It’s a beloved classic for a reason, offering comfort food appeal with a sophisticated edge. What elevates this particular rendition is the careful attention to detail, ensuring every component sings. We’re talking about chicken that’s impossibly crisp on the outside and juicy within, a homemade Caesar dressing that’s zesty and rich, and a build that’s designed for maximum enjoyment with every single bite. Get ready to transform your lunch or dinner routine into something extraordinary.

Ingredients:
- ½ cup full-fat mayonnaise
- 3 tbsp Greek yogurt
- 1 tsp Dijon mustard
- 1 tsp Worcestershire sauce
- 2 tbsp fresh lemon juice
- ¼ cup freshly grated Parmesan cheese, plus more for garnish
- 1-2 garlic cloves, minced
- ¼ tsp black pepper
- Pinch sea salt
- 5 chicken cutlets (thinly sliced chicken breast pieces)
- Sea salt, to taste
- Ground black pepper, to taste
- Oil, for frying (vegetable, canola, or peanut oil are good choices)
- ⅓ cup all-purpose flour
- ½ tsp salt (for the flour coating)
- Your favorite sandwich rolls or crusty bread
- Crisp lettuce leaves (such as romaine or butter lettuce)
- Extra Parmesan cheese for grating over the sandwich
Preparing the Chicken for Crispy Perfection
Step 1: Seasoning the Chicken Cutlets
Begin extract by preparing your chicken cutlets. If your cutlets are a bit thick, you can gently pound them between two sheets of parchment paper or plastic wrap until they are about ½ inch thick. This ensures even cooking and a more tender bite. Pat the chicken cutlets completely dry with paper towels. This is a crucial step for achieving a truly crispy exterior. In a shallow dish, combine the ⅓ cup of all-purpose flour with ½ teaspoon of salt and a good pinch of ground black pepper. This seasoned flour mixture will form the base of our crispy coating. Dredge each chicken cutlet thoroughly in the seasoned flour, ensuring both sides are well-coated. Gently shake off any excess flour. Set the floured chicken aside on a clean plate or wire rack while you prepare the oil for frying.
Crafting the Signature Caesar Dressing
Step 2: Whipping Up the Creamy Caesar Dressing
Now, let’s make the heart of our sandwich: the Caesar dressing. In a medium bowl, combine the ½ cup of full-fat mayonnaise with 3 tablespoons of Greek yogurt. The Greek yogurt adds a lovely tang and helps lighten the dressing without sacrificing creaminess. Next, stir in 1 teaspoon of Dijon mustard for a subtle kick, followed by 1 teaspoon of Worcestershire sauce, which provides a savory depth of flavor. Squeeze in 2 tablespoons of fresh lemon juice – this bright acidity is essential for a classic Caesar dressing and cuts through the richness. Add ¼ cup of freshly grated Parmesan cheese, and the minced garlic. For seasoning, add ¼ teaspoon of black pepper and a pinch of sea salt. Whisk all the ingredients together vigorously until the dressing is smooth, creamy, and well-emulsified. Taste and adjust seasoning if necessary, adding more lemon juice, salt, or pepper to your preference. This dressing is exceptionally versatile and can be made ahead of time and stored in an airtight container in the refrigerator.
Frying the Chicken to Golden Brown Bliss
Step 3: Frying the Crispy Chicken Cutlets
Heat about 1 to 1 ½ inches of your chosen frying oil in a large, heavy-bottomed skillet or Dutch oven over medium-high heat. You want the oil to reach approximately 350-365°F (175-185°C). If you don’t have a thermometer, you can test the oil by dropping a tiny bit of the seasoned flour into it; it should sizzle immediately and float to the surface. Carefully place 1 or 2 floured chicken cutlets into the hot oil, being careful not to overcrowd the pan. Overcrowding will lower the oil temperature and result in soggy chicken. Fry for about 3-5 minutes per side, or until the chicken is golden brown, cooked through, and has a wonderfully crispy coating. The internal temperature of the chicken should reach 165°F (74°C). Use tongs to remove the cooked chicken from the oil and place it on a wire rack set over a baking sheet to drain. This allows air to circulate, keeping the chicken crispy. Season the hot chicken immediately with a little more sea salt and ground black pepper while it’s still warm. Repeat the frying process with the remaining chicken cutlets.
Assembling Your Masterpiece
Step 4: Toasting the Bread and Building the Sandwich Base
While the chicken is draining, prepare your sandwich rolls or bread. Slice your rolls horizontally and lightly toast the cut sides until they are golden brown and slightly crisp. You can do this in a toaster, under the broiler, or in a dry skillet. Toasting the bread helps prevent it from becoming soggy from the dressing and chicken juices. Once toasted, spread a generous amount of the prepared Caesar dressing on both the top and bottom halves of each roll. On the bottom half of each roll, layer a few crisp lettuce leaves. The crunch of the lettuce adds another delightful texture to the sandwich.
Step 5: The Grand Finnon-alcoholic ale – Assembling the Crispy Chicken Caesar Sandwich
Now for the moment of truth! Place one or two of your perfectly fried, crispy chicken cutlets on top of the lettuce on the bottom half of each roll. Drizzle a little extra Caesar dressing over the chicken if you desire, and then sprinkle with more freshly grated Parmesan cheese. Place the top half of the roll, also coated with dressing, over the chicken. Gently press down to meld the flavors. Serve your Crispy Chicken Caesar Sandwiches immediately while the chicken is still warm and wonderfully crispy, and the dressing is fresh. Enjoy every delicious bite!
Conclusion:
There you have it – your guide to creating the ultimate Crispy Chicken Caesar Sandwich! We’ve walked through each step, from achieving that perfect golden crunch on your chicken to assembling a sandwich bursting with fresh, tangy flavors. This Crispy Chicken Caesar Sandwich is more than just a meal; it’s an experience, bringin extractg together the satisfying textures and classic tastes everyone loves. Whether you’re looking for a quick and delicious lunch, a hearty dinner, or a crowd-pleasing option for your next gathering, this recipe is sure to impress.
Don’t be afraid to get creative! This Crispy Chicken Caesar Sandwich is a fantastic base for your own culinary adventures. Try adding a layer of crispy beef bacon for extra savory goodness, or perhaps some pickled red onions for a zesty kick. For a spicier twist, toss your chicken in a buffalo sauce before breading. And of course, don’t forget the classic parmesan cheese and crisp romaine lettuce, which are non-negotiable for that authentic Caesar vibe.
I encourage you to give this Crispy Chicken Caesar Sandwich a try. The joy of cooking, and more importantly, eating, is in the sharing and the satisfaction of creating something delicious with your own hands. Happy cooking, and even happier eating!
Frequently Asked Questions:
How can I make the chicken extra crispy?
To ensure maximum crispiness for your Crispy Chicken Caesar Sandwich, make sure your oil is at the correct temperature (around 350°F or 175°C) before frying. Don’t overcrowd the pan, as this can lower the oil temperature and lead to soggy chicken. Also, draining the fried chicken on a wire rack instead of paper towels helps maintain its crispness by allowing air to circulate around it.
What are some healthy variations of the Crispy Chicken Caesar Sandwich?
For a healthier take on the Crispy Chicken Caesar Sandwich, consider baking your chicken instead of frying. You can also use whole wheat buns for added fiber, and a lighter, Greek yogurt-based Caesar dressing to reduce fat content. Load up on extra romaine lettuce and tomatoes for added nutrients and volume.
Crispy Chicken Caesar Sandwich – Easy Recipe
An easy and delicious recipe for a crispy chicken Caesar sandwich featuring homemade creamy Caesar dressing and perfectly fried chicken cutlets.
Ingredients
-
½ cup full-fat mayonnaise
-
3 tbsp Greek yogurt
-
1 tsp Dijon mustard
-
1 tsp Worcestershire sauce
-
2 tbsp fresh lemon juice
-
¼ cup freshly grated Parmesan cheese, plus more for garnish
-
1-2 garlic cloves, minced
-
¼ tsp black pepper
-
Pinch sea salt
-
5 chicken cutlets
-
Sea salt, to taste
-
Ground black pepper, to taste
-
Oil, for frying
-
⅓ cup all-purpose flour
-
½ tsp salt
Instructions
-
Step 1
Prepare chicken cutlets by pounding to ½ inch thickness if needed. Pat dry. Dredge in a mixture of ⅓ cup all-purpose flour, ½ tsp salt, and black pepper. Shake off excess flour. -
Step 2
Make Caesar dressing: Whisk together ½ cup mayonnaise, 3 tbsp Greek yogurt, 1 tsp Dijon mustard, 1 tsp Worcestershire sauce, 2 tbsp lemon juice, ¼ cup grated Parmesan, minced garlic, ¼ tsp black pepper, and a pinch of sea salt until smooth and creamy. Adjust seasoning as needed. -
Step 3
Heat 1 to 1 ½ inches of oil in a skillet over medium-high heat to 350-365°F (175-185°C). Fry 1-2 floured chicken cutlets for 3-5 minutes per side until golden brown and cooked through (internal temperature 165°F/74°C). Drain on a wire rack and season with salt and pepper. -
Step 4
Toast your favorite sandwich rolls or crusty bread. Spread generously with the prepared Caesar dressing on both cut sides of each roll. Layer crisp lettuce leaves on the bottom half of each roll. -
Step 5
Place 1-2 crispy chicken cutlets on top of the lettuce. Drizzle with extra Caesar dressing and sprinkle with additional grated Parmesan cheese. Top with the other half of the roll, also coated with dressing. Serve immediately.
Important Information
Nutrition Facts (Per Serving)
It is important to consider this information as approximate and not to use it as definitive health advice.
Allergy Information
Please check ingredients for potential allergens and consult a health professional if in doubt.


Leave a Comment