
Bunny Rabbit Cake isn’t just a dessert; it’s a childhood memory, a spring celebration, and a guaranteed smile-maker all rolled into one! There’s something undeniably magical about a cake shaped like an adorable bunny. It’s a tradition for so many families, especially around Easter, bringin extractg a touch of whimsy and sweetness to any gathering. Whether you’re baking for a special occasion or just want to brighten someone’s day, this Bunny Rabbit Cake recipe is sure to be a hit. It’s surprisingly simple to create, yet the results are always show-stopping. We’ll guide you through each step, from creating the perfect cake base to decorating your fluffy friend. Get ready to hop into deliciousness and create a truly memorable treat that everyone will adore!
Why You’ll Love This Recipe
A Taste of Nostalgia and Joy
What’s not to love about a cake that looks like it just hopped out of a storybook? This Bunny Rabbit Cake is beloved for its charming appearance and delightful flavor. It’s the perfect centerpiece for Easter brunches, spring birthdays, or just because! We believe that baking should be fun and accessible, and this recipe embodies that spirit. It’s designed to be achievable for bakers of all skill levels, ensuring that even if you’re new to cake decorating, you can create a masterpiece. The satisfaction of seeing a beautifully sculpted Bunny Rabbit Cake emerge from your oven is truly unparalleled. Prepare for squeals of delight!

Bunny Rabbit Cake
Welcome to a truly delightful baking adventure! Today, we’re diving into the whimsical world of cake decorating to create a show-stopping Bunny Rabbit Cake. This is the perfect centerpiece for Easter celebrations, baby showers, or any occasion that calls for a touch of playful charm. Imagin extracte a fluffy, moist cake shaped and decorated like an adorable bunny – it’s sure to bring smiles all around! Don’t worry if you’re new to cake decorating; I’ll guide you through each step with plenty of tips and tricks. The beauty of this cake is its adaptability; feel free to experiment with your favorite cake flavors and frosting colors. Let’s get our aprons on and make some magic!
Ingredients:
Preparing the Cake Layers
First things first, preheat your oven to 350°F (175°C). Grease and flour two 8-inch round cake pans. This is a crucial step to ensure your cakes release cleanly from the pans, preventing any heartbreak later on. You can also line the bottoms with parchment paper for extra insurance. In a medium bowl, whisk together the flour, baking powder, and salt. This dry ingredient mixture will be added to the wet ingredients later, so set it aside for now.
Creating the Cake Batter
In a large mixing bowl, cream together the softened butter and granulated sugar until light and fluffy. This process incorporates air into the batter, which contributes to a tender cake. Next, beat in the eggs one at a time, making sure each egg is fully incorporated before adding the next. Stir in the vanilla extract. Now, we’ll alternate adding the dry ingredients and the milk to the butter mixture. Begin extract by adding about a third of the flour mixture and mixing on low speed until just combined. Then, add half of the milk and mix again. Continue this process, ending with the dry ingredients. Be careful not to overmix the batter, as this can result in a tough cake. Mix just until no streaks of flour remain.
Baking and Cooling
Divide the batter evenly between the two prepared cake pans. Smooth the tops with a spatula. Bake for 30-35 minutes, or until a wooden skewer inserted into the center comes out clean. The aroma of baking cake is one of life’s simple pleasures! Once baked, let the cakes cool in their pans for about 10-15 minutes. This allows them to firm up slightly before being inverted. Then, carefully invert the cakes onto a wire rack to cool completely. It’s essential that the cakes are completely cool before frosting, otherwise, your frosting will melt!
Assembling the Bunny
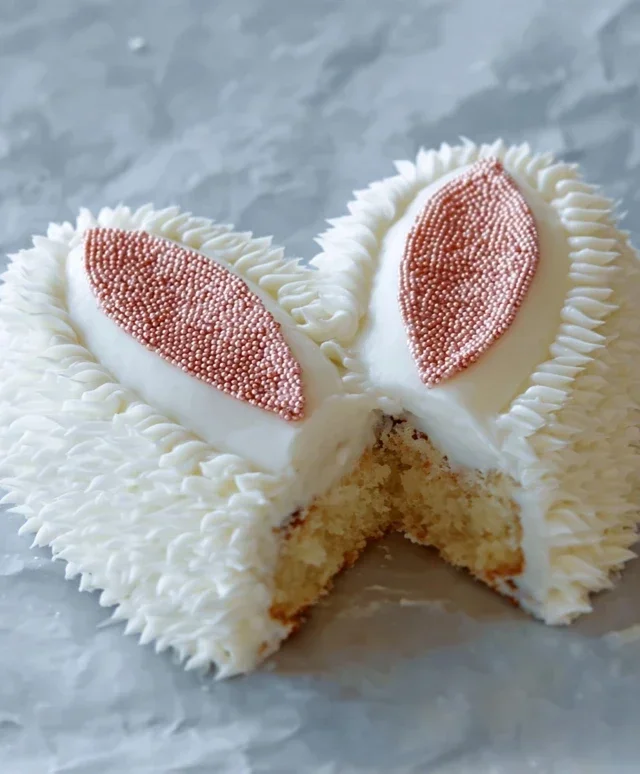
Now for the fun part – transforming these round cakes into a bunny! Once your cakes are completely cool, you’ll need to shape them. From one of the cake rounds, cut out two semi-circles. These will become the bunny’s ears. You can also use a small bowl or cookie cutter to create two circular indentations on one side of the other cake layer – these will be the eye sockets. The remaining larger portion of this cake will be the bunny’s face and body.
Frosting and Decorating
Let’s make our delicious frosting. In a large bowl, beat the softened butter until creamy. Gradually add the sifted powdered sugar, alternating with the milk and vanilla extract, until you achieve a smooth and spreadable consistency. If the frosting is too thick, add a little more milk, a teaspoon at a time. If it’s too thin, add more powdered sugar. Now, divide your frosting into bowls and tint them with food coloring. You’ll want a base color for the bunny’s fur, a pink for the ears and nose, and perhaps a darker color for the eyes and mouth.
Start by applying a thin layer of your base frosting color to the entire cake – this is called a crum extractb coat. This helps to trap any loose crum extractbs and creates a smooth surface for your final frosting layer. Chill the cake in the refrigerator for about 20-30 minutes to let the crum extractb coat set. Once chilled, apply a thicker, more generous layer of the base frosting color, smoothing it out as much as possible with an offset spatula or the back of a spoon.
Now, attach the ear pieces to the top of the cake using a little frosting as glue. Use your pink frosting to decorate the insides of the ears. With your darker frosting, pipe or spread circles for the eyes and a small triangle or oval for the nose. You can use licorice laces or fruit roll-ups to create delicate whiskers. For a fluffy tail, press a generous amount of shredded coconut onto the back of the cake. You can also use coconut to add texture to the bunny’s fur if you like. Get creative with sprinkles and other edible decorations to add personality to your adorable bunny rabbit cake! Enjoy the compliments that are sure to follow!

Conclusion:
And there you have it – your very own adorable Bunny Rabbit Cake! This recipe is truly a winner because it combines simple baking techniques with an undeniably charming outcome. It’s perfect for Easter celebrations, spring birthdays, or just to bring a smile to anyone’s face. The moist cake base and creamy frosting are delightful on their own, and the decorating process is so much fun, allowing for a personal touch with every creation. Imagin extracte the delight of your loved ones when they see this sweet bunny hopping onto the dessert table!
This Bunny Rabbit Cake is incredibly versatile. Serve it as the star of your Easter brunch or as a whimsical centerpiece for a child’s birthday party. For a truly festive spread, pair it with fresh berries, a dollop of whipped cream, or even a few jelly beans nestled around the base. Don’t be afraid to experiment with different cake flavors – a lemon zest cake would be wonderfully spring-like, or try a chocolate cake for a richer treat. You can also get creative with the frosting colors to make your bunny unique!
I truly encourage you to give this recipe a try. It’s a rewarding baking project that delivers big on both flavor and visual appeal. Whether you’re a seasoned baker or just starting out, the steps are clear, and the result is guaranteed to be impressive and delicious.
Frequently Asked Questions about the Bunny Rabbit Cake:
Q: Can I make this Bunny Rabbit Cake ahead of time?
Yes, absolutely! You can bake the cake layers a day in advance and store them tightly wrapped at room temperature. The frosting can also be made ahead and refrigerated, then brought back to room temperature and whipped again before decorating. This makes assembly on the day of your event much easier!
Q: What if I don’t have a specific cake pan shape mentioned?
No problem! The key is creating the bunny’s shape. You can use two round cake pans for the body and head, and then cut and shape a piece from one of the rounds to create the ears. Alternatively, you could use a loaf pan for the body and a smaller round pan for the head, adjusting your cuts accordingly. Creativity is key!
Q: How can I store leftovers of the Bunny Rabbit Cake?
Store any leftover cake in an airtight container at room temperature for up to 2-3 days. If your frosting contains cream cheese or a lot of dairy that needs to stay firm, you might want to refrigerate it, ensuring it comes back to room temperature before serving for the best texture.
Bunny Rabbit Cake
A whimsical bunny-shaped cake perfect for Easter or any celebration.
Ingredients
-
2 cups all-purpose flour
-
1.5 cups granulated sugar
-
1 teaspoon baking soda
-
0.5 teaspoon salt
-
1 cup buttermilk
-
0.5 cup unsalted butter, softened
-
2 large eggs
-
1 teaspoon vanilla extract
-
1 cup powdered sugar (for frosting)
-
2 tablespoons milk (for frosting)
Instructions
-
Step 1
Preheat oven to 350°F (175°C). Grease and flour two 8-inch round cake pans. Cut one cake into a bunny shape. -
Step 2
In a large bowl, whisk together flour, sugar, baking soda, and salt. -
Step 3
In a separate bowl, beat together buttermilk, softened butter, eggs, and vanilla extract until well combined. -
Step 4
Gradually add the wet ingredients to the dry ingredients, mixing until just combined. Do not overmix. -
Step 5
Pour batter evenly into the prepared cake pans. Bake for 25-30 minutes, or until a toothpick inserted into the center comes out clean. -
Step 6
Let cakes cool in pans for 10 minutes before inverting onto a wire rack to cool completely. -
Step 7
Prepare frosting by beating powdered sugar with milk until smooth. Decorate the cake to resemble a bunny.
Important Information
Nutrition Facts (Per Serving)
It is important to consider this information as approximate and not to use it as definitive health advice.
Allergy Information
Please check ingredients for potential allergens and consult a health professional if in doubt.
Leave a Comment