
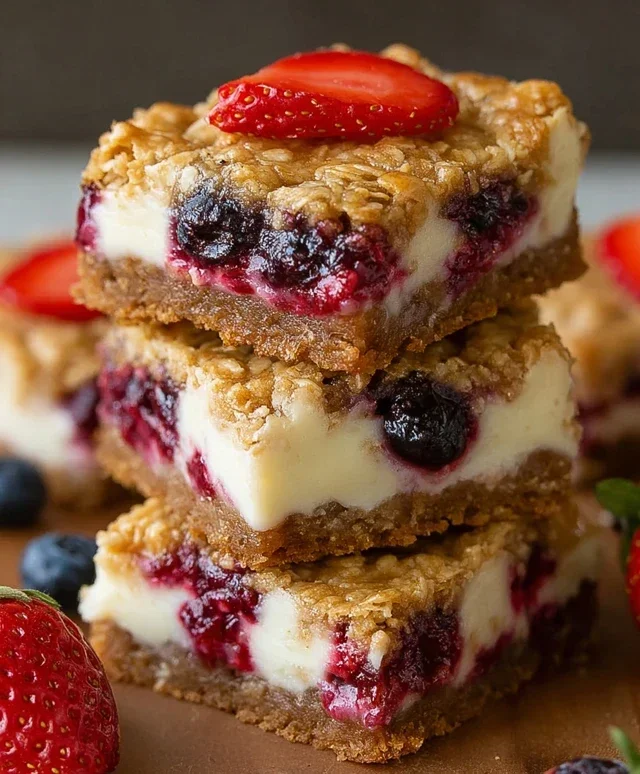
Berry Oatmeal Cheesecake Bars are a breakfast and dessert dream come true, a delightful fusion that will have you reaching for more. Imagin extracte a warm, slightly chewy oatmeal crust cradling a luxuriously smooth, tangy cream cheese filling, all swirled with bursts of sweet and tart berries. What’s not to love? These Berry Oatmeal Cheesecake Bars are the answer to those mornings when you crave something comforting and a little indulgent, but also want the goodness of oats. They strike that perfect balance – hearty enough for breakfast, yet decadent enough for an afternoon treat or even a light dessert. The beautiful marbled effect of the berries running through the cheesecake layer makes them as visually appealing as they are delicious, promising a bite that’s both familiar and excitingly new.

Berry Oatmeal Cheesecake Bars: A Deliciously Easy Treat
Who can resist a dessert that combines the comforting warmth of oatmeal with the creamy indulgence of cheesecake, all topped with a burst of fresh berry flavor? These Berry Oatmeal Cheesecake Bars are exactly that – a perfect harmony of textures and tastes that will quickly become a family favorite. They’re surprisingly simple to make, making them ideal for weeknight treats, potlucks, or even a special occasion. The base is a delightful, slightly chewy oatmeal cookie crust, which perfectly complements the smooth, rich cheesecake filling. And those pops of juicy strawberries? They’re the perfect sweet and tangy counterpoint. Let’s get baking!
Ingredients:
Making the Oatmeal Crust
The foundation of these delicious bars is a hearty and flavorful oatmeal crust. It’s more than just a binder; it’s a key component of the overall taste experience.
1. Prepare the Dry Ingredients: In a medium bowl, whisk together the all-purpose flour, baking soda, ground cinnamon, and salt. This ensures that all your dry ingredients are evenly distributed, which is crucial for consistent baking. The cinnamon adds a lovely warmth that pairs beautifully with the oats and berries. Set this bowl aside.
2. Cream the Butter and Sugars: In a large mixing bowl, or the bowl of your stand mixer fitted with the paddle attachment, cream together the softened unsalted butter, packed light brown sugar, and granulated sugar. Beat them on medium speed until the mixture is light, fluffy, and well combined. This creaming process incorporates air, which helps create a tender crust. Scrape down the sides of the bowl as needed to ensure everything is incorporated.
3. Add Wet Ingredients to the Crust Mixture: Beat in the two large eggs, one at a time, until fully incorporated after each addition. Then, stir in the vanilla extract. Make sure to scrape down the sides of the bowl again.
4. Combine Dry and Wet for the Crust: Gradually add the dry ingredients from step 1 to the wet ingredients, mixing on low speed until just combined. Be careful not to overmix at this stage; overmixing can develop the gluten in the flour, leading to a tougher crust.
5. Incorporate the Oats: Stir in the uncooked quick cook oats by hand or on the lowest speed setting. The oats are what give the crust that wonderful texture and rustic appeal. You want them to be evenly distributed throughout the dough.
6. Form the Crust: Grease and flour a 9×13 inch baking pan, or line it with parchment paper, leaving an overhang on the sides to help lift the bars out later. Press about two-thirds of the oatmeal mixture evenly into the bottom of the prepared pan. This forms your base layer.
Creating the Creamy Cheesecake Filling
Now for the luscious, creamy layer that makes these bars truly special.
7. Prepare the Cream Cheese Mixture: In a separate medium bowl, beat the softened cream cheese with the 1/2 cup of sugar until smooth and creamy. Again, make sure your cream cheese is truly softened to avoid lumps. A hand mixer or a stand mixer on medium speed works best here.
8. Add the Egg to the Filling: Beat in the remaining large egg (from the divided egg mentioned in the ingredients) until just combined. Be careful not to overbeat, as this can incorporate too much air and lead to cracking in the cheesecake. Stir in the vanilla extract.
Assembling and Baking the Bars
It’s time to bring all the elements together for a bake that will fill your kitchen with an irresistible aroma.
9. Layer the Filling and Berries: Evenly spread the cream cheese filling over the pressed oatmeal crust in the baking pan. Sprinkle the chopped strawberries evenly over the cream cheese layer. Then, sprinkle the white chocolate chips over the strawberries. These will melt into pockets of gooey sweetness. Finally, crum extractble the remaining one-third of the oatmeal mixture over the top. This creates a beautiful streusel-like topping that will get wonderfully crisp during baking.
10. Bake to Perfection: Bake in a preheated oven at 350°F (175°C) for 30-35 minutes, or until the edges are golden brown and the center is set but still has a slight jiggle. The topping should be lightly browned and the white chocolate chips should be melted and gooey. Overbaking can lead to a dry cheesecake layer, so keep an eye on them.
Cooling and Enjoying
Patience is key for the best texture and ease of slicing!
11. Cool Completely: Let the bars cool in the pan on a wire rack for at least 30 minutes. This initial cooling allows the cheesecake to set further. Once slightly cooled, transfer the pan to the refrigerator for at least 2 hours, or until completely chilled. Chilling is essential for the bars to firm up properly, making them easy to cut into neat squares. If you try to cut them while warm, they will likely fall apart.
12. Slice and Serve: Once thoroughly chilled, use the parchment paper overhang to lift the entire block out of the pan. Place it on a cutting board and slice into bars using a sharp knife. For cleaner cuts, you can wipe the knife with a damp cloth between slices.
These Berry Oatmeal Cheesecake Bars are a delightful treat that offers a sophisticated flavor profile without being complicated to prepare. The contrast between the nutty, slightly spiced oat base, the creamy, tangy cheesecake, and the sweet bursts of berries and white chocolate is simply divine. Enjoy every single delicious bite!
Conclusion:
There you have it! These Berry Oatmeal Cheesecake Bars are truly a winner for so many reasons. The delightful combination of a crunchy, subtly sweet oatmeal crust, a rich and creamy cheesecake layer, and the burst of fresh berry flavor makes them an absolute showstopper. They’re perfect for a special occasion brunch, a delightful afternoon treat, or even a sophisticated dessert at your next gathering. I guarantee they’ll be a hit with everyone who tries them!
For serving, I love these slightly chilled, letting the flavors meld and the cheesecake set beautifully. You can enjoy them plain, or for an extra touch of indulgence, a dollop of whipped cream or a drizzle of extra berry compote takes them to the next level. Don’t be afraid to get creative with variations either! Swap out the mixed berries for just strawberries, blueberries, or raspberries. You could even add a hint of lemon zest to the cheesecake filling for a brighter flavor profile.
I genuinely encourage you to give these Berry Oatmeal Cheesecake Bars a try. They’re surprisingly easy to make and offer such a rewarding, delicious outcome. You’ll be so proud of yourself when you present these delightful bars!
Frequently Asked Questions:
Can I make these ahead of time?
Absolutely! These bars are fantastic for making ahead. In fact, I often find they taste even better the next day after the flavors have had a chance to deepen. Store them in an airtight container in the refrigerator for up to 3-4 days.
What kind of berries work best?
While mixed berries are wonderful, you can use your favorite single berry! Fresh or frozen (thawed and drained) blueberries, raspberries, or chopped strawberries are all excellent choices. If using frozen berries, ensure they are well-drained to avoid making the cheesecake layer too wet.
Can I freeze these Berry Oatmeal Cheesecake Bars?
Yes, freezing is a great option! Cut the bars into individual servings before freezing. Wrap each bar tightly in plastic wrap, then place them in a freezer-safe container or bag. They should last for up to 2-3 months. Thaw them in the refrigerator overnight for the best texture.

Berry Oatmeal Cheesecake Bars
A delightful fusion of creamy cheesecake and hearty oatmeal, swirled with sweet berries and crunchy white chocolate chips.
Ingredients
-
1 3/4 cups (228g) all-purpose flour
-
1 tsp baking soda
-
3/4 tsp ground cinnamon
-
1/2 tsp salt
-
3/4 cup (168g) unsalted butter, room temperature
-
3/4 cup (168g) packed light brown sugar
-
1/2 cup (104g) sugar
-
2 large eggs
-
2 tsp vanilla extract
-
2 cups (175g) uncooked quick cook oats
-
8 oz cream cheese
-
1/2 cup (104g) sugar
-
1 large egg, divided
-
3/4 cup (127g) white chocolate chips
-
1 1/4 cups chopped strawberries
Instructions
-
Step 1
Preheat oven to 350°F (175°C). Line an 8×8 inch baking pan with parchment paper, leaving an overhang on the sides. -
Step 2
In a medium bowl, whisk together flour, baking soda, cinnamon, and salt. In a large bowl, cream together butter, brown sugar, and sugar until light and fluffy. Beat in the 2 large eggs one at a time, then stir in vanilla extract. -
Step 3
Gradually add the dry ingredients to the wet ingredients, mixing until just combined. Stir in the oats. Press 2/3 of this mixture into the bottom of the prepared baking pan to form the crust. -
Step 4
In a separate bowl, beat the cream cheese until smooth. Beat in the 1/2 cup sugar and the divided egg until combined. Stir in the white chocolate chips. -
Step 5
Spoon the cream cheese mixture evenly over the oat crust. Sprinkle the chopped strawberries over the cream cheese layer. Crumble the remaining 1/3 of the oat mixture over the strawberries. -
Step 6
Bake for 30-35 minutes, or until the edges are golden brown and the center is set. Let cool completely on a wire rack before cutting into bars.
Important Information
Nutrition Facts (Per Serving)
It is important to consider this information as approximate and not to use it as definitive health advice.
Allergy Information
Please check ingredients for potential allergens and consult a health professional if in doubt.


Leave a Comment